Panicle hydrangea is the easiest hydrangea to grow well, and I mean that. Unlike bigleaf hydrangeas that throw a tantrum every time winter cuts their flower buds, panicle hydrangeas bloom on new wood every single year. Get the site right, give them a decent pruning in late winter, and they'll reward you with massive cone-shaped flower heads from midsummer through fall. Here's exactly how to do all of it.
How to Grow Panicle Hydrangea Step by Step

Marcus Holloway
24 Mar 2026
What panicle hydrangea actually is
Hydrangea paniculata is native to eastern and southern China, Japan, Taiwan, Sakhalin, and the Kuril Islands. It's commonly called panicle hydrangea or PeeGee hydrangea, that second name coming from the old cultivar 'Grandiflora' (H.P.G.). In gardens, it's one of the toughest hydrangeas you can plant, reliably hardy in USDA Zones 3 through 8, which covers a huge swath of North America from Minnesota winters down through the upper South.
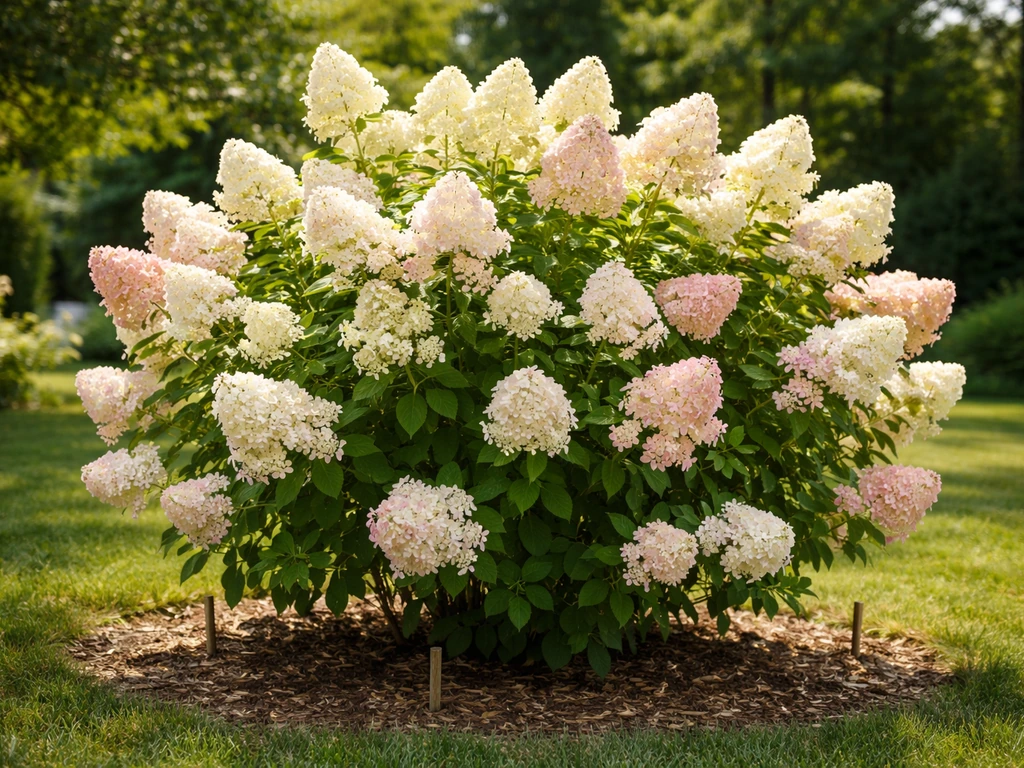
Mature size is worth knowing before you plant. Depending on the cultivar and how you prune, you're typically looking at 8 to 15 feet tall and wide, and some specimens push toward 25 feet if left alone. Compact cultivars like 'Little Lime' top out around 3 to 5 feet; larger ones like 'Limelight' hit 8 feet or more. The flower heads are conical panicles, white or creamy when they open in summer, then aging to pink or parchment by fall. Because they bloom on the current season's new growth, you don't have to worry about winter killing off next year's flowers the way you would with old-wood bloomers like bigleaf hydrangeas.
Picking the right spot
Panicle hydrangea wants full sun, which means at least 6 hours of direct sunlight per day. This is the single biggest difference between panicle hydrangeas and the shade-tolerant types, and it matters for bloom quantity. More sun generally equals more flowers and stronger stems. You can get away with light shade, especially in hotter climates where afternoon protection prevents scorching, but if you're in Zones 5 or 6 and planting in a spot that only gets 3 to 4 hours of sun, don't expect a spectacular show. I've seen too many panicle hydrangeas stuck in a semi-shaded corner producing only a handful of small blooms when the same plant in full sun would have been loaded.
Airflow matters more than most gardeners realize. Crowded plantings with poor air circulation set the stage for powdery mildew and other fungal problems. Give each plant enough room to breathe. For standard cultivars, that typically means spacing them 6 to 8 feet apart from other plants and structures. For larger growers like 'Limelight', err on the wider side. If you're planting against a fence or wall, keep the plant at least 3 feet out from the surface to allow air movement around the branches.
Avoid planting in low-lying spots where water pools after rain. Panicle hydrangeas tolerate moist conditions but they absolutely do not like standing water around their roots. A gentle slope or raised bed is ideal if your yard has drainage issues.
Getting the soil right before you plant
Panicle hydrangeas are not fussy about soil pH the way bigleaf hydrangeas are. If you've read about adjusting soil pH to shift flower color from pink to blue, that applies to bigleaf types, not panicle types. For panicle hydrangeas, aim for a pH somewhere in the 6.0 to 7.0 range, though they'll tolerate a bit of variation on either side. The bigger priorities are drainage and organic matter, not pH chemistry.
That said, do yourself a favor and get a soil test before planting, especially if you're working with clay-heavy or sandy soil. Your local cooperative extension office usually offers inexpensive tests that tell you pH, organic matter levels, and nutrient deficiencies. It takes the guesswork out of amendments and saves you money in the long run.
For most home garden soils, here's what to do before planting: work 2 to 3 inches of compost into the top 12 inches of soil across the planting area. If you're dealing with heavy clay, you can also incorporate coarse horticultural grit or perlite to improve drainage. Sandy soil benefits mostly from extra compost to improve water retention. Skip the bagged topsoil mixes that are mostly filler, and definitely skip adding straight peat moss without any other amendment, since it compacts badly over time.
When and how to plant
Best planting times
Spring and fall are both excellent planting windows. Spring planting (once the ground is workable and frost risk is low) gives the plant a full growing season to establish roots before its first winter. Fall planting, roughly 6 weeks before your first hard freeze, is equally good because the soil is still warm, roots settle in quickly, and the plant isn't pushing energy into new top growth. Summer planting works but it requires more attentive watering to prevent heat stress on a newly installed root system.
Step-by-step planting
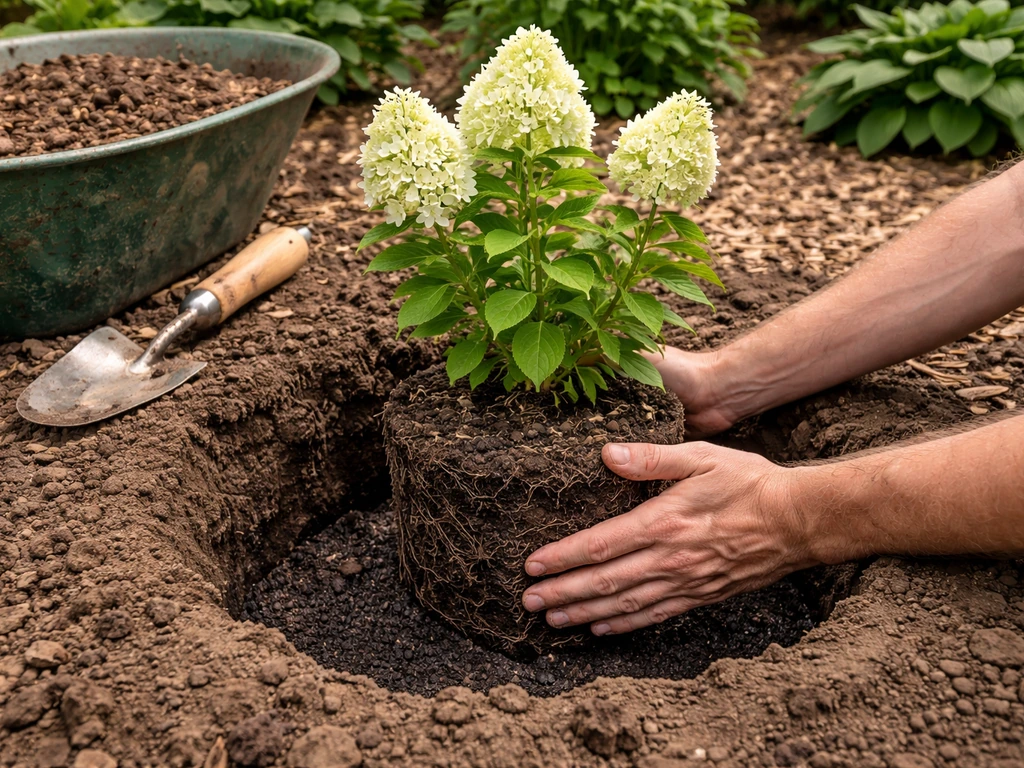
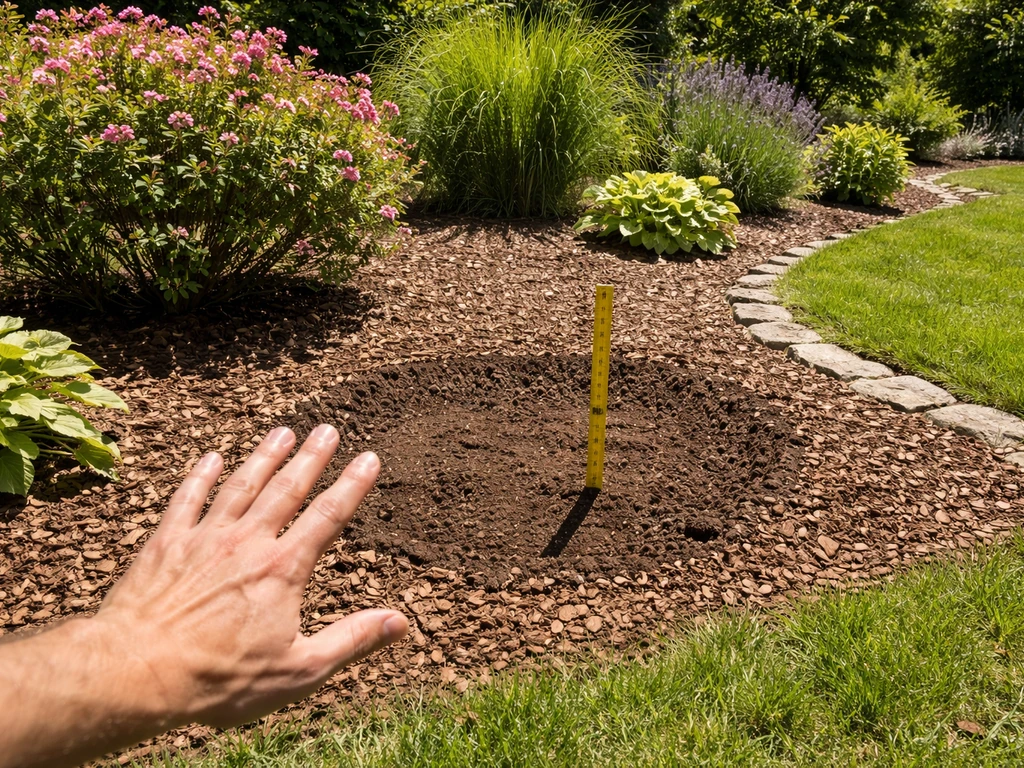
- Dig a hole that's about twice as wide as the root ball and roughly the same depth. You want the top of the root ball to sit at or just slightly above the surrounding soil grade, not buried below it.
- If the plant is in a container, remove it and gently loosen any circling roots. For balled-and-burlapped plants, remove any wire cage and fold back the burlap once the plant is in the hole.
- Set the plant in the hole, double-check the depth, and backfill with the original soil. If your native soil is poor, you can mix in some of the compost-amended soil you prepared, but avoid creating a dramatically different soil 'pocket' that water pools in.
- Firm the soil gently around the base with your hands to eliminate large air pockets. Don't stomp it hard.
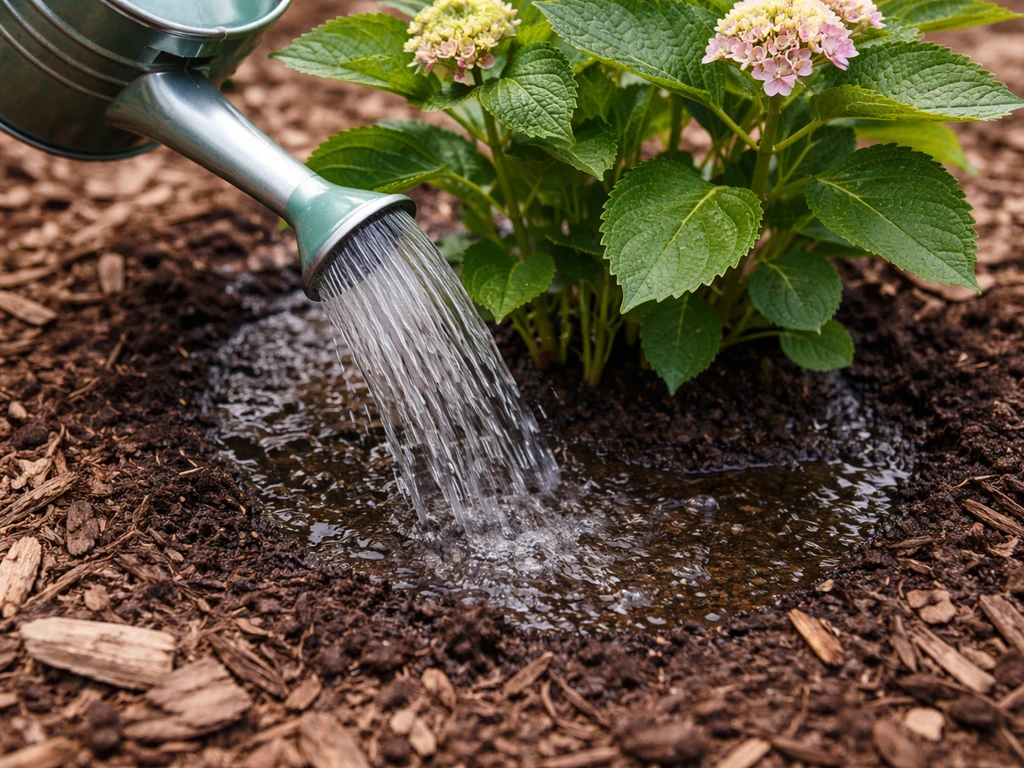
- Water slowly and deeply right after planting, letting the water soak in rather than run off. You want the soil to be thoroughly moist several inches down.
- Apply 2 to 3 inches of organic mulch (shredded bark, wood chips, or leaf mold) in a ring around the plant, keeping it a few inches away from the main stems. This retains moisture, moderates soil temperature, and reduces competing weeds.
- Water again every 2 to 3 days for the first two to three weeks, then taper off to a regular watering schedule based on rainfall.
Watering and feeding through the seasons
Watering
Newly planted panicle hydrangeas need consistent moisture for the first full growing season while they're establishing a root system. Once established (typically after one to two full seasons), they're reasonably drought tolerant, especially compared to bigleaf hydrangeas. That said, consistent moisture during the heat of summer directly affects both plant vigor and flower size.
A good general rule: water deeply once or twice a week during dry stretches, delivering about 1 inch of water per week total from rain plus irrigation. Wilting leaves in the morning (not just afternoon heat wilt) are a sign the plant actually needs water. Avoid shallow, frequent sprinkles that only wet the surface and encourage shallow roots. Soaker hoses or drip irrigation at the base are far better than overhead sprinklers, which wet the foliage and can encourage fungal disease.
Fertilizing
For most home garden soils with decent organic matter, one application of a balanced slow-release fertilizer in early spring is all panicle hydrangeas need. Something like a 10-10-10 or a formula designed for flowering shrubs works fine. Apply it as the plant is breaking dormancy and new growth is just beginning, then scratch it lightly into the soil surface and water it in.
Avoid over-fertilizing, especially with high-nitrogen products. Too much nitrogen pushes lush leafy growth at the expense of flowers, which is the opposite of what you want. I'd be cautious about dumping Miracle-Gro on these plants repeatedly through the season. It's not going to kill them, but you'll likely end up with a big green shrub that blooms less than it should. If your soil is genuinely poor and you did a soil test confirming low nutrients, a second light feeding in early summer is reasonable. After mid-July, stop fertilizing entirely so the plant can begin hardening off for winter.
Pruning panicle hydrangea: the one skill that pays off most
This is where panicle hydrangea care diverges most clearly from other hydrangea types, and it's worth understanding why before you pick up the pruners. Because panicle hydrangeas bloom on new wood (growth produced in the current season), you cannot cut off next year's flowers by pruning. That freedom makes the timing and approach much more forgiving than with bigleaf or oakleaf hydrangeas.
When to prune
If you want to know the timing, how to grow Annabelle hydrangea starts with pruning in late winter to early spring, just before new growth starts pushing out. You can also prune in fall after the plant goes dormant, but many gardeners (myself included) prefer to leave the dried flower heads on through winter. They look beautiful dusted with frost or snow, and they give the plant some structural interest during the dormant months. Come late February or March, you can prune the old flowers and do your shaping work all at once.
How to prune

For established plants, the goal is to blank" rel="noopener noreferrer">cut each stem back to just above a fat, healthy-looking bud. University of Minnesota Extension also recommends using this type of heading cut, trimming stems back to just above a fat bud for hydrangeas that bloom on new wood, including panicle hydrangea cut each stem back to just above a fat, healthy-looking bud. That heading cut is what triggers the plant to push vigorous new growth from below the cut, and that new growth is what will carry the flower buds. You can be fairly aggressive about reducing the overall height, which is useful for keeping large-growing cultivars manageable. Some gardeners cut panicle hydrangeas back by one-third to one-half each year with great results.
One important caveat from University of Minnesota extension research: let a newly planted panicle hydrangea grow for one to two seasons before doing any hard pruning. In the first year or two, the plant is building its root system and branching structure. Heavy pruning during that establishment phase can delay flowering and weaken the overall framework you're trying to build.
Common pruning mistakes to avoid
- Pruning in early summer right as buds are forming: you won't kill the plant, but you will delay or reduce blooms for that season.
- Removing as much wood as possible every year just because the plant 'looks messy': over-pruning can weaken the structure over time and reduce the number of flowering stems.
- Cutting flush to the main trunk or branch: always leave a short stub just above a visible bud, not a flat cut against the parent wood.
- Forgetting to sterilize your pruning tools between plants: a quick wipe with rubbing alcohol prevents spreading any fungal issues from plant to plant.
Troubleshooting: why your panicle hydrangea isn't performing
Few or no blooms
This is the most common complaint, and the cause is almost always one of three things: not enough sun, too much nitrogen fertilizer, or pruning done at the wrong time. If you still get few or no blooms after checking sun, nitrogen, and pruning timing, go through how to grow hydrangea for the full panicle-friendly checklist. Start with light. If your plant is getting fewer than 4 to 5 hours of direct sun, that's your answer. Move it, or rethink the location for your next plant. If the light is fine, look at your fertilizing habits. Lay off the nitrogen-heavy products and switch to a bloom-focused fertilizer with a higher middle or third number (phosphorus and potassium). Finally, if someone pruned the plant in late spring or early summer right when buds were developing, that season's flowers are simply gone. It will recover and bloom the following year.
Weak, floppy growth
Stems that can't hold the flower heads upright usually mean one of two things: not enough light, or over-fertilizing with nitrogen. Both produce soft, weak tissue. Improving light exposure and dialing back fertilizer typically resolves this over one to two seasons. It also helps to do a hard pruning in late winter, which forces fresh, sturdier new growth rather than elongated weak stems extending from old wood.
Browning leaves and edges
Brown leaf edges in summer usually mean either drought stress or, occasionally, too much reflected heat from a wall or paved surface. Check your watering consistency first. If the soil is dry several inches down, you need to water more. If moisture is fine but browning continues, assess whether the plant is getting intense afternoon sun bouncing off a nearby surface. Scorch from reflected heat is common with plants placed right against south-facing walls.
Powdery mildew and leaf spots
Powdery mildew shows up as white or grayish powdery patches on leaf surfaces, often accompanied by yellowing underneath. It thrives when air circulation is poor and the weather shifts between humid nights and dry days. The best prevention is proper spacing and siting in good light. Once you see it, improving airflow (sometimes via selective thinning of interior stems) and avoiding overhead watering are your first moves. For persistent cases, neem oil applied as a preventive spray in early summer works reasonably well. Full-on fungicide programs are rarely necessary for home gardens.
Leaf spot diseases cause brown or tan circular spots with defined margins. They're rarely fatal but can be cosmetically frustrating. The same cultural fixes apply: better airflow, drier foliage, and removing and disposing of infected leaves rather than leaving them on the ground to reinfect the plant.
Common pests
Panicle hydrangeas don't have a long list of serious pest problems, but a few show up regularly. Aphids cluster on new growth and produce sticky honeydew residue. A strong blast of water from the hose knocks most of them off, and repeated treatment with insecticidal soap handles heavier infestations. Spider mites become a problem in hot, dry conditions, especially if the plant is stressed by drought. They leave a fine webbing under leaves and cause a stippled, bronzed appearance on the foliage. Keeping the plant well watered and avoiding broad-spectrum insecticides (which kill the mite predators) is the best prevention. Scale insects can appear on stems; horticultural oil or insecticidal soap applied when dormant or in early spring handles them effectively.
A practical seasonal care calendar
| Season | What to Do |
|---|---|
| Late winter (Feb–Mar) | Prune back stems to just above a fat bud; remove old flower heads if you haven't already; apply a thin layer of fresh compost around the root zone |
| Early spring (Mar–Apr) | Apply a balanced slow-release fertilizer as new growth breaks; check mulch depth and top up to 2–3 inches if needed; watch for aphids on new growth |
| Late spring (May) | Water consistently as temps rise; avoid fertilizing after early spring if growth looks vigorous; monitor for powdery mildew if weather is humid |
| Summer (Jun–Aug) | Water deeply once or twice a week during dry stretches; enjoy the bloom show; deadheading is optional since spent heads are decorative; watch for spider mites in dry/hot spells |
| Early fall (Sep–Oct) | Stop fertilizing entirely; reduce watering as temps cool and rainfall increases; optionally plant new specimens now for fall establishment |
| Late fall (Nov) | Leave flower heads on for winter interest; apply a fresh 2–3 inch mulch layer before the ground freezes to protect roots, especially in Zones 3–5 |
| Winter (Dec–Feb) | No active care needed; plan pruning cuts for late winter; assess if any plants need relocation to a sunnier spot come spring |
Setting yourself up for next year's flowers
The biggest advantage panicle hydrangeas have over other hydrangea types is that you genuinely can't mess up next year's blooms with a bad winter or a mistimed haircut. That takes an enormous amount of anxiety out of the equation. The basics that matter most are good sun, decent drainage, a consistent watering habit especially in the first season or two, and a late-winter pruning that keeps the plant shapely and encourages vigorous new flowering stems. If you get those four things right, you'll have flowers every summer without fail. And once you've got panicle hydrangea dialed in, exploring other types, like Annabelle hydrangeas or bigleaf varieties, starts to feel a lot more manageable because you'll understand how much of hydrangea care comes down to knowing exactly which wood each type blooms on. how to grow blue hydrangeas how to grow blue hydrangeas
FAQ
Why is my panicle hydrangea blooming poorly or only producing small flower heads?
Aim for about 6 hours of direct sun, at minimum, and water enough that the root zone stays evenly moist (not soggy) through the first growing season. If you still get sparse blooms, check for late spring pruning or heavy nitrogen feeding, both of which commonly reduce cone size.
Can I grow panicle hydrangea in a container, and what changes for care?
Yes, but keep in mind that they need real light for blooms. Choose a large container (at least 15 to 20 gallons), use fast-draining potting mix, and water more often than in-ground plants because containers dry out quickly in heat.
Should I cut off the spent flower panicles during summer to keep it looking tidy?
You can remove spent cones in summer if you want, but do not use summer pruning to “shape” the plant. For panicle hydrangeas, the safest time for heading cuts is late winter to early spring, just before new growth.
When is the best time to prune, and is it ever okay to prune in fall?
Do it after dormancy, late winter to early spring, when you can see healthy buds. If you must prune in fall, limit it to light tidying (like removing dead or broken stems), and avoid major cuts that reduce the number of flowering shoots.
How much can I prune a young panicle hydrangea without delaying flowering?
If it’s newly planted, wait one to two seasons before doing hard pruning, since the plant is still building structure and roots. Once established, you can cut back by roughly one-third to one-half each year without sacrificing the next year’s blooms.
How often should I water, and how do I tell if I’m watering too little or too much?
Best practice is to water deeply so the moisture reaches below the surface, typically once or twice per week in dry spells. If leaves wilt in the morning, water immediately, then reassess whether your mulch is thick enough to slow evaporation.
What’s the right way to mulch panicle hydrangeas?
Use mulch to maintain even moisture, but keep it off the crown (leave a small gap around the stem). For panicle hydrangeas, 2 to 3 inches of shredded bark or compost is usually enough, thicker piles can trap moisture and worsen drainage.
Should I adjust soil pH to change panicle hydrangea flower color?
For panicle hydrangeas, correct pH mainly supports healthy growth rather than changing flower color. Aim for roughly 6.0 to 7.0 if you’re adjusting for nutrients, but prioritize drainage, compost, and consistent moisture first.
My flower heads flop over, what can I do besides staking?
Yes, some cultivars are top-heavy when cones get large. Full sun and balanced feeding help stems stay sturdier, and a late-winter hard pruning can encourage thicker new shoots that hold the blooms better.
What should I do if powdery mildew shows up on my hydrangea leaves?
If powdery mildew appears, improve airflow by spacing plants, avoid overhead watering, and remove heavily infected leaves. For stubborn cases, a neem oil spray timed to early summer is often more useful as a preventive than as a last-ditch rescue.
How can I tell if I have spider mites versus another problem?
If you suspect spider mites, focus on hot, dry periods and check the underside of leaves for fine webbing and stippling. Keep plants evenly watered, and avoid broad-spectrum insecticides that can wipe out mite predators.
What should I do if my panicle hydrangea leaves look weak or yellow even after pruning?
If chlorotic or unhealthy foliage persists, re-check sun exposure and verify you are not over-fertilizing with nitrogen. A soil test is the fastest way to decide whether you need nutrients versus simply fixing drainage, watering, or light.
Is staking ever necessary, and how do I do it without damaging the plant?
Avoid tying stems too tightly to supports, use soft ties, and keep stakes stable so they do not rub the bark. If you add stakes, do it early in the season before cones bulk up, not after stems have already bent permanently.