To grow azaleas outdoors successfully, you need to match the right variety to your climate, plant in acidic well-drained soil with a pH between 4.5 and 6.0, give them dappled to partial shade, keep their roots consistently moist but never waterlogged, mulch generously, fertilize lightly right after blooming, and prune immediately after flowers fade. Get those fundamentals right and azaleas are genuinely one of the most rewarding shrubs you can grow. After you plant, follow a simple routine for sunlight, soil pH, watering, and pruning so your photinia establishes well and stays healthy Get those fundamentals right. Get them wrong and you'll spend years wondering why your plant is alive but never thriving.
How to Grow Azaleas Outdoors: Step-by-Step Guide

Marcus Holloway
22 Jun 2026

Choose the Right Azalea Type for Your Climate
This is the step most gardeners skip, and it causes more heartbreak than anything else. Azaleas are not one-size-fits-all. Most common varieties are hardy in USDA Zones 6 to 9, but if you're gardening in a colder region, there are cold-hardy cultivars bred specifically for brutal winters. The Northern Lights series, for instance, was developed to handle Zone 4 conditions and can tolerate flower bud temperatures as low as -45°F in the depths of winter. If you're in Zone 5 or colder, that's where to start your search rather than buying whatever's on the shelf at your local garden center.
Beyond hardiness zones, you'll need to decide between evergreen and deciduous types. Evergreen azaleas (most of the classic Southern garden varieties) keep their leaves year-round and tend to have a tighter, mounding habit. Deciduous azaleas drop their leaves in fall, often put on a stunning foliage color show before they do, and tend to be more cold-hardy. Native deciduous types and some Asian evergreen varieties perform quite differently depending on your region, so pay attention to what your local nursery actually recommends for your specific area, not just what looks prettiest in the catalog photo.
If you're interested in azaleas that rebloom throughout the season rather than just in spring, Encore azaleas are worth exploring as a separate category with their own specific care nuances. Encore azaleas have a reblooming habit, so using the same soil acidity and watering guidance can help them put on flowers more consistently. For now, the core principle is simple: check your hardiness zone, decide between evergreen and deciduous, and buy from a nursery that sells varieties proven for your region.
Best Outdoor Planting Time and Site Selection
In most climates, early spring or early fall is ideal for planting azaleas outdoors. Spring planting lets roots establish before summer heat hits. Fall planting, done at least six weeks before the ground freezes, gives roots time to settle in before the plant has to push through its first winter. Avoid planting in the heat of summer if you can help it. Transplant shock is real, and a newly planted azalea in July heat is fighting an uphill battle from day one.
For site selection, partial shade is usually the sweet spot. Azaleas do best with morning sun and afternoon shade, or dappled light filtered through tall deciduous trees. Deep, all-day shade leads to sparse flowering. Full sun in hot climates causes leaf scorch and heat stress. In winter, plants in partial shade actually suffer less cold injury to both the plant and the flower buds, which is a bonus that a lot of gardeners don't consider when picking a spot.
Beyond light, think about wind exposure. Cold, drying winter winds are hard on evergreen azaleas in particular. A planting spot with some wind protection from a fence, wall, or taller shrubs on the north or northwest side can make a real difference in cold climates. Also avoid planting under roof overhangs or in spots where water drains directly off a roof, as consistent overwatering at the root zone is one of the fastest ways to kill an azalea.
Soil Setup, pH, and Drainage Requirements
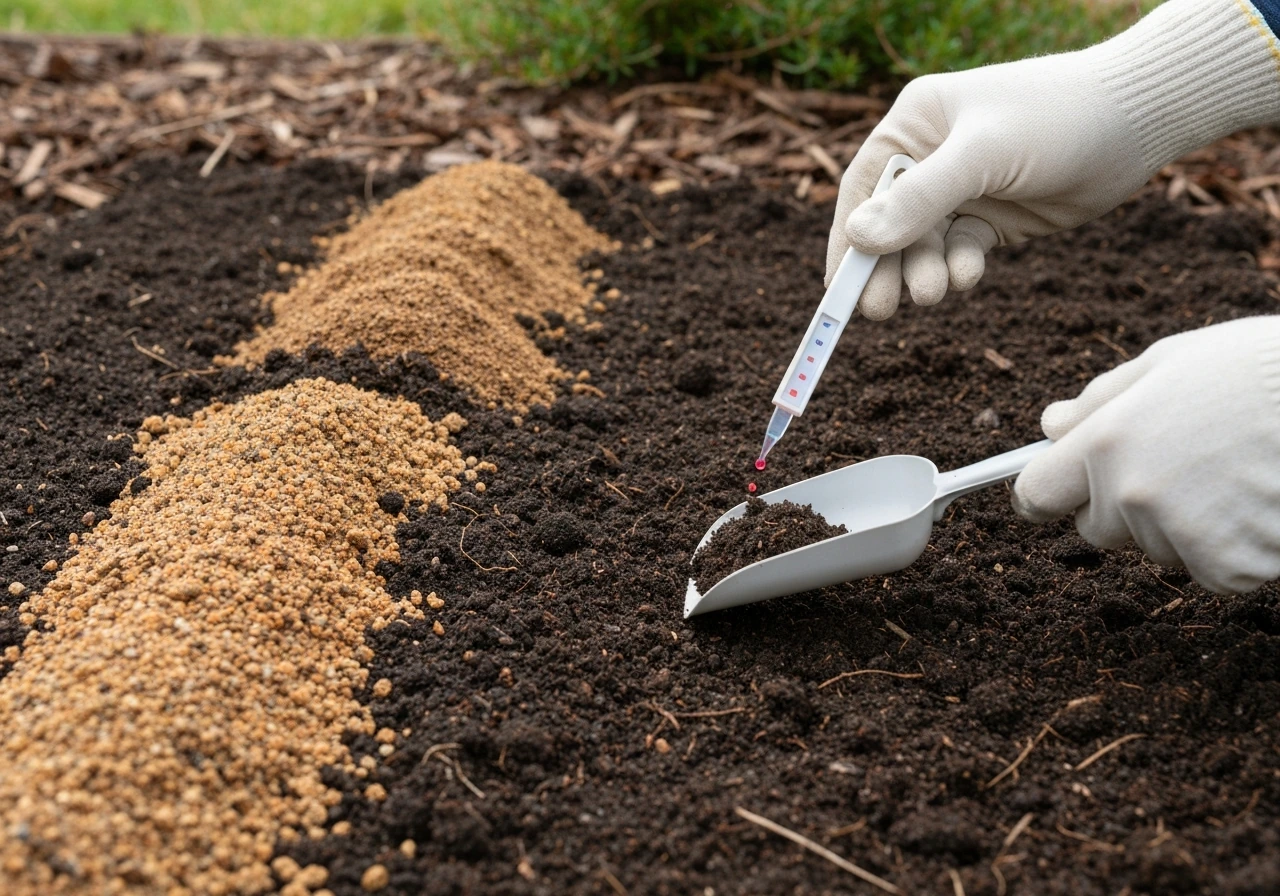
Azaleas are genuinely picky about soil, and this is where most outdoor failures originate. They need acidic conditions, with a soil pH between 4.5 and 6.0. If your pH drifts above 6.0, the plant starts struggling to absorb iron and other micronutrients even if those nutrients are physically present in the soil. The result is a plant that looks sick and chronically underperforms. If you're not sure where your soil stands, get a soil test through your local county Extension service before you do anything else. It's inexpensive and takes all the guesswork out of the pH puzzle.
If your pH is too high, elemental sulfur is your best tool to bring it down. A rough starting point is about one-third pound of elemental sulfur per application for modest adjustments, but actual rates depend on your current pH, target pH, and soil type. Iron sulfate also works to lower pH by roughly one unit. One important warning: do not use aluminum sulfate. Multiple university extension programs, including UGA and the University of Maryland, explicitly flag aluminum sulfate as potentially toxic to azalea roots. Despite being commonly sold for this purpose, it's not worth the risk.
If you're dealing with alkaline clay, be honest with yourself about the limits of soil amendment. Blanket sulfur applications across a large area rarely shift heavy clay pH reliably, and experienced gardeners will tell you that working intensively-amended soil directly around the planting hole gives you far better results than trying to change the chemistry of an entire garden bed. Growing in raised beds is another excellent option when native soil is genuinely problematic.
Drainage matters just as much as pH. Azaleas are shallow-rooted and intolerant of waterlogged conditions. Roots sitting in soggy soil quickly run out of oxygen and become susceptible to Phytophthora root rot, which can quietly kill a plant before you notice anything is wrong. If your native soil drains poorly, mix in large amounts of organic matter, up to about 50 percent fine pine bark or well-rotted leaves by volume, before you plant.
Avoid fresh manure or mushroom compost, as these can be alkaline and will work against the pH you're trying to achieve. In problem areas, planting slightly high, with the top of the root ball a couple of inches above existing grade and mounded amended soil around it, helps water drain away from the crown rather than pooling around it.
Planting Steps and Spacing for Healthy Roots
Once your soil is right, planting technique matters more than most people realize. Here's how to do it properly:
- Dig your hole the same depth as the root ball and two to three times wider. Wider is more important than deeper. Azalea roots spread horizontally, not down, and a wide, loosened planting zone gives them room to establish quickly.
- Check container plants carefully before you set them in the ground. If roots are circling around the inside of the pot, use a sharp knife to make three or four evenly spaced vertical cuts about a quarter-inch deep from top to bottom of the root ball. This stops girdling roots from strangling the plant years later.
- For balled-and-burlapped plants, remove any wire baskets, nylon strapping, and twine from around the trunk and root ball before backfilling. Natural burlap can be folded back and left to decompose, but synthetic materials must come out completely.
- Set the plant so the top of the root ball sits at or very slightly above the surrounding soil grade, roughly two inches above grade in good garden soil. Never plant deep. Burying the crown invites rot.
- Backfill with your amended soil, firming it gently to eliminate air pockets without compacting.
- Water thoroughly right after planting to settle the soil around the roots.
- Space plants according to their mature width, which varies dramatically by variety, from compact two-foot mounds to sprawling six-foot specimens. Read the tag and give them room. Crowded azaleas have poor air circulation and are more prone to fungal disease.
Watering Schedule and Mulch for Outdoor Azaleas
Azaleas like consistent moisture, but they hate sitting in water. In the first season after planting, water deeply once or twice a week depending on rainfall and heat. The best way to check whether your plant needs water is to pull back the mulch near the base and feel the soil in and around the root ball. If it's still moist an inch or two down, wait. If it's dry, water. This is a better guide than any fixed schedule because heat, soil type, and rainfall vary so much.
In established plants (typically after the first full growing season), azaleas become more drought-tolerant but still need supplemental water during dry spells, especially in summer. Drought stress opens the door to root rot and other disease problems when rain eventually returns, so don't let them completely dry out for extended periods. One practical note: avoid fertilizing drought-stressed plants in summer. A plant already under heat stress doesn't need the additional pressure of pushing new growth.
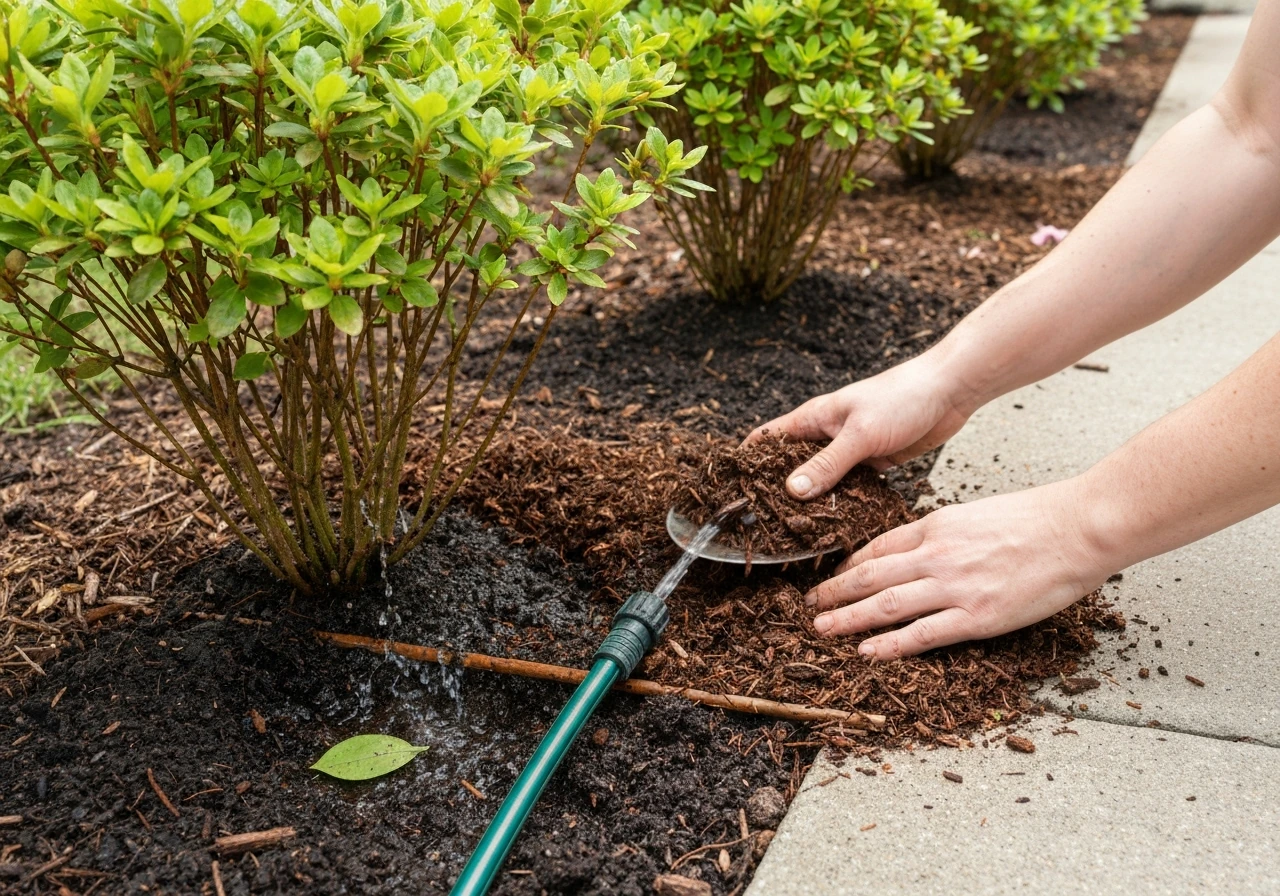
Mulch is not optional. A three to four inch layer of pine bark, pine straw, or shredded leaves around the base of your azaleas does several things at once: it holds soil moisture, moderates root temperature, gradually acidifies the soil as it breaks down, and suppresses weeds. Keep mulch a couple of inches away from the main stem to prevent crown rot. Replenish it every year or two as it breaks down. This single habit will noticeably reduce how often you need to water and will improve overall plant health.
Sunlight Needs, Heat Stress, and Seasonal Light Changes
The ideal light for most azaleas is filtered shade or partial shade, typically four to six hours of indirect or dappled sunlight. Morning sun with afternoon protection is the classic formula, and it works well across most of the country. In the South and other hot climates, more shade during the hottest part of the day is genuinely protective. In the North, you can get away with a bit more sun, but watch for leaf scorch on west-facing exposures in July and August.
Deciduous azaleas are a bit more flexible and often handle brighter, more open conditions reasonably well, especially if soil moisture is consistent. Evergreen varieties are generally more sensitive to intense afternoon sun.
Seasonal light changes are worth thinking about when you're choosing a planting spot. A location under a deciduous tree might offer ideal dappled shade in summer but get more winter sun once leaves drop. That's actually fine for most azaleas and can even help moderate the coldest winter temperatures on the plant's foliage. What you want to avoid is a spot that's deeply shaded year-round or one that gets intense reflected heat from a south-facing wall in summer.
Fertilizing and Pruning for Blooms
When and How to Fertilize
Azaleas are light feeders, and more fertilizer is not better. The goal is to support healthy growth without pushing the plant into producing so much foliage that it forgets to flower. Use a fertilizer formulated for acid-loving plants, or one with nitrogen sources like ammonium sulfate or ammonium nitrate, which don't push soil pH in the wrong direction. Apply fertilizer once in early spring as growth begins and, if needed, a second lighter application about six weeks later. Stop fertilizing by midsummer so the plant can harden off for winter rather than pushing soft new growth.
If your azalea shows signs of iron deficiency chlorosis (yellowing leaves with green veins, discussed more in troubleshooting below), check your soil pH before reaching for a chelated iron supplement. Correcting the pH is always the better long-term fix, because an iron supplement applied to soil that's too alkaline will just keep losing effectiveness.
When and How to Prune
Timing is everything with azalea pruning, and getting it wrong means sacrificing next year's flowers. Azaleas set their flower buds for the following spring in late summer, typically by midsummer or shortly after. If you prune in late summer, fall, or winter, you're cutting off those buds and you'll wonder why your plant doesn't bloom.
The rule is simple: prune right after flowering ends, while the plant is still in active spring growth. That window is usually only a few weeks wide, but it gives the plant the entire growing season to set new buds on the fresh growth. If you are aiming for a dense forsythia hedge, the same idea applies: prune at the right time to control shape and encourage new flowering growth. For light shaping, hand pruners are fine. For rejuvenating an overgrown plant, you can cut azaleas back hard (even to within a foot of the ground for some varieties), but do it right after bloom and accept that the plant may skip a bloom year while it recovers.
Troubleshooting Common Outdoor Problems
Plant Won't Bloom
The most common reason is pruning at the wrong time, specifically late summer, fall, or winter, which removes the buds before they open. The second most common reason is too much shade. The third is improper pH, which stresses the plant enough that flowering becomes secondary. Check all three before assuming something is seriously wrong.
Yellow Leaves with Green Veins (Iron Chlorosis)
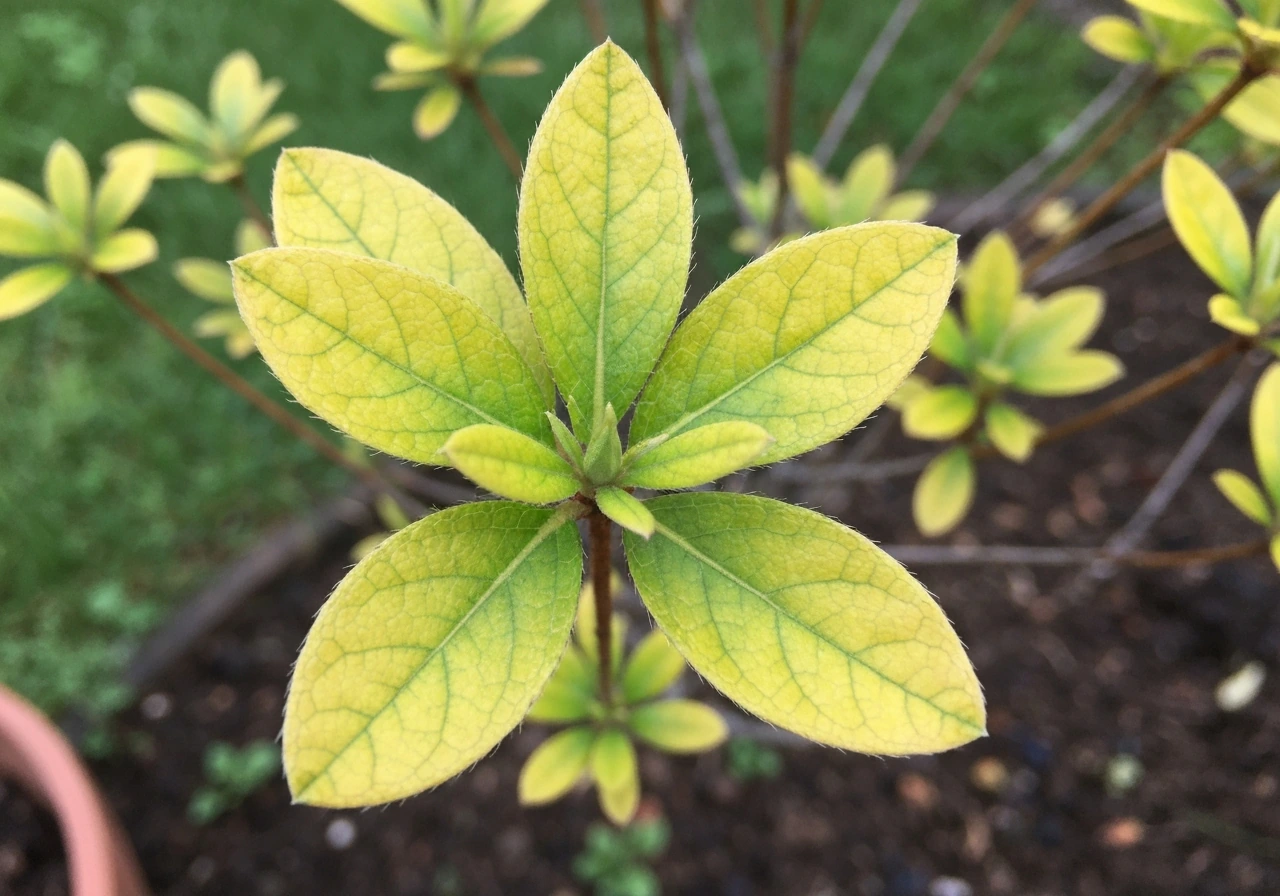
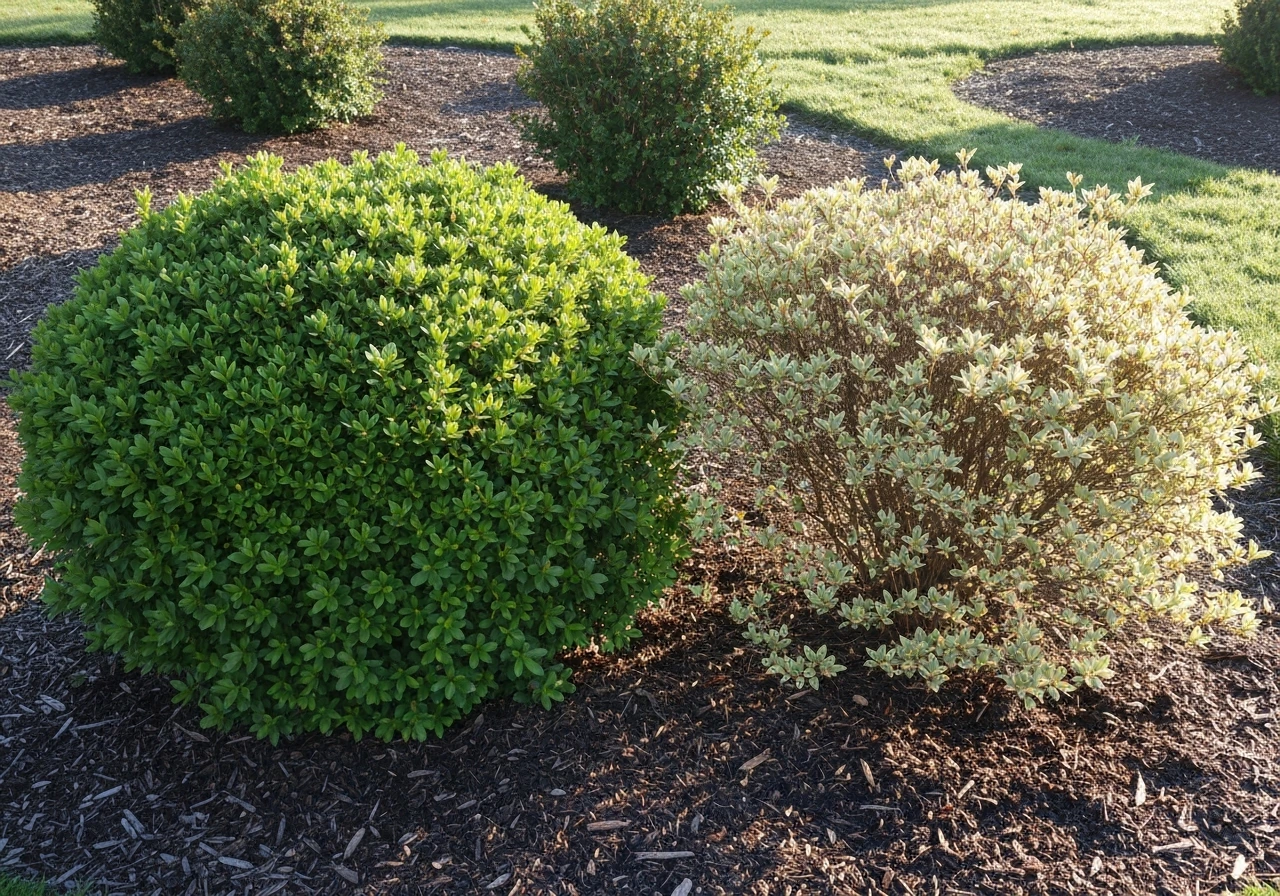
This pattern, where leaf tissue yellows but veins stay green, is classic iron deficiency chlorosis. In azaleas, the cause is almost always pH-related. When soil pH climbs above 6.0, iron becomes chemically unavailable to the plant even if it's physically present. Test your soil pH, and if it's too high, start working to lower it with elemental sulfur. A chelated iron foliar spray can buy you some time, but it won't fix the underlying problem. Chlorosis can also be caused by compacted soil, overwatering, or excessive fertilizer, so rule those out too.
Wilting, Dieback, or Root Rot
If branches are dying back and the plant looks waterlogged or has been in a low spot that stays wet, Phytophthora root rot is likely. This fungal pathogen thrives in saturated soil and can kill azaleas quietly, with plants sometimes appearing symptom-free until a drought or flood event tips them over the edge. Unfortunately, once root rot is well established, there's limited rescue potential. Improve drainage immediately, cut back to healthy wood, and if the plant continues declining, remove it rather than letting disease spread. Replant in a raised bed or an improved-drainage spot.
Transplant Shock
Newly planted azaleas sometimes drop leaves, look wilted, or stall out completely for weeks after planting. This is usually transplant shock, not death. Keep watering consistently, stay patient, and don't fertilize during this recovery period. Avoid disturbing the roots. Most plants that are wilting but not mushy at the crown will pull through if the fundamentals are in place.
Pests and Other Disease Signs
| Symptom | Likely Cause | What to Do |
|---|---|---|
| Stippled, bronzed leaves | Lace bugs (common in hot, sunny spots) | Move plants to more shade; use insecticidal soap or neem oil for heavy infestations |
| Sticky residue, distorted new growth | Aphids or scale | Spray with insecticidal soap; treat scale with horticultural oil in dormant season |
| Grayish powdery coating on leaves | Powdery mildew | Improve air circulation by spacing plants properly; apply fungicide if needed |
| Water-soaked spots on leaves, leaf drop | Phytophthora leaf blight | Improve drainage; avoid overhead watering; apply appropriate fungicide early |
| Galls or swollen distorted tissue | Azalea leaf gall (fungal) | Remove and destroy affected tissue immediately; do not compost |
Struggling in Clay Soil
Clay soil is one of the toughest environments for azaleas, and it's worth being realistic about what broad amendments can achieve. Spreading sulfur across a large clay bed rarely shifts pH enough to matter. Your best approach is to work intensively amended soil, with generous organic matter mixed in, directly in and around the planting zone, consider raised beds, and choose a variety known to tolerate heavier soils.
Some gardeners have better luck treating each planting hole almost like a container environment with purpose-mixed soil rather than trying to transform the existing ground. If clay and azaleas together feel like a constant battle in your yard, that specific challenge is worth exploring in more depth as its own topic.
If you're specifically wondering how to grow azaleas in clay soil, focus on getting the amended planting zone and drainage right, since that is what most strongly determines success.
Your Next Steps
If you're starting from scratch, order a soil test before you buy a single plant. That one step will tell you exactly what you're working with and prevent the most common mistakes. If you already have azaleas that are struggling, start by ruling out the big three: wrong pH, poor drainage, and pruning at the wrong time. If you want a deeper guide, follow these steps for how to grow an azalea from choosing the right variety to getting the soil and watering right wrong pH. Most azalea problems trace back to one of those three things. Fix the fundamentals first and give the plant a full growing season to respond before assuming the worst.
Azaleas grown in the right conditions with the right variety for your zone are genuinely low-maintenance once established. They don't need constant attention. They need correct setup at the start, consistent moisture during the first year or two, and a light touch with fertilizer and pruning timed precisely right. To learn the best timing, spacing, and soil tweaks for this specific shrub, follow a detailed forsythia growing guide. Do that, and you'll have a shrub that fills your yard with color every spring for decades.
FAQ
Can I grow azaleas outdoors in containers, and do I need different care than in-ground planting?
Yes, but treat it like an outdoor container problem. Mix a planting medium that stays acidic (using fine pine bark, peat-free acidic compost, or another ericaceous mix), keep drainage excellent, and water more frequently in hot weather because pots dry faster. Also plan to protect roots from freeze-thaw cycles in winter (insulate the pot and avoid leaving it in standing water).
What if my azalea is yellowing, but my soil pH is only a little above 6.0?
If your soil pH is only slightly high, sulfur can help, but the change is not instant. Expect measurable improvement over months, so do not rely on quick fixes. For troubleshooting now, check moisture and shade first, then correct pH gradually, and consider a temporary chelated iron foliar spray only as a short-term cover while the pH is corrected.
How accurate does the soil pH need to be, and what pH range should I treat as a problem for azaleas?
Target 4.5 to 6.0, but the practical threshold is avoiding anything clearly above 6.0 for long periods. If you test and see pH drifting upward, it often comes from alkaline amendments (like manure), limestone chips, or certain composts. Re-test after amending, and adjust your approach by improving the planting-zone soil rather than trying to correct an entire bed.
What fertilizer should I use, and what are the most common fertilizing mistakes that reduce azalea blooms?
Use an ericaceous fertilizer or one labeled for acid-loving plants, and follow the label rates. Avoid high-phosphorus “flower boosters” and avoid frequent feeding. One common mistake is continuing fertilization into late summer, which can trigger tender growth that winter-kills or reduces next spring’s bloom.
Can I deadhead my azaleas to clean them up after flowering ends, or will it hurt next year’s blooms?
Generally, avoid cutting back or deadheading after midsummer unless you are shaping lightly and know you are not removing many flower bud sites. The reason is that azaleas form buds on last season’s growth, so pruning too late can remove next year’s flowers even if the plant looks “tidy” afterward.
How do I know when to water, especially during cool rainy weeks?
Watering should be consistent, but the check-the-root-zone method matters most. A good indicator is whether the soil 1 to 2 inches down is still moist when you remove mulch. If you water on a fixed schedule, you can easily overwater in cool, rainy periods, so adjust based on weather and soil texture.
Does winter watering or wind protection matter for evergreen azaleas?
Yes, evergreen azaleas especially dislike drying winter winds. In cold regions, site them with wind shelter and keep mulch in place going into winter. If the crown dries or winds desiccate the foliage, you can see leaf burn or twig dieback in spring.
How far from the stem should mulch be, and how much mulch is too much for azaleas?
Mulch helps, but piling it against the stem or covering the crown can encourage crown rot. Leave a small gap around the main stem, keep mulch depth around 3 to 4 inches, and refresh yearly since it breaks down and can settle.
What should I do if I need to move an azalea to a new spot?
Yes, but do it carefully. If you transplant in spring or early fall, water thoroughly before and after, keep the root ball intact, and avoid disturbing roots more than necessary. Expect slower recovery the first year. Also avoid fertilizing right after transplant and focus on consistent moisture and shade to reduce shock.
How can I tell whether my azalea’s wilting is transplant shock or an early sign of root rot?
Sometimes wilting or leaf drop is transplant shock, but sometimes it signals drainage or root-rot stress. A quick check is whether the crown feels mushy or the base stays wet for days. If it stays wet or smells off, prioritize drainage improvements over just watering more.
Is it worth trying to lower pH across my whole yard, or should I focus on the planting hole?
Yes, but your timeline matters. Elemental sulfur works by changing soil chemistry, so you need time and should follow up with another soil test. If you want faster control, focus on correcting just the planting zone with a pre-acidified, well-draining mix and proper drainage, then maintain with mulch. Large-area sulfur spreading on clay often underperforms.
How much spacing should I use between azaleas, and what placement issues cause long-term problems?
Space depends on the variety, but a common mistake is planting too close, which increases competition for moisture and airflow problems. Provide enough room for the mature spread, and avoid planting where downspouts wet the root zone. Better airflow and consistent drying between waterings helps prevent disease.