
You can grow hydrangeas in water two ways: rooting a stem cutting in a jar of water to produce a brand-new plant, or placing a budded stem in a vase so it opens and blooms indoors. Both work, both are beginner-friendly, and both are genuinely useful depending on what you're after. Rooting cuttings in water takes 2 to 8 weeks depending on the species, costs almost nothing, and gives you free plants from a shrub you already own. Forcing a cut stem to bloom in a vase is faster and purely decorative. This guide walks you through both, with honest timelines, a realistic success picture, and clear steps you can follow today.
How to Grow Hydrangeas in Water: Root & Force Cuttings
Marcus Holloway
23 Jul 2026
What 'growing hydrangeas in water' actually means
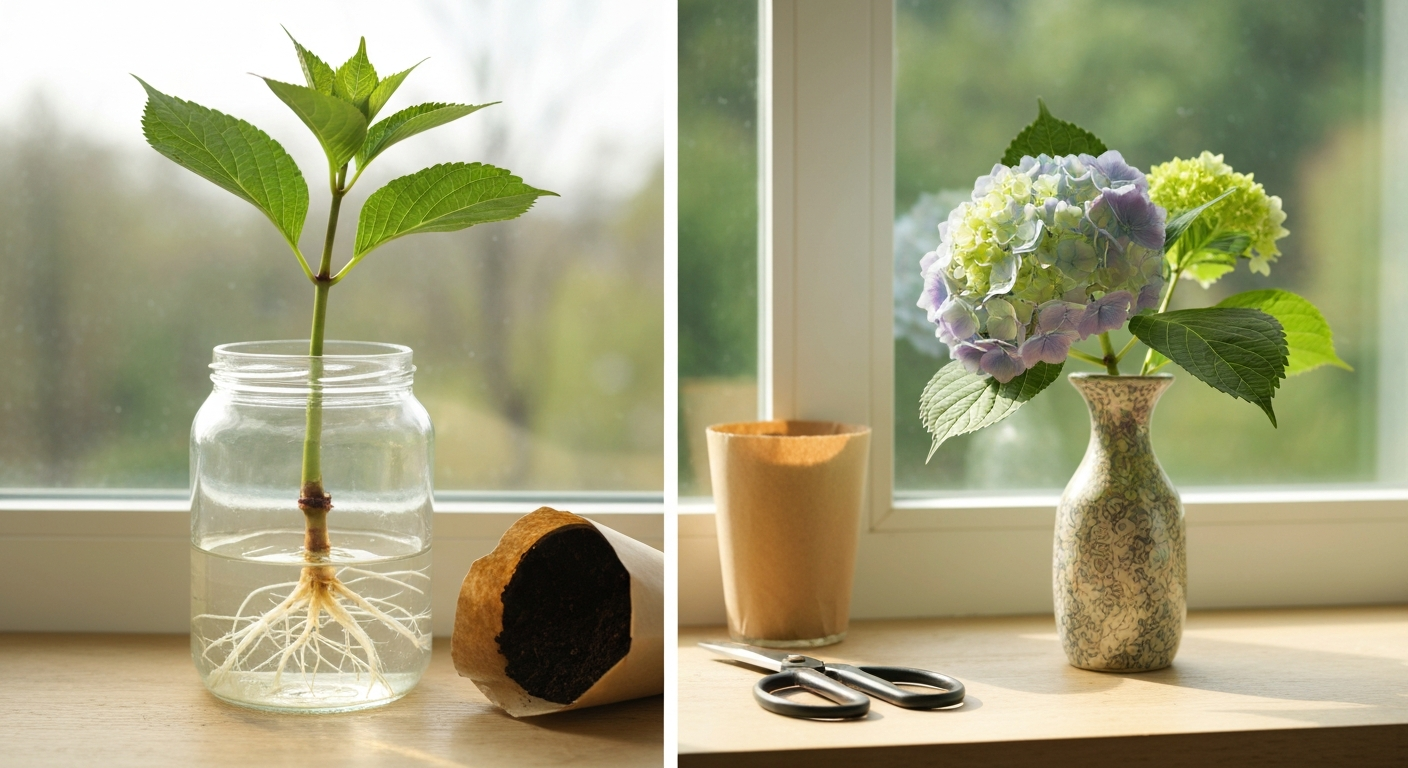
The phrase covers two completely different goals, and it helps to know which one you're aiming for before you pick up a pair of scissors.
The first is water propagation: you take a healthy stem cutting, strip the lower leaves, and stand the cut end in a glass or jar of clean water. Over the next few weeks, roots form at the node, and once those roots are an inch or two long you move the cutting into soil. This gives you a new hydrangea plant with minimal cost and no need for rooting medium or a greenhouse.
The second is vase forcing: you cut a stem that already has a flower bud or fully formed bloom and condition it in a vase of water so it opens and lasts as long as possible indoors. This is what florists do commercially, and what you're doing when you snip blooms from the garden for a kitchen arrangement. It's not propagation at all, it's just keeping cut flowers alive and beautiful.
Both are covered below. I'll keep them clearly separated so you can skip straight to whichever method you need.
Why bother with water? The real benefits
The most obvious reason to root in water rather than soil is visibility. You can watch roots develop through a clear jar without disturbing the cutting at all. For beginners especially, that feedback is genuinely encouraging. You know something is working before you commit the cutting to a pot.
Water propagation is also low-commitment in terms of materials. You don't need special compost, perlite, rooting trays, or a propagator. A clean jar, a windowsill, and some patience are enough. I've rooted more hydrangea cuttings in old jam jars than I care to count, and the results are perfectly respectable when the timing and technique are right.
For the vase-forcing side, the benefit is simple: you can enjoy hydrangea blooms indoors even if you don't have cut flower varieties growing in the garden. A single well-conditioned stem of Hydrangea paniculata or macrophylla in a vase can last a week or more if you manage the water properly.
- Free new plants from cuttings you take yourself
- No special propagation media required
- Visual root-check without disturbing the cutting
- Works for all major hydrangea species
- Vase forcing brings garden blooms indoors with minimal effort
- Beginner-friendly with a high success rate when timing is right
Best timing: when to take cuttings or cut stems for the vase
For water propagation, timing is the single biggest factor in your success rate. You want softwood cuttings, meaning stems from the current season's growth that are flexible and green but not yet woody. Late spring to early summer is the sweet spot, typically May through July in the Northern Hemisphere, when new shoots are actively growing. Softwood cuttings root far more readily than hardwood material because the cells are still in an energetic, growth-oriented state.
If you're in the Southern Hemisphere (New Zealand, South Africa, or similar climates), flip those months: aim for November through January, when spring growth is pushing and stems are at that perfect softwood stage. The same biology applies, just a different calendar.
For vase forcing, timing is about the bloom stage. Cut stems in the morning when temperatures are cooler and stems are well-hydrated. For longest vase life, cut when the flower head is about half to three-quarters open rather than fully open. Fully open blooms are already partway through their life, while tight buds may not open fully after cutting unless the plant has built up enough carbohydrates in the stem.
A note on species and cultivar: Hydrangea arborescens (like 'Annabelle') is the easiest to root and can hit close to 100% rooting rates in ideal softwood conditions. Hydrangea paniculata (like 'Limelight' or 'Phantom') is also very reliable, typically rooting in four to five weeks. Hydrangea macrophylla (the classic bigleaf types with blue or pink mophead flowers) is more variable and some cultivars take up to eight weeks, but most still root well with correct softwood timing.
What you'll need: materials checklist
- Sharp, clean pruning scissors or a knife (clean the blade with rubbing alcohol)
- A clear glass jar or container (4 to 8 inches tall works well)
- Clean water: tap water is fine, but if your supply is heavily chlorinated, let it sit 24 hours before use or use filtered water
- A healthy hydrangea plant with new-season softwood growth
- Optional: IBA rooting hormone powder or gel (250–500 ppm for softwood cuttings at home)
- A bright windowsill out of direct sun
- Opaque or colored bottle (optional, reduces algae buildup)
- Small stakes or rubber bands to keep leaves above the waterline
- Potting mix for transplanting later: a peat-free compost or a mix of loam, perlite, and compost
Choosing and preparing healthy cuttings
This step is where most failures begin. Choosing the wrong stem and you're fighting biology from the start.
Look for a non-flowering shoot. Stems that are already putting energy into a flower bud root poorly because the plant's carbohydrates are going up toward the bloom, not down toward potential roots. You want a vigorous vegetative shoot: green, flexible, with at least two sets of leaves and a clearly visible node (the swollen point where a leaf meets the stem).
Cut a 4 to 6 inch (10 to 15 cm) section, making a clean diagonal cut just below a node. The diagonal cut increases the surface area in contact with water, which helps with both water uptake and rooting. Strip all the leaves from the bottom half of the cutting so nothing is submerged and rotting. If the remaining leaves are very large (as they often are on macrophylla), trim them in half crosswise to reduce the water loss the cutting has to compensate for. It's a simple cut and makes a real difference.
If you're using rooting hormone, dip the cut end briefly in the powder or gel immediately before placing it in water. I'd recommend it for macrophylla cuttings in particular, where rooting can be slower and less consistent. For arborescens, you can often skip it entirely.
Step-by-step: rooting hydrangea cuttings in water
- Fill a clean jar with room-temperature water. If you're using tap water from a heavily chlorinated supply, let it sit uncovered for 24 hours first.
- Take your prepared cutting (diagonal cut below a node, lower leaves removed, large remaining leaves trimmed by half) and place it in the jar so at least one node is submerged but all remaining leaves are above the waterline.
- If using IBA rooting hormone, dip the cut end for a few seconds before placing in water. Tap off any excess powder.
- Position the jar on a bright windowsill with no direct sun hitting the cutting itself. A north-facing or east-facing window, or one shaded by sheer curtains, is ideal.
- Keep the temperature steady between 65 and 75°F (18 and 24°C). Avoid cold drafts, radiators, or air conditioning vents nearby.
- Change the water every 2 to 3 days, or whenever it turns cloudy. Rinse the jar out each time to reduce bacterial buildup.
- Watch for root nubs forming at the node, usually visible through a clear jar. Arborescens cuttings often show roots within 2 to 3 weeks; paniculata in 4 to 5 weeks; macrophylla anywhere from 3 to 8 weeks.
- Once roots are 1 to 2 inches long (2.5 to 5 cm), the cutting is ready to move to soil. Don't wait until roots are very long and tangled, as they become brittle and difficult to pot without damage.
Step-by-step: forcing hydrangea stems to bloom in a vase
- Cut stems in the early morning when the plant is fully hydrated. Choose stems with buds that are half to three-quarters open.
- Make a fresh diagonal cut at the base of the stem, about 1 to 2 inches up from the original cut, using clean scissors.
- Immediately place the stem in a bucket or vase of cool water before the cut end seals over. Speed matters here: the longer a stem is out of water, the more air enters the vascular tissue and blocks uptake.
- For longer vase life, lightly crush or split the bottom inch of the stem with your scissors or a knife handle. Hydrangea stems have woody bases even when young, and this increases water uptake significantly.
- Fill your display vase with cool, clean water. Adding a commercial flower food (which contains a mild biocide plus sugar) measurably extends vase life by keeping bacteria in check and feeding the bloom.
- Keep the vase away from direct sun, heat sources, and ripening fruit (which emits ethylene gas that speeds petal drop).
- Re-cut the stems every two to three days and change the water at the same time.
- Blooms conditioned this way typically last 5 to 10 days. If a hydrangea head wilts suddenly, submerge the entire stem and head in a tub of cool water for 30 to 60 minutes. This rehydration trick revives wilted heads surprisingly well.
Daily and weekly care while cuttings or stems are in water
For rooting cuttings, the care routine is simple but non-negotiable. Change the water every two to three days and rinse the container at the same time. This is the one habit that separates successful water propagators from frustrated ones. Stale water develops bacterial colonies that cause stem rot before roots ever form. You don't need to feed the cutting during this phase: it's living off stored energy in the stem, and liquid fertilizer in the water at this stage can actually inhibit rooting by pushing leafy growth instead.
Keep the light bright but indirect. A spot that gets good ambient light without direct sun hitting the cutting is ideal. Direct sun raises the temperature of the water, speeds evaporation, and accelerates algae growth in the jar. It also stresses a cutting that has no roots yet to replace water lost through its leaves.
Temperature matters more than most people realize. The 65 to 75°F range (18 to 24°C) is not arbitrary: below 60°F, root initiation slows dramatically. I've left cuttings on a cool north-facing windowsill in autumn and watched them sit for weeks with nothing happening, then moved them to a warmer spot and seen roots appear within days.
| Task | Frequency | Notes |
|---|---|---|
| Change water and rinse jar | Every 2–3 days | Do not skip this. Cloudy water means bacterial buildup. |
| Check water level | Daily | Top up with fresh water if level drops below the node. |
| Inspect for root development | Every 2–3 days | Look through the jar wall without disturbing the cutting. |
| Remove any rotting leaf material | As needed | Pull off any leaf that fell in the water immediately. |
| Check temperature at the windowsill | Weekly | Move if below 65°F or above 78°F for extended periods. |
| Re-cut vase stems and change vase water | Every 2–3 days | For display stems only, not rooting cuttings. |
Troubleshooting: when things go wrong in water
Stem rot at the base
This is the most common failure, and it almost always comes down to one of three causes: leaves left below the waterline (they rot and introduce bacteria), water not being changed often enough, or the jar not being rinsed between changes. Fix all three and stem rot drops sharply. If the base of your cutting turns soft and brown, that cutting is lost. Start again with a fresh cutting and a properly clean container.
Green algae coating the jar and water
Algae grow when there's light plus nutrients in the water. The fix is to block some of the light from the container: use an opaque jar, wrap a clear jar in brown paper, or move it slightly back from the window. Changing the water more frequently also keeps algae populations in check. Algae itself won't kill the cutting, but the bacterial environment that develops alongside heavy algae growth can.
No roots after 4 weeks
First, check the species and the time of year. Macrophylla cuttings taken in late summer from semi-hardwood material root much more slowly than softwood cuttings taken in May or June. If the timing was wrong, those cuttings may simply not root in water at all. If the timing was right, check temperature: too cool means slow or no rooting. Also consider whether the cutting came from a flowering shoot, which roots poorly. Try again with a non-flowering shoot, optional IBA hormone, and a warmer location.
Limp, yellowing, or dropping leaves
Some leaf wilt and even a little yellowing is normal in the first week as the cutting adjusts to life without roots. If this continues past week two, it usually means the cutting is losing water through its leaves faster than it can absorb through the cut stem. This is more common on large-leafed macrophylla types. The solution is to trim the remaining leaves down by half if you haven't already, and ensure the cut end is sitting cleanly in the water with no air gap.
Realistic timelines and what success actually looks like
I want to be straight with you about expectations here, because optimistic internet guides often skip this part.
| Species | Typical Rooting Time in Water | Expected Success Rate (correct timing + technique) | Notes |
|---|---|---|---|
| Hydrangea arborescens (e.g., 'Annabelle') | 2–3 weeks | Very high, often 80–100% | Most forgiving species for beginners |
| Hydrangea paniculata (e.g., 'Limelight') | 4–5 weeks | High, often 70–90% | Reliable with softwood timing |
| Hydrangea macrophylla (bigleaf) | 3–8 weeks | Variable, 50–80% depending on cultivar | Some cultivars root slowly; use IBA hormone |
| Hydrangea quercifolia (oakleaf) | 4–8 weeks | Moderate | Slower rooting; hardwood cuttings sometimes better |
These are honest averages based on extension research and production trial data. If you're working with the wrong timing or suboptimal conditions, expect those numbers to drop. The best thing you can do is take more cuttings than you need: take five or six even if you only want two plants, and accept that you'll have a mix of outcomes. That's not failure, that's just how propagation works.
Moving water-rooted cuttings into soil
Water roots are structurally different from soil roots. They develop fewer of the fine root hairs that anchor in and draw from soil particles. This isn't a reason to avoid water propagation, but it does mean the transition to soil needs a little care. Rush it, and your cutting will wilt dramatically. Take your time, and the cutting adjusts without much drama.
When roots are 1 to 2 inches long (2.5 to 5 cm), prepare a small pot with a free-draining potting mix: a blend of good multipurpose compost with about 20 to 30 percent perlite works well. Avoid very rich compost or adding fertilizer at this stage. The cutting needs to build soil-adapted roots first, and too much nitrogen will push leafy growth before the root system can support it.
- Water the potting mix thoroughly before planting so it's moist throughout but not waterlogged.
- Gently remove the cutting from the jar, handling the roots carefully to avoid snapping them.
- Make a hole in the potting mix with your finger or a pencil, lower the roots in, and firm the mix gently around the stem.
- Water lightly from the top to settle the mix around the roots.
- Place the pot in the same bright-indirect-light location the cutting was in. Don't suddenly move it into full sun.
- For the first week, keep the soil consistently moist and consider placing a clear plastic bag loosely over the pot to maintain humidity around the leaves. This reduces transpiration stress while the cutting builds new soil roots.
- After 7 to 10 days, gradually increase ventilation by opening the bag for longer periods each day.
- After 2 to 3 weeks, the cutting should be establishing well. Begin light feeding at this point with a diluted balanced fertilizer.
Don't plant directly into the garden at this stage. Keep the young plant in its pot for at least a full growing season, growing it on in a sheltered spot. It'll be ready to go into the ground the following spring, when it has a proper root system to handle the transition.
Water propagation vs. soil propagation vs. growing from seed
Each method has a genuine use case, and the right choice depends on your goals, your time, and the resources you have available.
| Method | Ease for Beginners | Cost | Time to Rooted Plant | Success Rate | Best For |
|---|---|---|---|---|---|
| Water propagation | Very easy | Near zero | 2–8 weeks to roots | Moderate to high | Quick new plants, visible progress, no special media |
| Soil propagation | Moderate | Low (potting mix, perlite) | 3–8 weeks to established roots | High (especially with mist or humidity dome) | More robust root system from the start, better for large batches |
| Growing from seed | Harder | Low to moderate | Months to a usable plant | Variable; species and cultivar dependent | Experimenting with variety, unavailable cultivars, educational projects |
Soil propagation using the same softwood-cutting technique but rooting into a perlite and compost mix tends to produce a stronger root system from the beginning, because soil roots develop the fine root-hair structure suited to drawing nutrients from growing medium. Commercial nurseries overwhelmingly use soil or bark-based media rather than water. But for a home gardener who wants a handful of new plants without buying propagation trays or special compost, water propagation is a completely sensible choice.
Growing hydrangeas from seed is a different project entirely. It's slow (months before you have anything worth transplanting), and named cultivars won't come true from seed, meaning seedlings won't necessarily look like the parent plant. If you're curious about the seed route, the timing and species selection questions involved are worth a deeper read before you start.
Simple care schedule and quick tips
- Take softwood cuttings in late spring to early summer for the best rooting rates
- Use only non-flowering shoots: check carefully before cutting
- Cut diagonally just below a node, 4 to 6 inches long
- Strip all leaves below the waterline, trim large remaining leaves by half
- Change water every 2 to 3 days without exception
- Keep temperature between 65 and 75°F (18 to 24°C)
- Use bright indirect light, not direct sun
- Pot up when roots reach 1 to 2 inches, not before and not much after
- Use a humidity tent (a clear plastic bag) for the first week after potting
- For vase stems: re-cut and change water every 2 to 3 days, keep away from heat and fruit bowls
Advanced tips and small hacks worth knowing
Rooting hormone: worth using or not?
For arborescens and paniculata, rooting hormone is optional. These species root readily from softwood cuttings on their own. For macrophylla cultivars, especially ones known to be slower, a basic IBA powder at around 250 to 500 ppm (available in standard off-the-shelf rooting powders like Dip-N-Grow or garden center rooting gel) meaningfully shortens the rooting timeline and improves consistency. Published nursery and extension reports document a wide IBA usage range, roughly 250–500 ppm in experimental recommendations, 1,000–3,000 ppm for operational dips, and quick-dips cited up to 2,500–4,000 ppm depending on cutting maturity and method; see Rooting Response of Hydrangea macrophylla Cuttings to IBA and Media, Biochemjournal (study) blank" rel="noopener noreferrer">Rooting Response of Hydrangea macrophylla Cuttings to IBA and Media — Biochemjournal (study). Peer-reviewed trials (see Roles of Cultivar, Light and Carbohydrates in Rooting of Cuttings of Hydrangea macrophylla, PMC) report that exogenous auxin (IBA) increases rooting frequency and shortens rooting time, with effective concentrations ranging from a few hundred ppm for softwood cuttings to several thousand ppm for hardwood or quick-dip nursery dips blank" rel="noopener noreferrer">Roles of Cultivar, Light and Carbohydrates in Rooting of Cuttings of Hydrangea macrophylla — PMC (peer-reviewed). Dip the cut end, tap off excess, and place in water immediately. Don't leave it standing with powder on the end for longer than a minute or two before placing it in water.
Water quality and container choice
If your tap water smells strongly of chlorine, let it sit in an open container for 24 hours before using it for cuttings. Heavy chlorine can inhibit the early stages of root initiation. For most municipal supplies, this isn't a major issue, but it's a zero-cost tweak worth making if you're struggling with results. On containers: a dark or opaque vessel (an old wine bottle, a colored glass jar) meaningfully reduces algae growth compared to a clear glass jar. If you only have clear jars, wrap them in brown paper or foil around the bottom two-thirds to block light from the water without blocking your view through the top.
Choosing the right variety makes a difference
If you're propagating for the first time and want a high success rate, choose a cutting from a Hydrangea arborescens or paniculata parent plant. These species are significantly more reliable in water than some macrophylla cultivars, especially older or less-vigorous named varieties. If you're set on propagating a specific macrophylla cultivar (say, a particularly beautiful blue mophead in your garden), be patient, use rooting hormone, take extra cuttings, and know that some cultivars simply take longer and root less predictably.
For longer-term and region-specific growing guidance
Water propagation is the starting point, not the whole story. Once your cuttings are rooted and potted, you'll be moving them into the garden, and how you manage them outdoors depends heavily on your climate, your soil, and your season. For a complete picture of growing hydrangeas in the garden, whether you're planning beds, dealing with alkaline soil, or figuring out when to prune in your region, guides covering outdoor hydrangea growing in specific climates are worth reading alongside this one. For UK-specific advice on site selection, soil pH and pruning seasons, see our guide on how to grow hydrangeas in the UK. For detailed, region-specific advice for New Zealand gardeners, see our guide on how to grow hydrangeas NZ. For region-specific advice, see our guide on how to grow hydrangeas in South Africa for timing, soil and pruning tips tailored to that climate. For step-by-step advice on planting, pruning, soil, and climate-specific care, see how to grow hydrangeas outdoors. Gardeners in the UK, New Zealand, and South Africa all face different seasonal conditions, frost windows, and humidity levels that affect both propagation timing and garden establishment.
If seed propagation interests you as an alternative or complementary approach, there's useful detail on the right timing and species selection for seed-grown hydrangeas, which operates on a completely different calendar and skill set to the cutting methods described here. For specifics on when to grow hydrangea from seeds, see the guide on seed timing and species selection.
When to use water methods and final recommendations
Use water propagation when you want free new plants from a shrub you already have, when you don't have propagation media on hand, and when you want to see root progress without guessing. It's a genuine, practical method, not a gardening shortcut that produces inferior results, as long as you manage the transition to soil carefully afterward.
Use vase forcing when you want hydrangea blooms indoors, cut from the garden or bought from a market. Keep the water clean, re-cut the stems every few days, and use a flower food if you want to push vase life past the usual week.
The honest summary: take your cuttings in late spring from non-flowering softwood shoots, keep the water fresh, give them warmth and bright indirect light, and pot them up gently when the roots are an inch or two long. That's it. Most of the failures I've seen come from skipping one of those steps, usually the timing or the water-change routine. Get those right and you'll have new hydrangea plants with very little cost and a reasonable amount of patience.
FAQ
What does "growing hydrangeas in water" mean — propagation vs vase forcing?
There are two distinct practices: (1) Water propagation — placing node-bearing hydrangea stem cuttings in clean water until roots form so you can later plant them in soil; (2) Vase forcing (cut-flower forcing) — cutting stems that already have flower buds or immature blooms and conditioning them in a vase so they open indoors for short-term display. Propagation creates new, long-term plants; forcing is for indoor flowers only and doesn’t produce a new plant unless the stem is rooted first.
When is the best time to take hydrangea cuttings for rooting in water?
Late spring to early summer is best for softwood cuttings (new-season, flexible growth). This is when shoots are actively growing and have high rooting potential. Semi-ripe cuttings in mid to late summer also root well for some species. Avoid taking cuttings from flowering shoots (energy is diverted to blooms) or during cold, dormant periods.
Which hydrangea types root most reliably from water cuttings?
Hydrangea arborescens (e.g., 'Annabelle') and Hydrangea paniculata root very reliably and quickly when properly taken. Many Hydrangea macrophylla (bigleaf) cultivars root well but are more variable; success depends on cultivar and cutting maturity. Expect higher success with softwood/semi-ripe cuttings and good technique.
What materials do I need to root hydrangea cuttings in water?
Clean glass jars or bottles (transparent for easy inspection or darker to reduce algae), sharp sterile pruners or scissors, containers to hold multiple cuttings (jars/mason jars), clean tap or filtered water (dechlorinated if heavy chlorination), optional rooting hormone (IBA powder or quick-dip), paper towel and plastic bag if you want a humidity tent, and a bright, indirect light location with stable temperatures (65–75°F / 18–24°C).
Step-by-step: how do I take and start hydrangea cuttings in water?
1) Select a healthy non-flowering shoot with several nodes. 2) Cut a 4–6 inch (10–15 cm) segment just below a node using a clean diagonal cut. 3) Remove lower leaves so at least one or two nodes will be submerged; reduce remaining leaves by half to lower transpiration. 4) (Optional) Quick-dip the basal end in rooting hormone per product directions. 5) Place the cutting in a jar so a node or two are submerged but leaves stay above water. 6) Keep the jar in bright, indirect light at 65–75°F. 7) Change water regularly (see care schedule) and watch for roots forming at submerged nodes.
What daily and weekly care do water-rooted hydrangea cuttings need?
Daily: check water level and top up with fresh water to keep nodes submerged; remove any leaves that fall in the water. Weekly (or sooner if water becomes cloudy): fully replace the water and rinse the jar to reduce microbes and algae. Keep cuttings in bright, indirect light and steady warm temperatures (65–75°F / 18–24°C). If algae grows, move to a darker container or change water more often. Optionally mist leaves to reduce stress if the air is very dry.