African violets are one of the easiest houseplants to propagate from a single leaf, and if you follow the right steps, you can go from one healthy leaf to a flowering plant in around 10 months. You snap or cut a leaf with its petiole (that short stem connecting the leaf to the plant), trim the petiole to about 1 to 1.5 inches, tuck it into a well-draining rooting mix, keep humidity up, and wait. Roots form in 3 to 4 weeks, baby plantlets follow a few weeks after that, and eventually you have a whole new plant. The details of how you handle moisture, light, and temperature are what separate success from a mushy, rotted leaf in a pot.
How to Grow Violets From Leaves: Leaf Propagation Guide

Marcus Holloway
15 Jun 2026
Which violets can actually be propagated from a leaf (and which can't)
When most people search for growing violets from leaves, they're thinking about African violets (Saintpaulia), and that's where leaf propagation genuinely shines. African violets are almost uniquely suited to it. You take a leaf, stick it in some damp mix, and a whole new plant grows from the base of that petiole. It sounds almost too simple, but it really works. blank" rel="noopener noreferrer">African Violets (Virginia Tech / VCE) — Propagation section notes that virginia Tech (Virginia Cooperative Extension) explicitly states African violets (Saintpaulia) can be propagated easily by leaf cuttings.
There's one important exception within African violets: chimera varieties. Chimeras have a striped or pinwheel petal pattern caused by two genetically distinct cell types arranged in layers. The problem is that when you propagate a chimera from a leaf cutting the normal way, the resulting plantlets don't reliably carry that pattern because the genetic structure gets scrambled. If you've got a chimera and you want to preserve its look, you need to propagate it from suckers or side shoots instead. If you're not sure whether your plant is a chimera, look at the flowers. A pinwheel or clearly striped two-tone pattern is the giveaway.
What about other plants people call 'violets'? Common garden violets and wild violets (Viola species) are a different story. To learn how to grow violets outdoors, you can adapt these basics to shade, soil, and seasonal temperature changes Common garden violets and wild violets. These are outdoor plants with a different growth habit, and leaf propagation isn't really the method for them.
If you're interested in growing those in your yard or in outdoor beds, that's a separate topic from what this guide covers. If you want violets outdoors, check out our guide on how to grow violets in your yard for the right light, soil, and placement. This article is specifically about African violet leaf propagation indoors.
If you want to expand beyond leaf propagation, check out how do you grow violets for more general care and growth tips growing violets from leaves.
Leaf cutting vs. leaf propagation: what 'from leaves' actually means
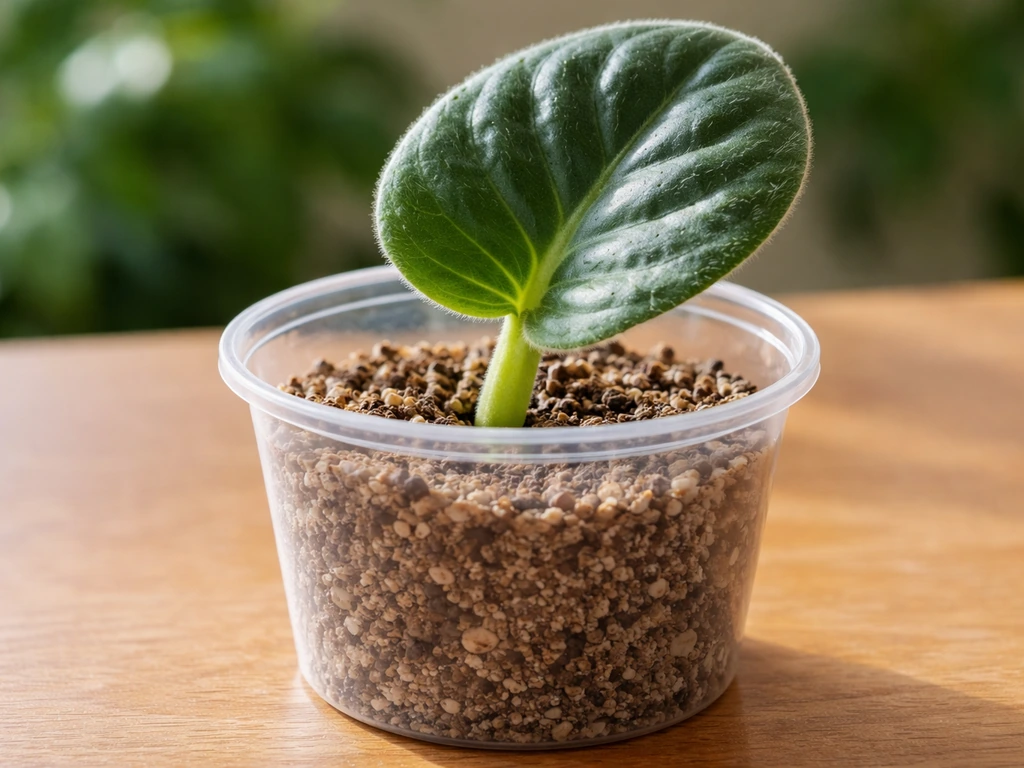
There's some confusion about terminology worth clearing up before you start. A leaf cutting for African violets is technically a leaf petiole cutting: you're taking the entire leaf blade along with its petiole (the little stem that attaches the leaf to the main plant). You are not just pressing a leaf blade flat into the soil with no stem, and you are not just floating the leaf in water. The petiole is where all the action happens. That buried petiole base is where roots emerge and where the baby plantlets eventually push up.
You might also see people talk about rooting African violet leaves in water. That method can work, but it comes with more risk of rot than rooting directly in a loose, well-draining mix. Most experienced growers go straight to a rooting medium. The water method is fine for experimenting, but if you want reliable results, skip it and use a proper mix from the start.
Step-by-step: preparing your leaf cutting and rooting materials
Choosing the right leaf
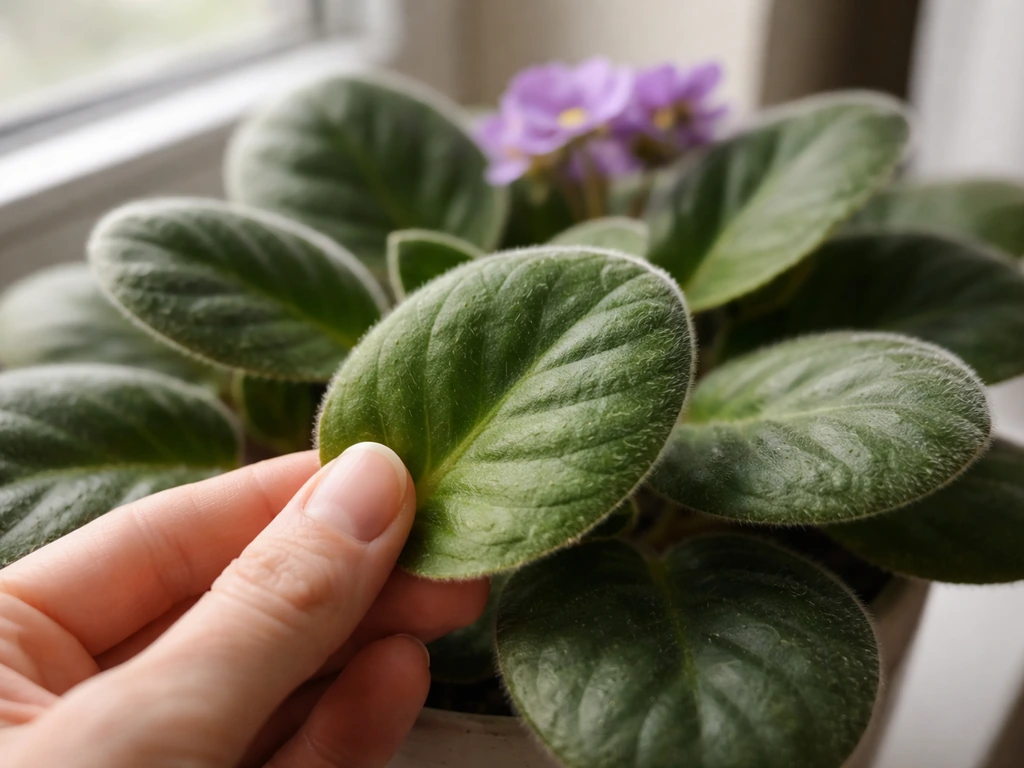
Pick a healthy, mature leaf from the middle rows of the plant. Avoid the very youngest center leaves (they're not mature enough) and the oldest outer leaves (they may be past their prime for propagating). You want a firm, fully-colored leaf with no spots, damage, or softness. One critical tip: avoid heavily variegated leaves. Leaves with lots of white or cream in them are significantly more prone to rotting before any plantlets appear. Stick to solid green or lightly variegated leaves for your best odds.
Removing and trimming the leaf
- Snap or cut the leaf cleanly from the plant at the base of the petiole where it meets the main stem. A clean cut with a sharp, sterile blade or scissors works well.
- Trim the petiole down to about 1 to 1.5 inches long. Any longer and it can wobble and fail to root; any shorter and there's not enough stem buried to generate plantlets.
- Let the cut end sit in open air for 15 to 30 minutes to form a slight callus. This small step genuinely reduces rot risk.
- You don't need rooting hormone for African violet leaves. Many experienced growers skip it entirely and get great results. If you have it and want to use it, a light dip won't hurt, but don't rely on it to fix a bad leaf or bad conditions.
Preparing the rooting mix and container
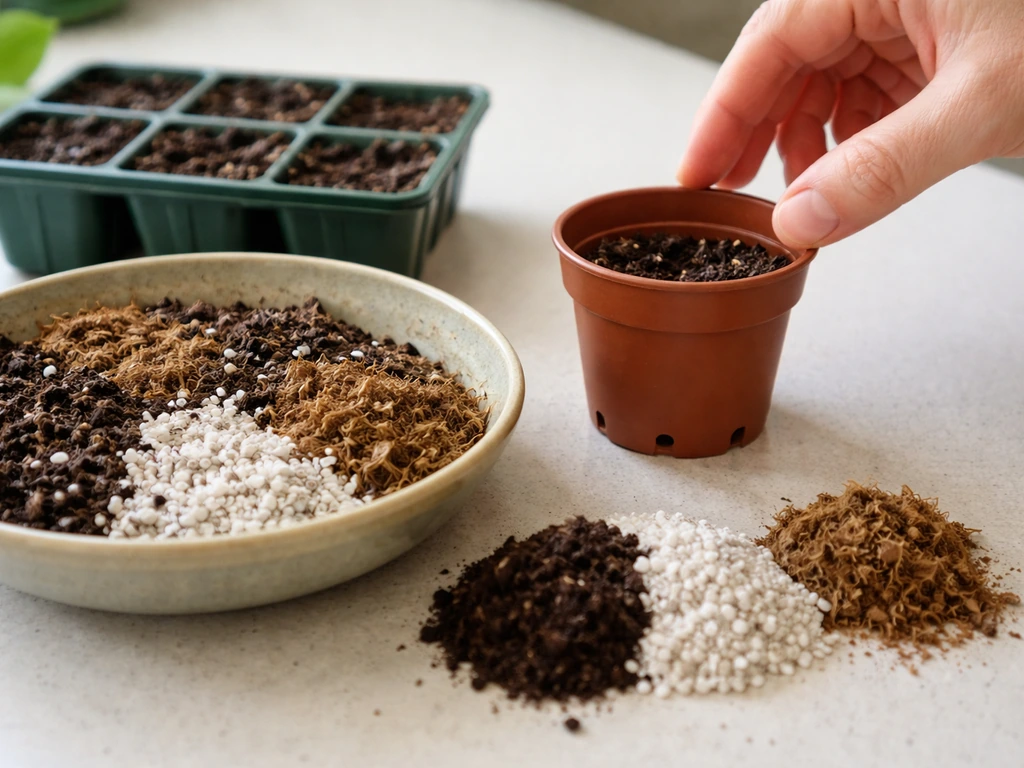
African violet leaves need a mix that holds some moisture without staying soggy. A good standard formula is equal parts potting soil, sphagnum peat moss, and horticultural perlite. Alternatively, a peat moss, vermiculite, and perlite blend also works well. Perlite is especially important because it keeps air pockets in the mix so roots can breathe. Whatever you use, make sure it's sterile or fresh from the bag. Reusing old potting mix is asking for fungal problems.
Use a small pot or cell tray with drainage holes. A 2 to 3-inch pot is plenty for one leaf cutting. Moisten the mix before you insert the petiole so the medium is evenly damp (not soaking wet) before the leaf goes in. Make a small hole with a pencil or chopstick, insert the petiole at roughly a 45-degree angle so the leaf blade is tilted slightly upward, and firm the mix gently around it so the petiole stays in place.
Rooting conditions: humidity, light, temperature, and watering
Humidity
Humidity is probably the single biggest variable during rooting. The leaf is no longer pulling water from a plant, so it needs the air around it to stay moist. The most reliable way to do this is to enclose the cutting in a clear plastic bag or cover the pot with a clear plastic dome. This creates a little greenhouse effect that holds humidity up and keeps the leaf from wilting before it can root. Misting the leaf every day is not as effective as this enclosure method and adds the risk of water sitting on the leaf blade and causing rot.
One caveat: if you see condensation pooling as standing water inside the bag, it's too wet. Open the bag briefly each day to allow some air exchange and let excess moisture escape. You want foggy condensation on the walls of the bag, not puddles.
Light
Bright, indirect light is ideal. African violets famously dislike direct sun, and that goes double for a fragile leaf cutting. A spot near a north or east-facing window works well, or under fluorescent grow lights for 12 to 14 hours a day. Avoid direct afternoon sun, which can heat up the bag or dome and cook the cutting. African Violets (Cornell Cooperative Extension) PDF — rooting medium & covering notes that cornell Cooperative Extension PDF guidance for African violet propagation states to use a high-moisture-capacity rooting medium, keep the rooting medium moist, and cover the cutting with a glass jar or place in a plastic bag; it also warns that temperature differences between water and leaf can cause problems.
Temperature
Keep things warm. African violets root best in temperatures between 65 and 75 degrees Fahrenheit. Avoid putting them near cold drafts, air conditioning vents, or windowsills that drop in temperature at night. Cool temperatures slow root development significantly and can encourage rot. Room temperature in a typical home is usually fine, as long as you're not placing the cutting somewhere chilly.
Watering during rooting
There's no useful fixed watering schedule for rooting African violet leaves because so much depends on your mix, your container size, your humidity setup, and your home's conditions. What you're aiming for is a mix that stays lightly moist but never waterlogged. Check by pressing a finger into the surface. If it feels damp, leave it alone. If it feels dry half an inch down, add a small amount of water at the base of the pot (bottom watering is ideal). Never let the cutting sit in a tray of standing water for extended periods. Overwatering is the number one reason leaf props fail.
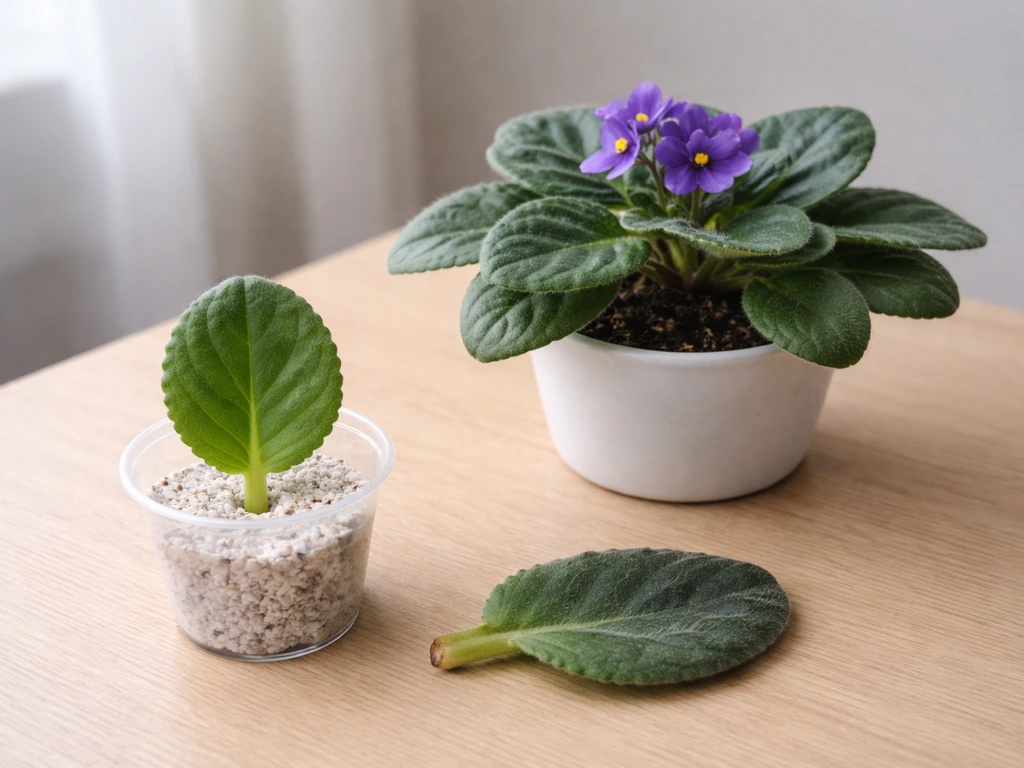
Transplanting your baby violets: timing, potting, and aftercare
About 3 to 4 weeks after you insert the cutting, roots should form at the base of the petiole. You won't see them yet, but you'll know things are working when, about 3 to 4 weeks after that, tiny leaves start pushing up through the surface of the mix. This is exciting, but don't rush to dig things up the moment you see the first pair of tiny leaves.
Wait until the baby plantlets (there will likely be several, clustered at the base of the original petiole) have leaves at least the size of a dime before you separate them. Missouri Botanical Garden suggests waiting until plantlets are about 2 inches tall or have 4 to 6 leaves each. Separating too early is one of the most common mistakes. The tiny plantlets are fragile and don't have much root mass yet. Patience here pays off.
How to pot up the plantlets
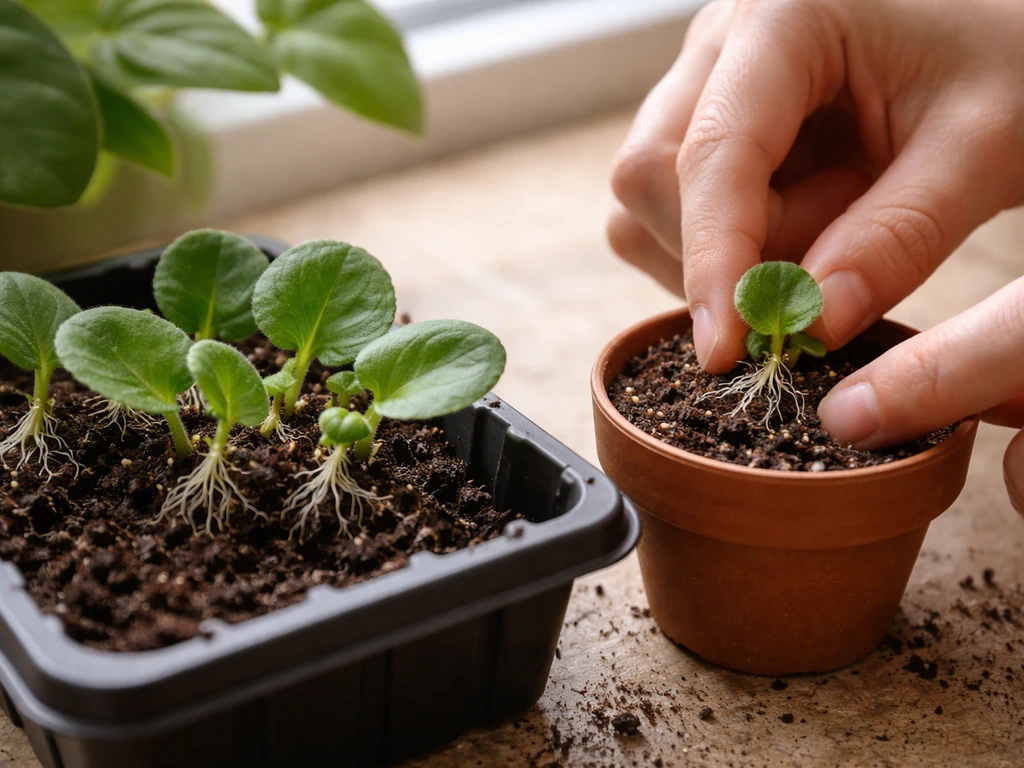
- Gently remove the entire clump from the pot. The original leaf and petiole will still be attached and will look somewhat spent. That's normal.
- Carefully tease apart the individual plantlets, keeping as many roots intact on each one as possible. Use your fingers or a clean toothpick. Don't yank them apart.
- Pot each plantlet into its own small container (2 to 3 inches) using fresh African violet mix. Firm the mix lightly around the roots.
- Water gently from the bottom and place the newly potted plants back in a warm, bright spot. You can cover them loosely for the first week or two to reduce transplant shock, then gradually remove the cover.
Aftercare for young plants
Once your plantlets are potted up, treat them like young African violets. Keep them in bright indirect light, maintain consistent warmth, and water from the bottom to keep roots moist without wetting the leaves or crown. Wait until plants are well established (showing strong new growth) before you start any fertilizing, and when you do, use a balanced African violet fertilizer at a reduced rate. Don't push them with heavy feeding while they're still small.
Troubleshooting: when things go wrong and what to do about it
| Problem | Likely Cause | What to Do |
|---|---|---|
| Leaf turns soft, mushy, or black at the base | Too much moisture, rot setting in | Remove the cutting, trim away any rot with a sterile blade, let it callus for 30 minutes, restart in fresh dry-ish mix with less moisture |
| No roots after 6+ weeks | Too cold, too dry, or the petiole cut was too shallow | Check temperature (aim for 65–75°F), ensure humidity enclosure is in place, try a fresh leaf cutting with a clean trim |
| Mold on the soil surface or bag | Poor air circulation combined with high humidity | Open the bag daily, reduce watering, and if mold is heavy, remove the cutting and start fresh with sterile mix |
| Damping off (plantlets wilt and collapse at the base) | Fungal disease, usually from non-sterile mix or overwatering | Always use fresh sterile mix. Improve drainage. Remove affected plantlets immediately so it doesn't spread |
| Leaf goes limp but doesn't rot | Humidity too low or cutting lost moisture before rooting | Make sure enclosure is sealed and maintaining humidity; check that petiole is firmly anchored in the mix |
| Plantlets appear but stay tiny and weak | Insufficient light or separating too early | Move to a brighter spot or add grow light hours; wait until plantlets are dime-size or bigger before separating |
| Leaves develop white crust or leaf tips die | Salt buildup from tap water or fertilizer | Use filtered or distilled water; flush the mix occasionally; avoid over-fertilizing young plants |
One thing worth saying plainly: heavily variegated leaves fail more often than solid green ones. If you pick a beautiful white-edged leaf and it rots before you see a single plantlet, that's almost certainly why. Try again with a greener leaf. Also, if a batch fails, don't assume something is fundamentally wrong with your technique. A lot of first-time leaf props fail because the mix was just slightly too wet. Restart with a drier mix and a fresher leaf, and most people get it on the second or third try.
Growth timeline and when to expect flowers
Here's a realistic timeline for what to expect under good home conditions:
| Stage | Timeframe |
|---|---|
| Leaf cutting inserted into rooting mix | Day 1 |
| Roots form at petiole base | 3 to 4 weeks |
| Baby plantlets emerge from the surface | 6 to 8 weeks from start |
| Plantlets large enough to separate (dime size, 4–6 leaves) | 8 to 10 weeks from start |
| Young plants established in their own pots | 3 to 4 months from start |
| First flowers on healthy plant | Around 10 months from the original leaf cutting |
That 10-month timeline to flowering is from the University of Georgia and reflects good conditions. If you want a simple overview of the full process, this guide on how to grow African violets from a leaf walks you through the same steps 10-month timeline to flowering. In reality, home conditions vary a lot. Some growers see flowers closer to 6 to 8 months with excellent light and warmth; others wait longer in lower light or cooler rooms.
If you want flowers sooner, focus on maximizing light and stable warmth during the rooting and early growth stages 6 to 8 months. Reddit growers consistently report that 2 to 4 months to a decent-size plantlet is a reasonable expectation, and sometimes it takes longer. Don't panic if yours are slow. Slow and steady is fine as long as you're seeing gradual progress.
Once your plants are mature enough to bloom, the conditions that get flowers are the same ones that got you here: bright indirect light (ideally 12 to 14 hours under grow lights or a bright windowsill), temperatures consistently in the 65 to 75°F range, steady moisture without overwatering, and occasional feeding with a bloom-boosting African violet fertilizer once the plant is well established. African violets can flower almost continuously for months when conditions are right, which makes all this propagation effort more than worth it when you end up with a whole collection of blooming plants started from a single leaf.
FAQ
How deep should I insert the African violet leaf petiole for reliable rooting?
If the petiole is buried too shallow, the leaf often rots before it can root. Insert the trimmed petiole base into the medium so it is well supported, around the depth where the leaf blade stays above the surface. If the cutting lifts easily when you touch it, you probably inserted it too loosely or too shallow.
When is the right time to separate the baby plantlets, and when should I leave them alone?
The clearest sign you should not separate yet is that the “baby” plantlets still look tiny and tightly clustered, with little root mass you can see or feel. Wait until the plantlets have several leaves and are at least about dime-size, then tease them apart gently, keeping the crown and roots intact as much as possible.
Can I water African violet leaf cuttings from the top, or is bottom watering required?
Yes, but do it carefully. Bottom watering is safer once the plantlets are potted, because it keeps moisture away from the crown and leaves. During early rooting, skip frequent misting and keep the enclosure humid instead. If you see puddling condensation or the mix stays soggy, reduce moisture immediately and increase airing.
What should I do if my first leaf cutting rots, and is there any way to salvage it?
You can restart, but first inspect the cutting. If the petiole looks brown, mushy, or smells sour, remove it and discard the mix rather than trying to salvage it. Use fresh, sterile mix, lower humidity a bit (still enclosed but not puddling), and choose a greener, unblemished leaf from mid rows.
Is it okay to root African violet leaves in water, and how do I reduce the risk of rot?
No. For African violets, water rooting tends to be less reliable because the leaf base is more likely to sit in conditions that promote rot. If you try water anyway, only use a shallow amount so the cut end is moist but not submerged deeply, and switch to a rooting mix as soon as you see early roots.
My mix feels damp all the time, how do I know if I am overwatering the leaf cutting?
Overly wet mix is the most common failure. Use a mix that stays lightly moist, not slick, and make sure the pot has drainage holes. Press-test the surface before watering, and if it still feels damp half an inch down, wait. Bottom watering in small amounts helps prevent waterlogging.
What light level is safe during leaf propagation, and how can I tell if it is too bright?
Mildly bright indirect light is best, and direct sun is a problem. If you see leaf edges browning, bleaching, or the bag/dome heating up, move the setup farther from the window or reduce exposure time. North or east windows and grow lights on a timer are easier to control.
How cold is too cold for African violet leaf propagation, and why does it affect success?
Temperatures below the ideal range can slow rooting dramatically and increase rot risk. Aim for consistent warmth, around 65 to 75°F, and avoid cold drafts from windows or HVAC vents. If your rooting area gets chilly at night, relocating to a more stable room can make a big difference.
Can I propagate multiple African violet leaves in the same pot or container?
Some people keep multiple leaf cuttings in one pot, but it increases the chance that one rot issue spreads and makes it harder to monitor moisture for each leaf. For best control, root one leaf per small pot or cell, or keep separations tight enough that condensation and wetness do not pool between cuttings.
When should I start fertilizing African violet plantlets grown from leaf cuttings?
Yes, but it must be done later. Fertilize only after the plantlets are established with clear new growth, using a balanced African violet fertilizer at a reduced rate. Early feeding can stress the fragile roots and worsen problems when the mix is still regulating moisture.
I think my African violet is a chimera, does leaf propagation preserve the stripes?
If you have a chimera African violet, typical leaf propagation does not reliably preserve the striped or pinwheel pattern because leaf propagation may produce plantlets with altered genetic layer arrangements. To keep the look, propagate from suckers or side shoots instead of leaves.