
Violets and violas are some of the easiest, most rewarding flowers you can grow outdoors. Plant them in the right spot at the right time, give them decent soil, and they'll reward you with weeks of color in beds, borders, and containers. The trick is knowing which species you're working with, when your local climate calls for planting, and how to avoid the few mistakes that trip up most beginners, mainly waterlogged roots and planting too late into heat. For detailed timing and zone-specific advice on when to grow violas, see the section on planting windows and zone guidance. This guide walks you through every stage, from picking the right violet for your yard to nursing it through summer or winter depending on your zone. For step-by-step instructions on how to grow violets in your yard, see our in-depth guide. See our step-by-step guide on how do you grow violets for detailed, practical instructions.
How to Grow Violets Outdoors: Complete Planting Guide

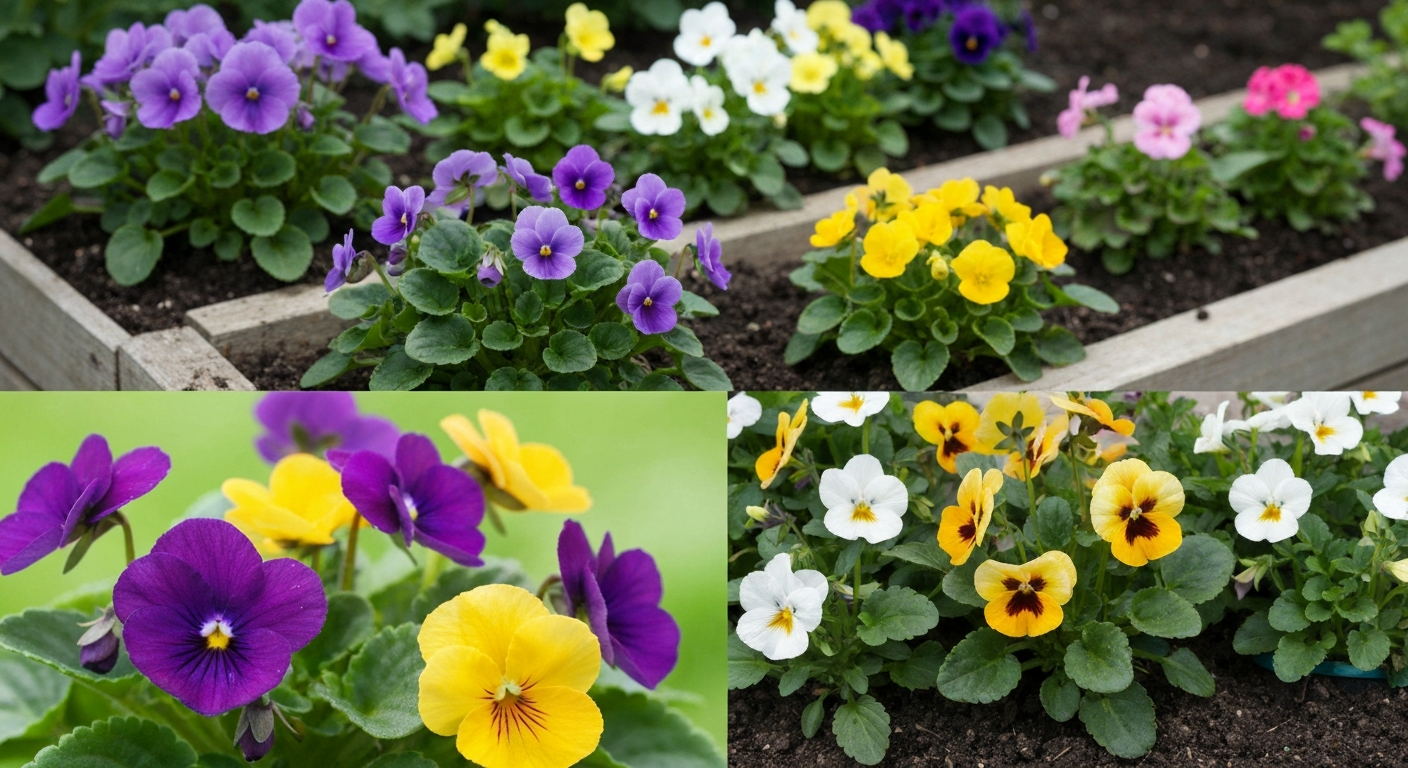
Outdoor violets vs. African violets: an important distinction
Before anything else, let's clear up a confusion that causes real problems. African violets are not actually violets. They belong to a completely different plant family (Gesneriaceae) and are classified as Streptocarpus sect. Saintpaulia, formerly Saintpaulia. They're houseplants grown on windowsills and under grow lights, and their care requirements have almost nothing in common with outdoor violas. If someone told you to grow your African violet outside in a garden bed, ignore that advice entirely. Everything in this guide applies to the genus Viola, the true outdoor violets and violas. If you're specifically growing African violets indoors, that's a separate subject with its own dedicated guide. For detailed indoor care, see our separate guide on how to grow African violets.
Choosing the right species for beds, borders, and containers
The genus Viola contains hundreds of species, but for home gardens you're really choosing between five main types. Each behaves differently in the landscape, so picking the right one saves you a lot of frustration later.
| Species / Type | Common Name | Best Use | Hardiness | Key Trait |
|---|---|---|---|---|
| Viola × wittrockiana | Garden pansy | Beds, containers, borders | Zones 6–11 (cool-season annual in colder zones) | Largest flowers, widest color range |
| Viola cornuta | Horned viola | Edging, borders, containers | Zones 4–8 (perennial) | Compact, prolific bloomer, more heat-tolerant than pansy |
| Viola × williamsii (hybrids) | Hybrid viola | Bedding, mass planting | Zones 5–8 | Cold-tolerant, compact, bred for long season |
| Viola tricolor / V. bicolor | Johnny-jump-up | Edging, naturalized groundcover | Zones 4–8 (self-seeding) | Self-seeds freely, very cold-hardy |
| Viola odorata | Sweet/English violet | Groundcover, underplanting | Zones 4–8 | Fragrant, spreads by runners, shade-tolerant |
| Viola sororia | Common blue violet | Native woodland groundcover | Zones 3–7 | Excellent for shady native plantings |
For most beginners, I'd start with Viola cornuta or a modern hybrid viola rather than the big garden pansy. Hybrid violas are smaller-flowered but produce far more blooms per plant, and they handle both cold snaps and mild heat better than large-flowered pansies. Pansies are spectacular, but they're more temperamental. If you want something that practically looks after itself and comes back every year, sweet violets (V. odorata) or Johnny-jump-ups are excellent choices. Just know that Johnny-jump-ups self-seed aggressively, which is either a blessing or a headache depending on how tidy you like your garden.
For containers specifically, garden pansies and compact viola hybrids are the go-to choices. They're bred for the confined root space, they're visually impactful, and you can time replacements neatly with the seasons. Wild species like V. sororia are better left in the ground where they can spread naturally.
When to plant: timing and zone guidance
Violas and outdoor violets are cool-season plants. That's the single most important thing to understand about timing. They thrive when temperatures sit between roughly 45–65°F (7–18°C) and they struggle once daytime highs push consistently above 75°F (24°C). This means your planting windows are spring and fall, not summer.
If you're sowing seed yourself, start indoors 7–9 weeks before your intended outdoor planting date, or 8–9 weeks if you want plants in flower when they go out. Germination happens best at 62–68°F (17–20°C), and seeds typically sprout in 4–7 days under those conditions. For wild or native violet species like V. odorata, keep in mind that seeds often have physiological dormancy and germinate far better after cold-moist stratification, either by sowing outdoors in fall to let winter do the work, or by giving seeds 4–8 weeks of moist cold in the refrigerator before spring sowing.
Zone-by-zone planting windows
| USDA Zone | Spring Planting | Fall Planting | Behavior |
|---|---|---|---|
| Zones 3–5 | After last frost (transplants); sow indoors 8–9 weeks before | Not reliable for overwintering pansies | Treat pansies/violas as spring annuals; perennial species overwinter in ground |
| Zones 6–7 | Early spring, 2–4 weeks before last frost (cold-hardy) | Early September for fall color | Violas and hardy species can overwinter with mulch protection |
| Zones 8–10 | Late winter/early spring | October–November for winter and spring display | Fall planting gives the longest bloom season; plants may survive mild winters |
| Zones 10–11 | Late fall/winter only | October–December | Grow as winter annuals; summer heat ends the season |
In cool-summer climates (think Pacific Northwest, coastal New England), you can often get continuous bloom from an April planting right through early summer. In hotter regions like the Southeast or Southern California, expect your spring planting to fade by late May and plan a fresh fall planting in early September. I've found that accepting this rhythm, rather than fighting it with extra water and shade cloth, gives far better results.
Planting schedule by season: what to do and when to expect blooms
Spring
This is the primary planting season for most gardeners in zones 4–7. Transplant nursery plugs or hardened-off seedlings as early as 2–4 weeks before your last expected frost date since established violas handle light frosts well. In cool climates, expect blooms within 2–4 weeks of transplanting if plants are already budded. Direct-sown seeds will bloom 10–12 weeks from sowing. In northern zones, this is your main season, and plants will wind down as summer heat arrives in June or July.
Summer
In most of the country, summer is a holding pattern for violas. If you're in zones 6–7 with established perennial species like V. cornuta or V. odorata, keep plants trimmed back and watered during heat waves. They often pause blooming in midsummer and rebound in late summer when temperatures drop. In cool-summer zones, you may enjoy nearly continuous bloom. For zones 8 and warmer, summer is essentially the off-season, and it's a good time to start seeds indoors for fall transplants.
Fall
Fall is an underrated planting window. In zones 6–10, planting viola transplants in early September gives them 6–8 weeks to establish before cold sets in, and many will bloom right through October and November. In zones 8–10, a fall planting gives the longest bloom season of all, carrying through winter and into spring. Plant in early September in zone 6, wait until October or even November in zone 9.
Winter
In zones 8–11, winter is active growing time for violas. For cultivar-specific hardiness and regional guidance see FPS‑609/FP609: Viola x wittrockiana (Pansy) (UF IFAS). Plants established in fall will bloom through January, February, and March, making them invaluable for winter garden color. In colder zones, perennial species like V. odorata and V. sororia die back to the ground and return from roots in spring. Hardy annual types like Johnny-jump-ups often self-sow and appear on their own each spring without any effort from you.
Picking the right site: sun, shade, and microclimate
Violas grown as spring annuals do best in full sun (at least 6 hours of direct light per day), which encourages the most flowers. But in warmer climates, afternoon shade is genuinely helpful. A spot that gets morning sun and afternoon shade in zones 7 and warmer will keep plants cooler, extend the bloom season, and reduce the rate at which plants bolt or get leggy. Woodland species like V. odorata and V. sororia actively prefer dappled shade under deciduous trees, which is where you'd naturally find them in the wild.
Wind is worth thinking about too. Violas are low-growing (typically 4–10 inches, 10–25 cm tall) so they're rarely damaged by wind the way taller flowers are, but constant strong winds dry out containers and light soils faster than you'd expect. A spot near a wall or low hedge that breaks strong afternoon wind can make watering less frequent without reducing light too much.
For companion planting, violas work beautifully as a low-growing underplanting beneath spring bulbs like tulips and daffodils, filling gaps while taller flowers are blooming. They also pair well along the front of borders with snapdragons, alyssum, and dusty miller. Their cool-season timing also makes them natural partners with ornamental kale and pansies for fall containers.
Getting the soil right before you plant
Violas want fertile, humus-rich, moist but well-drained soil with a pH of roughly 6.0–7.0. That's a fairly forgiving range. The biggest killer isn't the wrong pH, it's waterlogging. Violas sitting in soggy soil will develop crown rot and root rot quickly, especially in cool, wet spring weather. This is the single most common reason they fail, and it's entirely preventable with a bit of preparation.
Preparing a garden bed
- Test your soil pH using an inexpensive test kit or strip (available at garden centers). If pH is below 6.0, add garden lime; if above 7.5, add sulfur or work in acidic compost.
- Dig or loosen the top 6–12 inches (15–30 cm) of the planting area.
- Incorporate 2–4 inches (5–10 cm) of compost across the bed and mix it in thoroughly.
- If you have heavy clay soil, also work in coarse horticultural grit or perlite at roughly 20–25% by volume to improve drainage.
- Rake level and check that the finished soil surface is slightly raised (1–2 inches) above surrounding hard surfaces so water drains away from crowns rather than pooling.
- For raised beds, a mix of 60% quality topsoil, 30% compost, and 10% perlite works very well.
Preparing containers
Never use straight garden soil in containers as it compacts badly and drains poorly. Use a high-porosity commercial potting mix based on peat or coir, pine bark fines, and perlite, then amend it with 10–20% compost for fertility. Make sure every container has at least one generously sized drainage hole, and if you're tempted to put a saucer underneath for indoor-style water retention, resist the urge outdoors. Sitting water in a saucer is an invitation to root rot. A slow-release granular fertilizer mixed into the potting medium at planting is a good starting point, and then supplement with liquid feeds every 1–3 weeks through the season.
Planting depth, spacing, and layout
The depth rule for transplants is simple: the top of the root ball should sit at or very slightly above the surrounding soil surface. Burying the crown (the junction between roots and stems) invites rot. When sowing seed directly into the ground or trays, surface-sow or cover with the thinnest possible layer of vermiculite or fine compost, no more than 1–2 mm deep. Violet seeds need light or near-light conditions to germinate well, and burying them too deep is one of the most common reasons seed sowing fails.
| Use Case | Recommended Spacing | Notes |
|---|---|---|
| Mass bedding / drifts | 6–9 in (15–23 cm) | Standard for most hybrid violas and pansies |
| Edging / tight borders | 4–6 in (10–15 cm) | Use for compact cultivars; fills in faster |
| Container planting | 4–6 in (10–15 cm) | Closer spacing gives lush, full look quickly |
| Groundcover species (V. odorata, V. sororia) | 8–12 in (20–30 cm) | They spread by runners, so wider spacing is fine |
| Seed sowing (in trays) | Surface sow; thin to 2 in (5 cm) initially | Transplant when first true leaves appear |
Step-by-step planting instructions
Sowing seed indoors
- Fill seed trays or cell packs with a fine-textured, moist seed-starting mix.
- Surface-sow seeds or cover with no more than 1–2 mm of fine vermiculite. Do not bury deeply.
- Water in gently using a misting spray or by bottom-watering the tray, which avoids washing seeds around.
- Maintain temperature at 62–68°F (17–20°C). A heat mat set to the lower end of this range works well.
- Expect germination in 4–7 days. Keep the surface consistently moist but never waterlogged.
- Once seedlings have their first true leaves (not just the seed leaves), thin or pot up individually.
- Harden off for 7–10 days before transplanting: start with 1–2 hours of outdoor exposure in a sheltered spot and gradually increase.
A quick note on wild violet and native species seed: if you're starting V. odorata, V. sororia, or other species from collected or purchased wild seed, germination will likely be poor without cold stratification. Mix seeds with a little damp sand in a sealed bag and refrigerate for 4–8 weeks before sowing, or simply sow them outside in fall and let winter do the work naturally.
Transplanting nursery starts or cell-pack seedlings
- Water nursery plants thoroughly 1–2 hours before transplanting so the root ball is moist and holds together.
- Prepare the bed or container as described above, with loosened, amended soil.
- Dig a hole just large enough for the root ball. Depth: the top of the root ball should sit level with or just above the surrounding soil.
- Set the plant in, backfill gently, and firm the soil around the roots without compacting it tightly.
- Space transplants at 6–9 in (15–23 cm) for beds, 4–6 in (10–15 cm) for containers or edging.
- Water in immediately and thoroughly after planting.
- Mulch lightly around plants (not touching stems) with 1–2 in (2.5–5 cm) of fine bark mulch to retain moisture and regulate soil temperature.
- Check for wilting over the first 3–5 days and water as needed; established transplants typically need 5–10 days to root out into surrounding soil.
Planting nursery plugs
- Plugs are smaller than cell-pack transplants and need careful handling to avoid snapping the small root ball.
- Use a dibber or pencil to make a narrow planting hole sized to the plug.
- Firm soil around the plug gently but thoroughly; small air pockets around plug-sized root balls cause plants to dry out and stall.
- Water immediately and protect from heavy rain or overhead irrigation for the first few days while roots are establishing.
- Plugs are often planted at tighter spacing (4–6 in / 10–15 cm) and fill in quickly under good conditions.
Watering, feeding, and day-to-day care
Violas want consistent moisture. They're not drought-tolerant the way lavender or sedum is, but they also can't sit wet. In beds, water when the top inch of soil is dry, which in cool spring weather might be every 2–4 days, or more frequently in warm dry spells. In containers, check daily during warm periods. Push a finger an inch into the potting mix; if it's dry, water thoroughly until it drains from the holes.
For feeding, violas are moderate feeders. If you prepared the bed with good compost, you often won't need much more. A balanced slow-release granular fertilizer (something like a 10-10-10 formulation) worked into the soil at planting handles most of the season. Container plants benefit from a balanced liquid feed every 1–3 weeks since nutrients flush out with regular watering. I'd be cautious about high-nitrogen feeds, especially in rich soils. Overfed plants produce lush, leafy growth and fewer flowers. If your violas are producing lots of green leaves but few blooms, nitrogen is usually the culprit.
Deadheading (removing spent flowers) extends the bloom season noticeably. It only takes a few minutes per plant and tells the plant to keep producing flowers rather than setting seed. For Johnny-jump-ups, skip deadheading if you want them to naturalize and self-sow.
Propagation: seed, division, and a note on leaf cuttings
Seed propagation is covered in the planting instructions above. For perennial viola species, division is the most practical way to multiply plants and refresh tired clumps.
Dividing perennial violas
- Divide in early autumn after flowering or in early spring just as growth resumes.
- Lift the entire clump with a fork, taking care to minimize root damage.
- Pull or cut the clump apart into sections, each with several healthy shoots and a good set of roots.
- Discard the oldest, woodiest center of the clump if it looks congested or unproductive.
- Replant divisions at the same depth as the original plant and water in thoroughly.
- Divisions typically re-establish within a few weeks if soil stays moist.
On the topic of leaf cuttings: this is a propagation method that works for African violets (Streptocarpus/Saintpaulia) but does not reliably work for outdoor Viola species. If you've seen instructions for propagating violets from leaf cuttings, those instructions almost certainly refer to African violets growing indoors. For outdoor violas, stick to seed or division.
Seasonal care and winterizing
As temperatures drop in fall, most annual violas and pansies will fade and can be pulled and composted. Perennial species like V. cornuta, V. odorata, and V. sororia die back to the ground in colder zones but survive winters with their root systems intact. In zones 4–6, apply a light layer of straw or shredded leaf mulch over perennial crowns after the ground freezes to protect against freeze-thaw heaving. Remove this mulch in early spring once new growth appears.
In zones 7–8, established viola clumps often stay semi-evergreen through winter. Trim back any tatty, frost-damaged foliage in early spring to encourage fresh growth. Hardy pansies and violas planted in fall in zone 7 can overwinter with minimal protection and resume blooming in late winter or very early spring, sometimes as early as February.
Container violas in cold zones should either be moved to a sheltered spot (unheated garage or cold frame) or the plants pulled and replaced with fresh ones in spring. Containers freeze much faster than ground soil, and even hardy species can be killed when their roots freeze solid in a pot.
Pests, diseases, and common problems
Violas are generally tough and low-maintenance, but they do have a handful of recurring issues worth knowing.
Common problems and solutions
| Problem | Cause | What to Do |
|---|---|---|
| Crown rot / wilting despite watering | Waterlogged soil; poor drainage | Improve drainage; let soil dry slightly between waterings; avoid planting in low spots |
| Leggy, few flowers | Too much nitrogen OR too little light | Reduce nitrogen feed; move to a sunnier spot; cut back leggy stems to encourage branching |
| Powdery mildew (white coating on leaves) | Poor air circulation, dry soil followed by humidity | Improve spacing; water at base not overhead; remove affected leaves; neem oil spray if severe |
| Aphids (clusters on new growth) | Common in spring and fall | Knock off with water jet; insecticidal soap spray if heavy infestation |
| Slugs and snails (ragged holes in leaves) | Cool, moist conditions | Iron phosphate bait around plants; remove debris where slugs shelter |
| Botrytis / grey mould | Cool, humid, crowded conditions | Remove infected plant material immediately; improve air circulation; avoid overhead watering |
| Plants fade and stop blooming in summer | Normal heat stress response | Not a problem to fix; this is natural; shear back and wait for fall rebloom, or pull and replace |
The most important troubleshooting principle with violas: if plants look sick and the soil is wet, the problem is almost always overwatering or drainage before anything else. I've seen gardeners reach for fertilizer and fungicide when all that was needed was to stop watering so much and improve soil structure.
Landscape uses and design ideas
Violas punch well above their compact size in the garden. Here are the most effective ways to use them, based on species and situation. For an authoritative species list with landscape uses, see Violets (Missouri Dept. of Conservation).
- Front-of-border edging: Viola cornuta and compact hybrid violas create a neat, colorful edge along pathways or the front of mixed borders. Their tidy 4–8 inch height stays below taller perennials without being crowded out.
- Spring bulb companions: Interplant violas with tulips, daffodils, and muscari. The viola fills the bare soil between bulb stems and keeps the bed looking intentional rather than patchy.
- Container combinations: Pansies and violas pair well with trailing ivy, calibrachoa, and ornamental grasses in mixed containers. Use them as the 'filler' element in the classic thriller-filler-spiller formula.
- Fragrant groundcover: Sweet violets (V. odorata) spread slowly beneath deciduous trees and shrubs, covering bare soil where grass won't grow. Their early-spring fragrance is genuinely lovely.
- Naturalized woodland areas: Viola sororia and Johnny-jump-ups (V. tricolor) will self-sow and naturalize happily in lightly shaded, informal areas without any maintenance once established.
- Cutting garden: Violas make charming small cut flowers, especially in bunched posies. Harvest in the early morning for the longest vase life.
Quick-reference care checklist
- Plant in cool seasons (spring and fall); avoid summer planting in zones 6 and warmer
- Choose well-drained, amended soil with pH 6.0–7.0; never plant into waterlogged beds
- Space transplants 6–9 in (15–23 cm) for beds; 4–6 in (10–15 cm) for containers and edging
- Plant transplants with the crown at or just above soil level
- Water when the top 1 in (2.5 cm) of soil is dry; check containers daily in warm weather
- Feed with a balanced fertilizer; avoid excess nitrogen or you'll get leaves instead of flowers
- Deadhead regularly to extend bloom time
- Trim perennial species back after bloom or in early spring
- Mulch around plants (not touching stems) with 1–2 in of fine bark mulch
- Protect perennial crowns in zones 4–6 with mulch after the ground freezes
- Divide congested perennial clumps every 2–3 years in spring or fall
- For wild or native violet seed, cold-stratify for 4–8 weeks before sowing
FAQ
Which violet or viola species and cultivars are best for beds, borders, and containers?
Choose by purpose and climate: • Bedding/containers: Viola × wittrockiana (pansies) and modern viola hybrids — large or compact cultivars bred for bedding and cold tolerance. • Edging/compact perennial habit: Viola cornuta (horned viola) and Viola × williamsii hybrids. • Self-seeding groundcover/edging: Viola tricolor (Johnny‑jump‑up). • Fragrant woodland underplanting: Viola odorata (sweet/English violet). • Native woodland groundcover: Viola sororia. Match cultivar size (4–10 in /10–25 cm tall) to spacing: 4–6 in (10–15 cm) in containers or tight edging, 6–12 in (15–30 cm) for massed beds.
How do I choose when to sow or plant violas based on my USDA zone?
General timing: • Cold winter zones (USDA 3–5): Sow seed indoors 7–9 weeks before last frost; transplant after last frost. • Temperate zones (6–7): Sow/transplant in early spring for spring displays; you can also plant in fall for overwintering. • Mild/winter zones (8–10): Plant in fall or late summer for winter and spring color; many violas will overwinter. • Very warm/subtropical (10–11): Plant late fall or winter to avoid summer heat; treat as cool‑season ornamentals. Adjust to local frost dates; nursery guidance often recommends sowing 7–9 weeks before transplanting out.
How should I select a site and prepare soil for outdoor violets?
Site: full sun to part shade — at least 4–6 hours of morning sun; provide afternoon shade in hot climates; woodland species prefer dappled shade. Soil: fertile, humus‑rich, moist but well‑drained; pH ~6.0–7.0. Preparation steps: 1) Test soil pH. 2) Remove weeds and debris. 3) Incorporate 2–4 in (5–10 cm) of compost into the top 6–12 in (15–30 cm). 4) For heavy clay, mix in grit/perlite or use raised beds to improve drainage. 5) Finish so crowns sit slightly above surrounding soil to avoid waterlogging.
What is the proper planting depth and spacing for transplants and seeds?
Transplants: set root ball level with soil surface (crown at or slightly above grade) and firm soil around roots. Spacing: 4–6 in (10–15 cm) for tight edging/containers, 6–9 in (15–23 cm) typical for beds, up to 12 in (30 cm) for larger pansy varieties. Seeds: surface‑sow or cover very lightly (~1–2 mm); keep surface consistently moist for germination.
Step‑by‑step: how do I sow viola/pansy seed indoors and transplant outdoors?
1) Timing: sow 7–9 weeks before desired transplant date. 2) Media: use a fine seed‑starting mix. 3) Sow: surface‑scatter seeds and press lightly; cover only very thinly or not at all. 4) Conditions: keep temperature ~62–68°F (17–20°C) and the surface moist; germination in 4–7 days typical for hybrid seed. 5) Seedlings: move to brighter light once cotyledons open; transplant to individual cells when true leaves appear. 6) Harden off: gradually expose to outdoor conditions over 7–10 days. 7) Transplant: plant after frost risk has passed (or in fall for mild climates), spacing as above, water in well.
How do I propagate violas by seed, division, and cuttings (and when does leaf cutting apply)?
Seed: best for bedding hybrids and mass plantings; sow 7–9 weeks before transplanting or direct‑sow in fall for stratified/wild species. Division: for perennial violas (e.g., V. odorata, V. cornuta), divide in autumn after flowering or early spring — lift clump, separate into sections with shoots and roots, replant at same depth. Cuttings: some violas root from basal cuttings but are less commonly propagated this way; leaf cuttings are generally used for African violets (Saintpaulia/Streptocarpus), not outdoor Viola species — note: leaf‑cutting instructions in indoor African violet guides do not apply to outdoor violas.