You can grow paperwhites outdoors successfully, but whether they thrive as perennials or need to be treated as annuals comes down almost entirely to where you live. In USDA zones 8 through 11, paperwhites are legitimate outdoor bulbs: plant them in fall, enjoy blooms in late winter, and they'll naturalize over time. In zones 7 and below, freezing temperatures will kill the bulbs if left in the ground, so you'll either need to lift them after blooming or commit to replanting fresh bulbs each season. Get that one detail right for your climate and everything else falls into place.
How to Grow Paperwhites Outdoors: Planting Guide

Marcus Holloway
18 Jun 2026
Quick reality check: can paperwhites grow outdoors where you live
Paperwhite narcissus (Narcissus papyraceus) are native to the Mediterranean, and they behave like it. They want mild winters, no hard freezes, and a dry summer rest period. That profile maps almost perfectly to USDA zones 8 through 11, which includes coastal California, the Gulf Coast, Florida, Hawaii, and the warmer parts of the Pacific Northwest.
If you're in zone 7, you're on the edge. A mild winter might let you get away with leaving bulbs in the ground under a layer of mulch, but a hard freeze will wipe them out. Zone 6 and colder? Don't count on overwintering them outdoors. That doesn't mean you can't enjoy paperwhites outside in those zones during the season, but you'll need to either plant them as annuals or grow them in containers you can move indoors when frost threatens.
One thing working in your favor: blank" rel="noopener noreferrer">paperwhites don't need a cold chilling period to bloom. Unlike tulips or hyacinths, which need weeks of cold to trigger flowering, paperwhites will bloom without any vernalization. That makes them easier to manage in warm climates and means you're not fighting the calendar the way you would with other spring bulbs.
| Your Zone | Outdoor Strategy | Perennial or Annual? |
|---|---|---|
| Zones 9–11 | Plant in fall, leave in ground year-round | Perennial — naturalize over time |
| Zone 8 | Plant in fall, mulch in cold snaps, generally reliable | Perennial with minimal protection |
| Zone 7 | Plant in fall, heavy mulch required, lift if severe frost expected | Borderline — treat as annual to be safe |
| Zones 6 and below | Plant in containers or as seasonal annuals; bring in or discard after bloom | Annual — lift or replace each season |
Choosing bulbs and prepping for planting
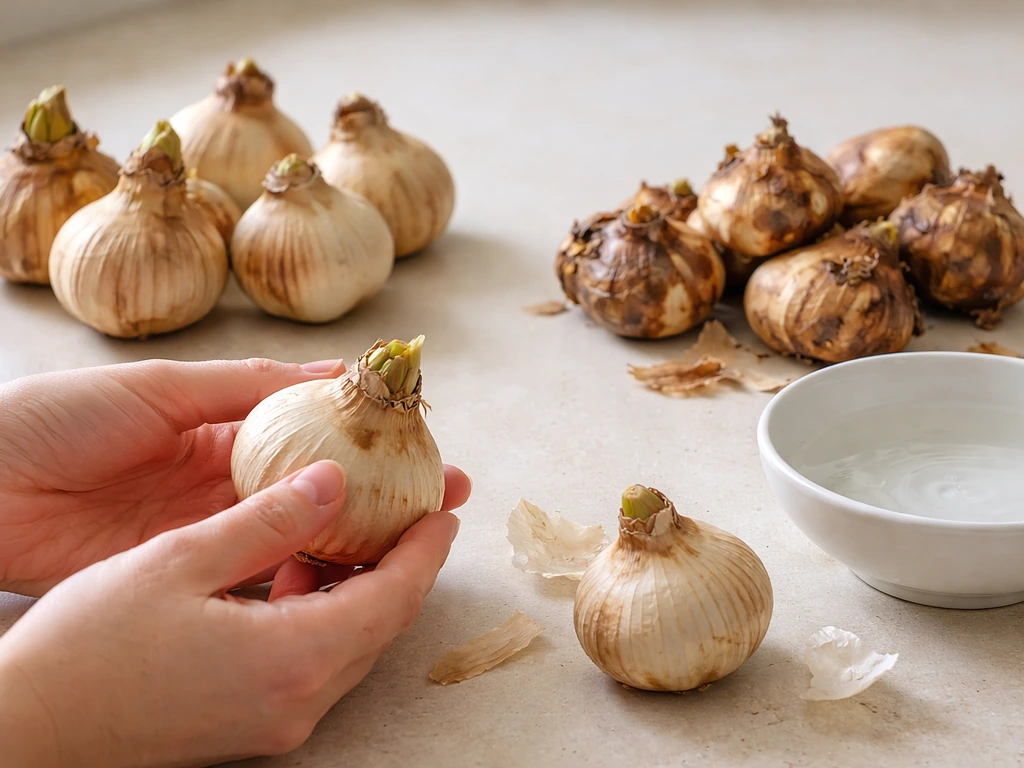
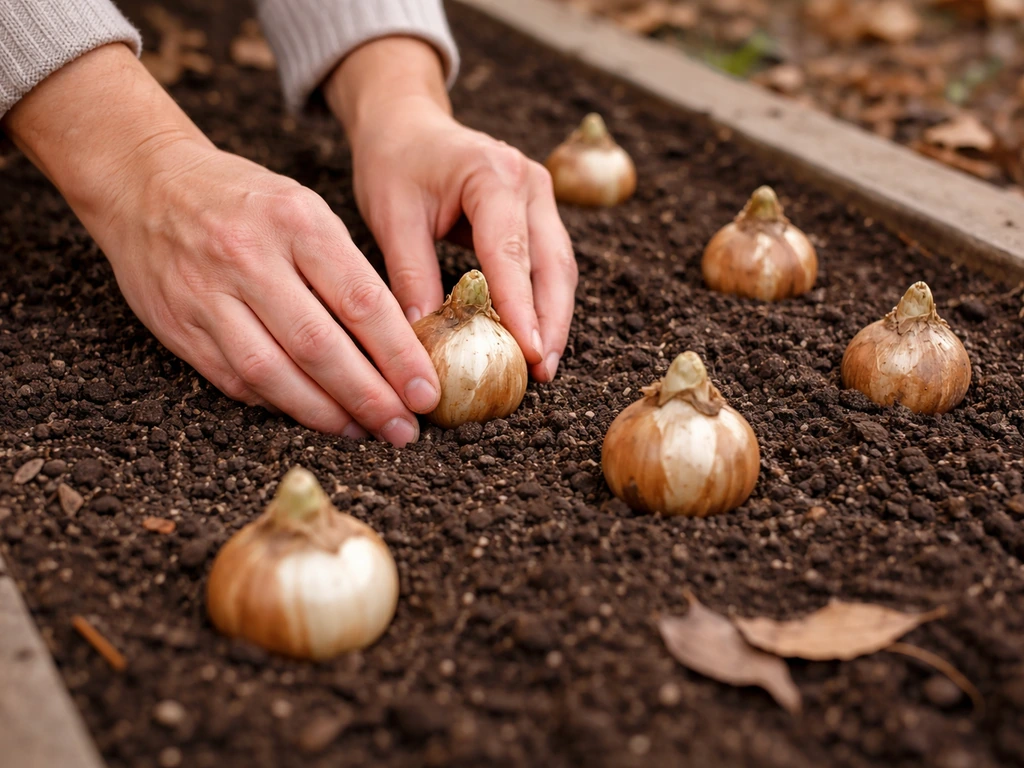
Start with the biggest bulbs you can find. Larger paperwhite bulbs consistently produce more flower stalks, which means a fuller, showier display per planting hole. When you're buying in bulk or from a bin, don't just grab whatever's on top. Pick them up and feel them.
Any bulb that feels soft, squishy, or hollow is already compromised. That softness is typically a sign of basal rot, usually caused by Fusarium fungus, and it will only get worse once the bulb is in the ground. A rotting bulb won't bloom and can spread decay to neighboring bulbs, so skip it. What you want is a bulb that feels firm and dense, with dry, papery outer skin and no visible mold or mushy spots at the base.
If you're using bulbs you stored from a previous season in a mild climate, inspect them the same way before replanting. Lay them out in a single layer in a cool, dry spot for a few days before planting if they've been in storage, just to make sure any surface moisture is gone before they go into the soil.
Best outdoor location: sun, microclimate, and wind protection
Paperwhites want full sun outdoors, ideally six or more hours of direct light per day. If you are specifically wondering where to grow cyclamen, match its needs for bright, indirect light and protection from hot afternoon sun to your garden’s microclimate full sun outdoors. This is non-negotiable if you want strong, upright stems. Low light is one of the primary reasons paperwhites get leggy and floppy, and the problem is much worse outdoors in a shady spot than it would be on a bright windowsill. Find the sunniest part of your garden that still has some protection from harsh afternoon wind.
Microclimate matters more than people expect. If you want to learn the full process for cyclamen specifically, follow a dedicated guide to how to grow cyclamen outdoors microclimate matters more than people expect. A bed along a south-facing wall, for instance, traps warmth and reflects light, which can push your paperwhites to bloom a few weeks earlier. In cooler zones where you're borderline for outdoor planting, that kind of protected microclimate can make the difference between bulbs that survive a cold snap and ones that don't. Walls, fences, and dense shrubs on the windward side all help moderate temperature swings and reduce desiccating winds that stress the foliage.
Avoid low-lying areas in your garden where cold air pools on frosty nights. Even in zone 8 or 9, a frost pocket can drop temperatures several degrees below what the surrounding area experiences. If your garden has a slight slope, plant paperwhites on the upper portion rather than the bottom.
Soil and drainage requirements (how to avoid rot)
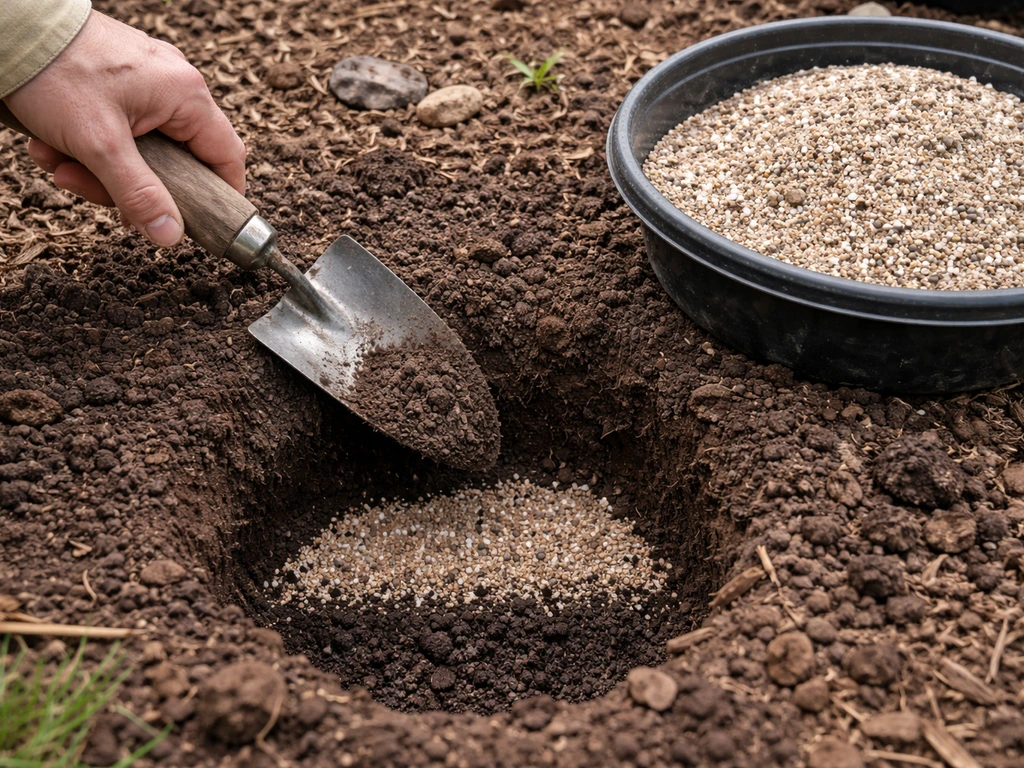
Drainage is the single most important soil factor for paperwhites outdoors. These bulbs will rot quickly in waterlogged conditions, and that rot typically starts at the base of the bulb where it contacts consistently wet soil. If your garden beds have heavy clay or stay soggy after rain, address that before you put a single bulb in the ground.
The fix is straightforward: work in generous amounts of coarse sand, perlite, or grit to break up clay and improve drainage. A good outdoor mix for paperwhites is roughly two parts native soil to one part coarse sand or fine grit. You want soil that drains freely within an hour or two of heavy rain rather than holding puddles. Paperwhites also prefer a slightly alkaline to neutral pH, somewhere in the range of 6.0 to 7.5, which is typical of most garden soils without amendment.
Raised beds are an excellent option if your native soil is problematic. Even a four-to-six-inch raised bed filled with a well-draining mix gives you meaningful control over moisture, and the slightly elevated position means roots are less likely to sit in water after heavy rain. If you're growing in containers outdoors, use a well-draining potting mix and make sure your pots have adequate drainage holes. Never let outdoor containers sit in saucers full of water during the growing season.
Planting timing and how deep to plant
In mild climates (zones 8 through 11), plant paperwhites outdoors in fall, typically from October through early December. This gives the bulbs time to establish roots before cooler winter temperatures trigger blooming, and you'll generally see flowers in late winter, often January through March. The goal is to get roots established before any cold snaps arrive, not to rush foliage growth.
In colder zones where you're treating paperwhites as seasonal or container plants, the timing shifts. You can plant them in fall in containers and bring those containers to a sheltered spot or indoors when frost threatens, or wait until after your last frost date in spring and enjoy them as a warm-season outdoor display before the next fall cold arrives. Just know that spring-planted bulbs won't have the same late-winter bloom timing as fall-planted ones in warmer zones.
Planting depth recommendations vary slightly by source, but a practical target for outdoor planting is 3 to 6 inches deep, measured from the base of the bulb. Gardening Know How recommends digging holes about 3 to 4 inches deep when planting paperwhites outdoors 3 to 6 inches deep. Shallower planting (around 3 to 4 inches) works well in very well-drained sandy soils or in mild climates where the soil stays loose. Deeper planting of around 5 to 6 inches gives better anchorage and more insulation in cooler or heavier soils. When in doubt, splitting the difference at about 4 to 5 inches is a safe call for most garden situations.
For spacing, plant tighter than you think you need to. About 3 inches apart in the garden (or as close as 1 inch in a container display) gives you the clustered, dense look that paperwhites are known for, and the tighter grouping actually helps the stems support each other. Spread them out too far and each stem has to stand alone, which increases the chance of flopping.
Outdoor watering and feeding schedule
Water paperwhites at planting to settle the soil around the bulbs, then hold back until you see active green growth emerging. Once shoots are up and growing, water when the top 2 inches of soil are dry. In practice, this usually means watering every 5 to 7 days during dry stretches in fall and winter, but you'll need to adjust based on your rainfall and how quickly your soil drains. In mild climates with regular winter rain, you may barely need to water at all.
The number one watering mistake is overwatering before growth appears. Sitting moisture around dormant bulbs in the early weeks after planting is exactly when rot sets in, especially if soil temperatures are still warm from summer. Plant, water once, and then leave them alone until shoots emerge.
For feeding, paperwhites are light feeders and don't need heavy fertilizing. A single application of a balanced slow-release bulb fertilizer (something like 5-10-10 or similar low-nitrogen formula) worked into the soil at planting time is usually enough. High-nitrogen fertilizers encourage lush foliage at the expense of flowers and make the legginess problem worse. If you want to feed during active growth, a diluted liquid fertilizer at half strength once during the growing season is plenty.
Temperature, frost handling, and preventing leggy growth
Protecting from frost
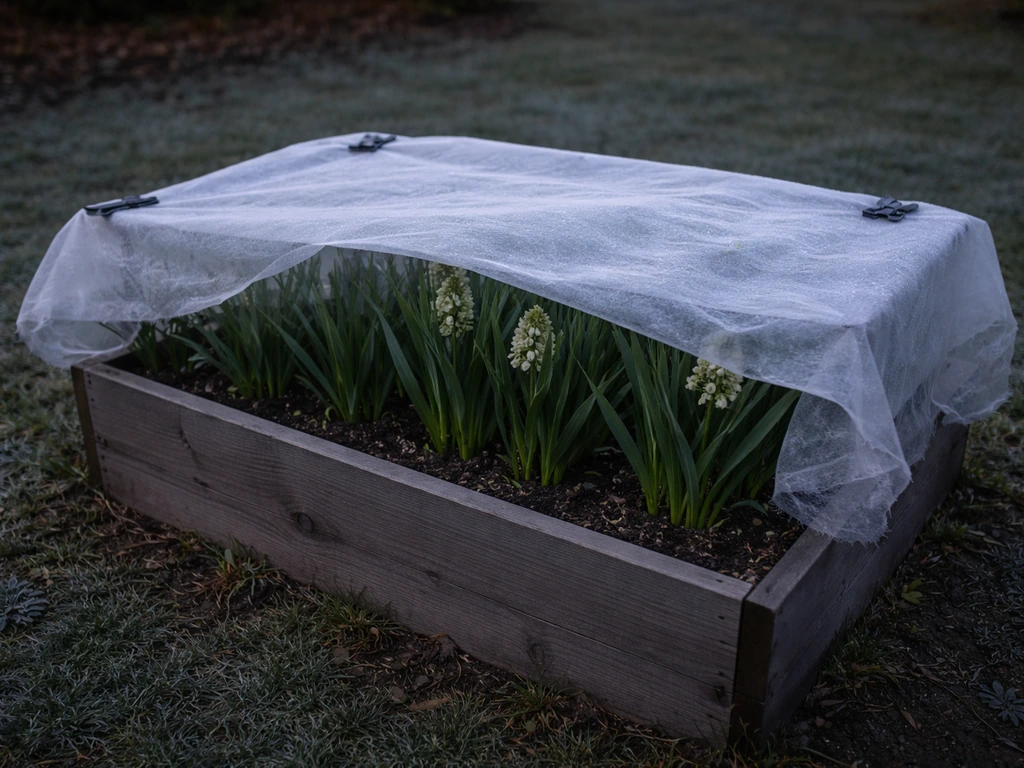
If an unexpected frost is forecast and your paperwhites are already sending up foliage, cover them with a frost cloth or even an old bedsheet overnight. A single hard frost can damage tender foliage and set the whole plant back. In zone 8 where light frosts are occasional rather than sustained, this kind of temporary protection is usually enough to carry the plants through without permanent damage.
Container-grown paperwhites outdoors have an obvious advantage here: you can simply move them to a sheltered spot, a covered porch, or indoors for the night when temperatures threaten to dip below 28 to 30 degrees Fahrenheit. Don't wait until the last minute, because cold-shocked foliage that has already been exposed to a sudden sharp freeze tends to turn mushy and won't recover well.
Dealing with leggy, floppy stems
Leggy paperwhites are almost always the result of too little light combined with too much warmth, especially during early growth. If your bulbs are pushing up fast, pale, stretched stems, those stems will flop once flowers open and the weight increases. Outdoors, the fix is placement: make sure the bed or container gets that full sun exposure. Outdoors, strong light and the right temperature balance are key for staying upright, and you can use the same kind of outdoor-care mindset when learning how to grow caladiums outside. Shady spots, even partially shady spots, will produce weaker stems every time.
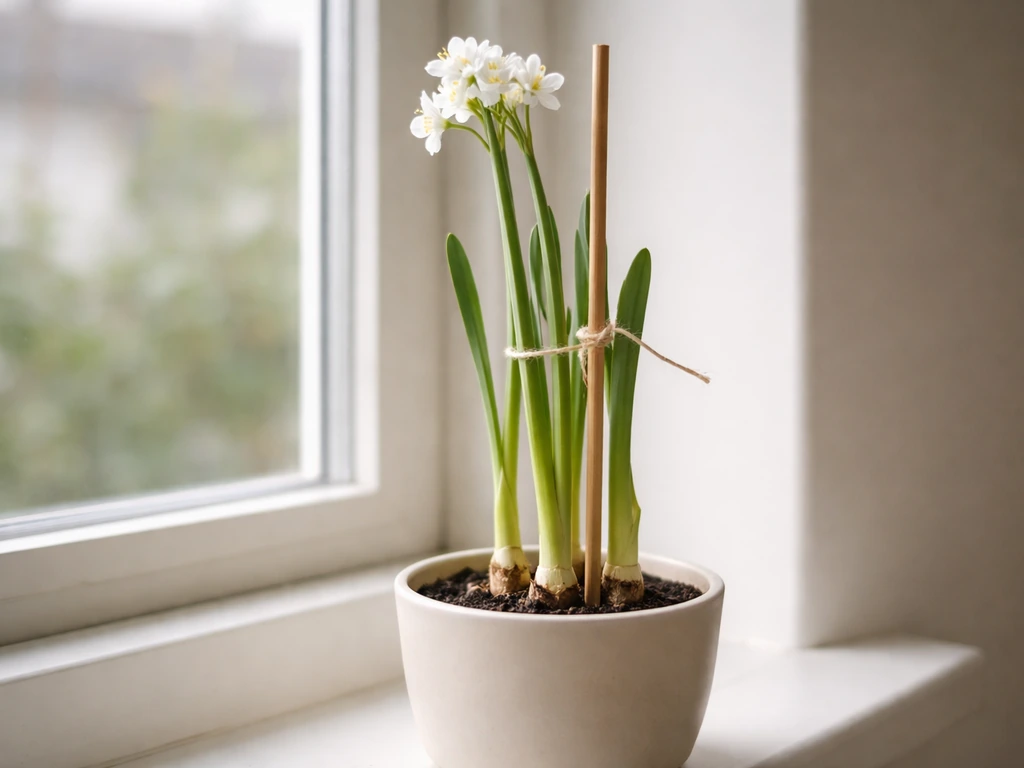
If stems are already getting tall and you're worried about flopping, staking is a practical solution. Use thin bamboo stakes placed around the outside of the cluster with twine looped loosely around the group, like a gentle corral. This is more discreet than staking individual stems and looks better in the garden. Another option for containers is to plant tightly enough that the stems lean on each other for mutual support.
One thing that's often overlooked: cooler nighttime temperatures actually help. If your paperwhites are in a warm, sheltered microclimate, they may grow faster than they would in open ground, and fast growth tends to mean weaker stems. If legginess is a persistent problem, try a slightly more open, exposed position with maximum sun and just enough wind protection to prevent physical damage to flowers.
How long until they bloom outdoors
Expect roughly 4 to 6 weeks from outdoor planting to first bloom in mild weather. Cooler conditions slow that down a bit; warmer conditions speed it up. The tradeoff is that faster growth in warm conditions often means shorter-lived blooms and leggier plants, so a slightly cooler, slower timeline often produces a better display.
After blooming: what to do next
Once flowers are spent, cut off the flower heads but leave the foliage completely intact. The leaves are still photosynthesizing and sending energy back into the bulb, and cutting them down early shortchanges the bulb's ability to store reserves for next season. Let the foliage yellow and die back naturally, then remove it cleanly. This usually takes 6 to 8 weeks after bloom.
If you're in a mild climate (zones 8–11)
Leave the bulbs in the ground. They'll go dormant over summer, which is natural for a Mediterranean bulb that expects dry summers. During dormancy, reduce or stop supplemental watering entirely. They don't need it. Mark where they're planted so you don't accidentally dig into them, and they should return the following fall to bloom again. If you are growing anthuriums outdoors, you will need to match their warmth and humidity needs, since they do not tolerate freezing weather like many hardy bulbs do. Over time, paperwhite clumps naturalize and can multiply into impressive drifts.
If you're in a colder climate (zones 7 and below)
Once foliage has yellowed and died back, you have two options: lift the bulbs or let them go and start fresh next season. If you want to save them, dig the bulbs carefully, brush off soil, and let them dry in a shaded, well-ventilated spot for a week or two. Store them in a mesh bag or paper bag (never plastic, which traps moisture) in a cool, dry location around 50 to 60 degrees Fahrenheit until fall planting time. Discard any that develop soft spots during storage.
Honestly, many gardeners in colder zones simply treat paperwhites as an annual and buy fresh bulbs each fall. Fresh, commercially-prepared bulbs often bloom more reliably than stored ones, and the cost is low enough that replanting makes more practical sense than the effort of lifting, storing, and monitoring bulbs through a hot summer. It's not a failure to start fresh, it's just efficient gardening.
Planning your next outdoor cycle is straightforward once you've been through it once. In mild climates, mark your calendar for October planting and late winter bloom. In colder areas, decide each fall whether you're going the container route with stored or new bulbs, or whether you'll plant a fresh batch directly into the ground to enjoy for the season. If you've enjoyed growing other tender bulbs outside, the approach is similar to what you'd use for caladiums or bromeliads in borderline zones: know your frost dates, protect when needed, and decide each year based on the bulbs you have on hand.
FAQ
How can I tell if my paperwhites outdoors are planted deep enough or too shallow for my soil?
Do a quick check one or two weeks after planting, look for the first signs of green growth. If shoots appear very early and plants look stressed or tip over quickly, you likely went too shallow (less insulation). If nothing appears after the usual establishment period, you may have planted too deep or in overly wet soil, then re-evaluate drainage around the planting spot rather than disturbing the bulbs immediately.
What should I do if I see mold on the soil surface or around the base after planting?
Surface mold usually points to persistent moisture and poor airflow. Stop watering until shoots emerge, improve airflow around the bed (avoid heavy mulch right over the planting zone), and if the soil stays soggy after rain, incorporate more coarse sand, grit, or switch to a raised bed next cycle to prevent basal rot.
Can I grow paperwhites outdoors in raised beds if I’m worried about clay soil?
Yes, raised beds are one of the best fixes. Aim for a well-draining bulb mix and keep the bed height at least 4 to 6 inches. Also, do not compact the mix when planting, compacted soil reduces drainage and increases rot risk even in raised beds.
Do paperwhites need fertilizer beyond the initial bulb feed?
Usually no. If you already used a low-nitrogen slow-release bulb fertilizer at planting, additional feeding is rarely necessary. If you do feed during active growth, use a diluted liquid fertilizer at half strength only once, because frequent feeding with higher nitrogen can reduce flower quality and encourage flopping.
Why are my paperwhites flowering but the blooms are small or short-lived outdoors?
Small or short-lived flowers often come from fast, warm growth. Try maximizing direct sun, avoid extra warmth from overly sheltered spots, and ensure you are not overwatering during the dormant-to-shoot stage. Also, larger bulbs generally give stronger flower stalks, so prioritize big, firm bulbs for better display.
How do I prevent paperwhites from flopping when they start to grow?
Staking works best before flowers fully open. If you wait until stems are already heavy, flowers may lean and never fully recover. Use a gentle circular support (bamboo stakes and loose twine) or plant tightly so stems provide mutual support, and keep them in the sunniest spot you have.
Is it okay to cut the leaves after blooming to make the bed look tidy?
No, cut the spent flower heads but leave foliage until it yellows and dies back naturally. The leaves refill the bulb’s reserves for next year, so removing them early reduces bloom quality or prevents reblooming entirely.
What’s the best way to handle paperwhites after a frost hits the leaves?
If the frost is light and temporary, cover overnight and uncover in the morning. If foliage turns mushy or collapses, you can leave it in place until the plant fully stops progressing, then remove it once it has clearly died back, since forcing removal immediately can stress the bulb during recovery.
Should I lift and store bulbs in zone 7, even if I use mulch?
If you get hard freezes, plan to lift. Mulch can buffer temperatures but it cannot reliably prevent lethal deep-freeze damage in every winter. In borderline winters, you can test on a small patch first, lift any bulbs that did not rebloom, and rely on containers as the backup option.
Can I keep paperwhites in containers outdoors year-round?
Not safely for most climates. In mild zones you can sometimes leave containers outdoors, but in colder areas you need to move them to a sheltered location or indoors before temperatures drop near freezing. Also, do not let pots sit in saucers with water, ensure drainage, and avoid letting the container freeze solid while soil remains wet.
How do I water paperwhites in rainy climates so I don’t cause rot?
Let rainfall do the work, but watch for long periods where the soil stays saturated. After planting, you can water once to settle soil, then avoid additional watering until shoots appear. If your area has frequent heavy rain, prioritize drainage amendments or raised beds, because controlling watering by hand is harder during extended storms.
Can I plant paperwhites at the wrong time of year and still get blooms?
You can sometimes adjust, but timing affects both reliability and bloom window. Fall planting in mild climates supports late-winter flowering, while spring planting usually produces blooms later and can shift the overall cycle. If you must spring-plant, expect a different schedule than your neighbors who planted in fall, and be extra strict about sun and drainage to support weaker development.