
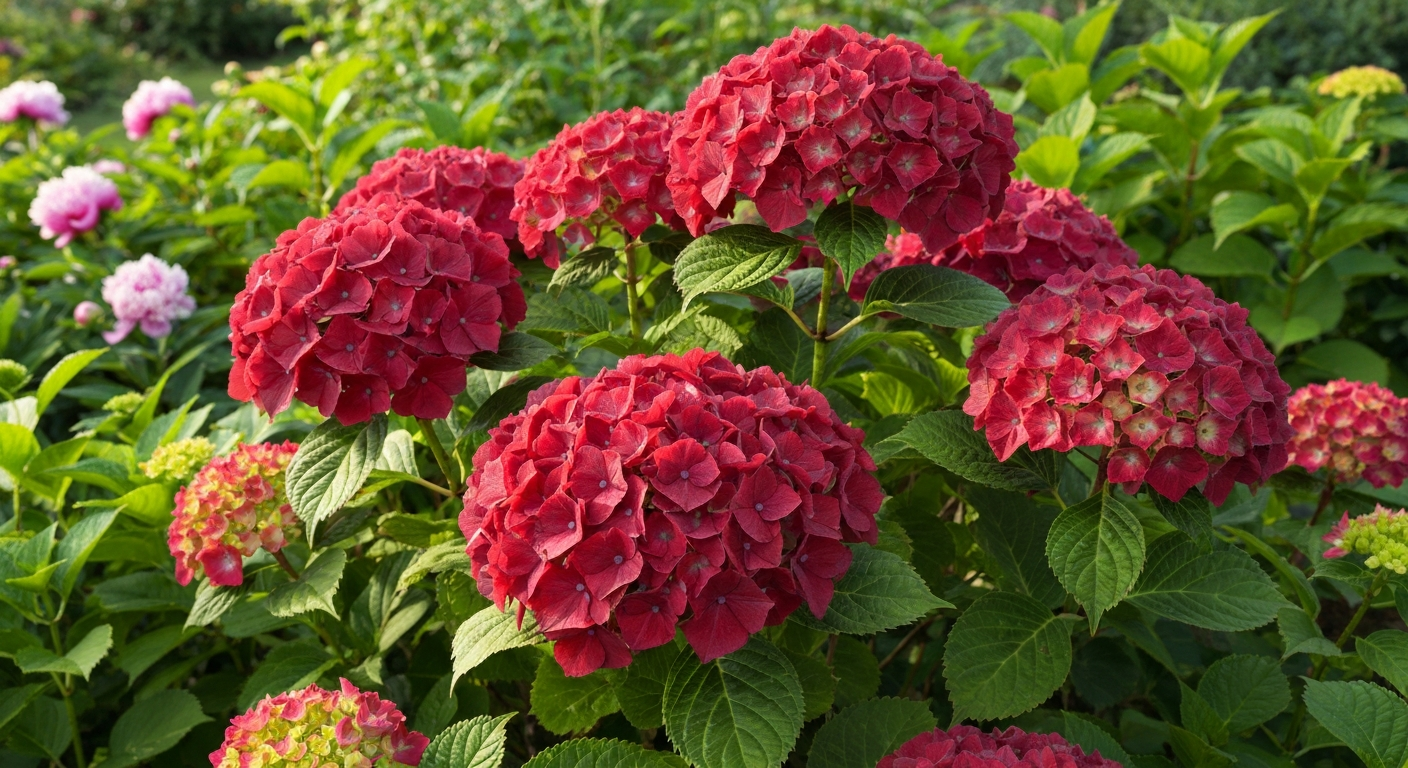
Growing red hydrangeas is absolutely possible, but you need to go in with realistic expectations: true scarlet-red is rare, and what most gardeners mean by 'red' is a deep, saturated crimson-pink or burgundy. The color you get depends partly on the cultivar you choose and partly on your soil chemistry, and those two factors work together in ways that trip up a lot of first-time hydrangea growers. Pick the right variety, get your soil pH into the correct range, and you can have reliably rich reddish blooms every season.
How to Grow Red Hydrangeas: Complete Guide for Home Gardeners
Marcus Holloway
24 Jul 2026
This guide is for home gardeners at every skill level who want to grow red or deep-pink hydrangeas and understand exactly why color changes happen and how to control them. Whether you're planting your first shrub or troubleshooting a plant that keeps going lavender when you want burgundy, you'll find step-by-step instructions, cultivar recommendations, safe amendment rates, and a seasonal checklist to keep things on track.
Quick-start checklist before you plant
- Choose a red-capable cultivar: 'Merveille Sanguine', 'Leuchtfeuer', Endless Summer Blushing Bride (pushed pink), or 'Tuxedo Red' are good starting points.
- Test your soil pH before doing anything else. Target pH 6.5 or higher for the deepest pink-red tones in bigleaf hydrangeas.
- If your soil tests below 6.0, apply agricultural limestone at rates from a soil-test report and retest in 3 to 6 months.
- Plant in morning sun with afternoon shade in USDA zones 5 to 9, with spacing of 3 to 5 feet depending on mature cultivar size.
- Water deeply once or twice a week (roughly 1 inch per week), more during the first season and during heat stress.
- Feed with a low-phosphorus fertilizer in spring and again in midsummer to avoid suppressing aluminum exchange.
- Prune old-wood bloomers right after flowering ends; prune reblooming types lightly in early spring only.
- Mulch 2 to 3 inches deep to conserve moisture and buffer soil temperature.
- Overwinter sensitive cultivars with extra mulch mounding or burlap wrap in zones 5 and 6.
Why hydrangea flowers change color: genetics versus soil chemistry
Hydrangea color is not magic and it's not entirely within your control, which is something gardening content often glosses over. The actual mechanism comes down to a metalloanthocyanin complex inside the sepal cells. Bigleaf hydrangeas (Hydrangea macrophylla) produce an anthocyanin called delphinidin-3-glucoside. When aluminum ions (Al3+) bind to that anthocyanin along with certain copigments, specifically caffeoyl- and p-coumaroylquinic acids, the complex absorbs light differently and you see blue. Experimental and molecular studies in that paper confirm aluminum (Al3+) uptake and transport into sepal tissues is essential for blueing; Al concentration, copigments and vacuolar chemistry together set the color, Al availability (not just pH) is the proximate agent See Direct mapping of hydrangea blue-complex in sepal tissues of Hydrangea macrophylla - PubMed for experimental confirmation that Al3+ uptake and transport into sepal tissues is essential for blueing.. When aluminum is absent or low, the same anthocyanin without that metal chelation shows up as pink or red.
Soil pH is what controls how much aluminum is available to the plant. Acidic soils (roughly pH 5.5 and below) keep aluminum soluble and available for uptake, which pushes flowers toward blue. At pH 6.5 and above, aluminum becomes largely insoluble and unavailable, so the plant can't form the blue complex and flowers express pink, red, or magenta tones instead. The range between roughly 5.5 and 6.5 produces mixed or purple results because aluminum availability is partial. That's the chemistry in plain language, and it's why the same plant in your garden and your neighbor's can look completely different.
Here's the important caveat: timing matters. Research confirms that aluminum must reach the developing buds while pigments are actively forming, typically in late winter through early spring. If you apply amendments late, after the flowers have already begun to color up, you will not change that season's blooms. You're always working at least one season ahead.
Genetics set the ceiling on what soil chemistry can do. Not every hydrangea species can change color at all. Only bigleaf (H. macrophylla) and mountain hydrangeas (H. serrata) have the right anthocyanin-copigment profile and the aluminum transporters needed to pull off this trick. Panicle hydrangeas (H. paniculata), oakleaf (H. quercifolia), smooth (H. arborescens), and white-flowering types are essentially non-responsive, meaning no amount of soil amendment will turn them blue or deepen their pink. Within the responsive species, individual cultivars also vary significantly in how readily they shift and how far toward red or blue they naturally sit.
Which species and cultivars actually produce red tones
For genuine red or deep crimson-pink blooms, you want bigleaf hydrangeas with cultivars that sit naturally on the red-pink end of the color spectrum and are either less responsive to aluminum or are bred to stay red even in moderately acidic soils. Mountain hydrangeas (H. serrata) also offer some excellent red-toned selections. Panicle types like Vanilla Strawberry do develop strawberry-pink and rosy-red tones as they age through the season, but that color comes from the natural maturation of the bloom, not from soil manipulation, and it's worth understanding the difference before you plant.
The short version: if you want deep, stable red tones with minimal fuss, choose a cultivar bred for that color rather than trying to use soil chemistry to push a general-purpose variety into the red zone. Soil management is a supporting tool, not a substitute for cultivar selection.
Cultivar recommendations: which varieties to actually grow
Best bets for deep red and crimson tones
- 'Merveille Sanguine' (also sold as 'Brunette'): This is probably the most reliably documented red-toned bigleaf hydrangea available. The RHS recognizes it for its deep wine-red to burgundy sepals, and it holds that color even in moderately acidic soils that would push most cultivars toward pink or purple. A personal favorite for gardeners who want drama without constant soil fussing.
- 'Leuchtfeuer' (meaning 'lighthouse' in German): Another strong red-leaning cultivar with deep crimson-red lacecap blooms. It's less widely distributed than Merveille Sanguine but worth seeking out through specialty nurseries. Documented in cultivar and trial literature as producing good red intensity.
- 'Tuxedo Red': A modern commercial introduction marketed specifically for red flower color. Less trial data than the older European cultivars, but nursery and grower reports support its red-toned bloom.
- 'Burgundy Lace': A lacecap type with deep burgundy-pink tones. The lacy flower head gives it a lighter, more delicate look than mophead types, which can be an asset in mixed borders.
- 'Teller Red' and the Teller series: Swiss-bred lacecap series with several red and deep-pink selections. 'Teller Red' specifically is listed in cultivar notes as a deep-pink to reddish variety.
Endless Summer types: reblooming and color-flexible
The Endless Summer series from Bailey Nurseries deserves its own section because these are among the most widely sold hydrangeas in North America and a lot of gardeners come to the red hydrangea question through them. Endless Summer cultivars are remontant bigleaf hydrangeas, meaning they rebloom on both old and new wood, which gives them a much longer flowering season than traditional H. macrophylla. They are pH-responsive, so their color is genuinely adjustable via soil management. Most Endless Summer types sit in the pink-to-blue range depending on soil aluminum availability. You can push them toward deep pink and magenta by keeping soil pH at or above 6.5, but you're unlikely to get true crimson-red from the standard 'The Original' variety.
That said, the reblooming habit is a huge practical advantage. If you're in zone 5 or 6 where late frosts can kill old wood and wipe out a single-season bloomer's entire flower set, Endless Summer types give you insurance. For red color combined with reblooming reliability, your best strategy is to pair an Endless Summer variety with good pH management (keeping soil above 6.5) for the richest possible pink tones, and consider planting a confirmed red cultivar like Merveille Sanguine alongside it for true depth of color. Growing Endless Summer hydrangeas well is its own topic worth a deeper read if you're committed to that series. For detailed care instructions, see how to grow Endless Summer hydrangea.
Vanilla Strawberry: panicle type with seasonal red tones
Vanilla Strawberry (H. paniculata 'Renhy') earns its name: the flowers open creamy white, then age to pink and eventually a strawberry-red or rosy-red by late summer. This color transition is entirely genetic and seasonal, not pH-driven, because panicle hydrangeas don't respond to aluminum chemistry at all. The advantage of Vanilla Strawberry is that it's significantly tougher and more heat-tolerant than bigleaf types, hardy to zone 3, and easier to site in full sun. The trade-off is that the red color appears gradually and is most intense in late summer rather than at peak bloom. If you want red across a long season with low maintenance, Vanilla Strawberry is an excellent choice, and it looks spectacular in late July and August when the bicolor effect is in full swing.
Comparison: red-capable hydrangea varieties at a glance
| Cultivar | Type | Peak bloom time | Color at maturity | Color stability | USDA hardiness zones | pH-responsive? |
|---|---|---|---|---|---|---|
| 'Merveille Sanguine' | H. macrophylla (mophead) | Mid to late summer | Deep burgundy-red | High (holds red even in mod. acid soil) | Zones 6–9 | Partially (low Al response) |
| 'Leuchtfeuer' | H. macrophylla (lacecap) | Mid to late summer | Crimson-red | Moderate-High | Zones 6–9 | Partially |
| 'Tuxedo Red' | H. macrophylla (mophead) | Mid summer | Deep red-pink | Moderate | Zones 6–9 | Partially |
| Endless Summer 'The Original' | H. macrophylla (mophead, remontant) | Early summer to fall | Pink to blue (pH dependent) | Variable (pH-driven) | Zones 4–9 | Yes (fully responsive) |
| Vanilla Strawberry ('Renhy') | H. paniculata | Late summer to fall | White aging to strawberry-red | High (genetic, not pH) | Zones 3–8 | No |
| 'Burgundy Lace' | H. macrophylla (lacecap) | Mid to late summer | Burgundy-pink | Moderate | Zones 6–9 | Partially |
| 'Teller Red' | H. macrophylla (lacecap) | Mid summer | Deep pink to reddish | Moderate | Zones 6–9 | Partially |
Red versus blue and purple hydrangeas: which way should you go?
This is the question I hear most often, and the honest answer is that the decision should start with cultivar genetics, not soil amendment plans. A cultivar like 'Nikko Blue' is a classic fully pH-responsive bigleaf hydrangea: given acidic soil with available aluminum, it will reliably go deep blue. Trying to grow Nikko Blue and push it toward red means fighting its natural genetic tendency, and you'll likely end up with a muddy purple rather than a clean red. That's exactly the wrong direction to work from. If you want blue or purple tones, Nikko Blue and similar cultivars are a much better fit than attempting to redirect a red-toned variety. Growing Nikko Blue hydrangea and growing purple hydrangeas are their own separate considerations, and the cultivar choices for those goals are genuinely different from what works for red.
Use this decision framework: if your existing plant is producing blue or purple blooms and you want to keep that direction, lower soil pH to 5.5 or below and use a low-phosphorus fertilizer to maximize aluminum availability. If you want pink or red, raise pH to 6.5 or above, and more importantly, start with a cultivar that has a genetic tendency toward red. If you're buying new plants specifically for red color, skip the pH manipulation entirely as your primary strategy and simply select the right cultivar for a reliably red result.
| Goal | Best cultivar approach | Soil pH target | Aluminum management |
|---|---|---|---|
| Deep blue blooms | Choose fully responsive cultivar (e.g., 'Nikko Blue') | ≤5.5 | Maximize availability: low-P fertilizer, possibly Al sulfate drench |
| Purple or mixed tones | Responsive cultivar, partial amendment | 5.5–6.5 | Partial availability |
| Pink to magenta | Responsive cultivar at high pH OR pink-stable cultivar | ≥6.5 | Minimize: lime, avoid Al sulfate |
| Deep red to crimson | Red-stable cultivar ('Merveille Sanguine', 'Leuchtfeuer') | ≥6.5 ideally | Keep aluminum low; cultivar does the heavy lifting |
| Seasonal red (white-to-red fade) | H. paniculata (e.g., Vanilla Strawberry) | Not applicable | Not applicable |
Choosing a site, understanding your zone, and planting timing
Sun, shade, and spacing
Most bigleaf hydrangeas, including the red-toned cultivars, perform best in morning sun with afternoon shade, especially in zones 7 and warmer. Full afternoon sun in hot climates causes wilting, bleached blooms, and faster color fading. In zones 5 and 6, more sun exposure is tolerable and can actually help the plant set buds, but you'll still want protection from harsh western sun. Aim for 4 to 6 hours of direct sun, ideally in the morning. Panicle types like Vanilla Strawberry are the exception: they handle and even prefer full sun (6 or more hours) and are generally tougher about heat.
For spacing, most bigleaf hydrangea cultivars reach 3 to 5 feet wide at maturity, so plant them 3 to 5 feet apart from center to center. Panicle types can get considerably larger (Vanilla Strawberry often reaches 6 to 7 feet), so give those 5 to 6 feet of space. Crowding hydrangeas is one of the most common beginner mistakes: tight spacing increases humidity around the foliage, inviting fungal problems, and creates competition for soil nutrients.
USDA zone guidance
Bigleaf hydrangeas are reliably hardy in USDA zones 6 to 9. In zone 5, they can survive winter but old wood (which carries next season's buds on non-remontant types) is vulnerable to late frost damage. That's why remontant types like Endless Summer are particularly valuable in zones 5 and 6: they bloom on new wood produced the same season, so a hard winter doesn't wipe out the entire flower set. In zones 8 and 9, the challenge shifts to heat and drought stress rather than cold. Panicle types (Vanilla Strawberry) are hardy to zone 3 and are a strong choice for northern gardeners who keep losing bigleaf bloom to frost.
When to plant
Spring planting is ideal in most zones: plant after the last frost date, when soil has warmed, giving the plant a full growing season to establish before winter. Fall planting (6 weeks before your first expected frost) also works well for bigleaf types because cooler temperatures reduce transplant stress and plants can root without having to support active top growth. Avoid planting in midsummer heat unless you can water daily and provide shade cloth for the first few weeks. Container-grown plants can technically go in the ground almost any time, but spring and early fall give the best survival rates with the least intervention.
Soil preparation and pH management
Test before you amend
I can't overstate this: do a soil test before applying any amendment. NC State Extension Gardener Handbook (soil testing & interpretation guidance, Chapter 13/related units) recommends testing soil pH and a nutrient panel before applying sulfur, lime, or aluminum sulfate and retesting 3–6 months after amendment because liming and acidifying soils can take months to equilibrate and buffering varies widely. A basic soil test from your cooperative extension service or a mail-in lab will give you your starting pH and nutrient levels, and that information tells you what you actually need to do, not just what the bag of lime or sulfur says to do in general terms. Guessing and applying amendments blindly is how people end up with compacted, mineral-imbalanced soil that produces poor results no matter what they plant. Test first, amend with purpose, and retest 3 to 6 months after any major amendment to see where you've landed.
Raising pH for red tones: using agricultural lime
To create the higher-pH, low-aluminum conditions that favor red and pink tones in bigleaf hydrangeas, you raise soil pH using agricultural limestone, either calcitic (calcium carbonate) or dolomitic (calcium-magnesium carbonate). Cornell Cooperative Extension provides standard application rate tables based on your starting pH and soil texture. As a general orientation: a sandy soil starting at pH 5.5 and targeting pH 6.5 might need around 5 to 7 lbs of lime per 100 square feet; a clay or loam soil starting at the same point might need 8 to 12 lbs or more because it has higher buffering capacity. These are ballpark figures only: get actual rates from your soil test report, which will be specific to your sample.
Incorporate lime into the top 6 to 8 inches of soil before planting if possible. For established plants, broadcast it evenly at the drip line and water it in well. Lime works slowly, taking several months to equilibrate, so ideally amend in fall for spring planting. Always retest before applying additional lime: over-liming to excessively high pH causes nutrient deficiencies, particularly iron and manganese chlorosis, and is harder to correct than low pH.
Lowering pH for blue tones: sulfur and aluminum sulfate
For gardeners trying to go the other direction and push hydrangeas toward blue (relevant if you're deciding between red and blue cultivar strategies), elemental sulfur is the recommended long-term method. NDSU Extension guidance calls for application and incorporation into the top 6 to 8 inches, with important cautions: don't exceed 0.5 lbs of sulfur per 100 square feet in a single application on lawns or around established plants, and expect the process to take months to years on clay or highly buffered soils. Elemental sulfur is converted to sulfuric acid by soil bacteria, so it works slowly but relatively durably.
Aluminum sulfate is the faster option for boosting aluminum availability directly. A commonly recommended rate from university extensions is 1 level tablespoon dissolved per gallon of water, applied as a soil drench at the root zone in early spring, repeated monthly while buds are developing. This works faster than sulfur but carries real risks: too much aluminum damages roots, and it creates only a temporary, localized pH drop. Extensions including NDSU and Mississippi State are explicit that you should not exceed label rates, that you should soil-test first, and that aluminum sulfate is a short-term tool rather than a foundation for color management. High soil phosphorus also blocks this from working well, because phosphorus binds aluminum and makes it unavailable to plants, which is why low-phosphorus fertilizers are recommended whenever you're trying to influence color through aluminum availability.
Watering and fertilizing schedules
How much water and when
Hydrangeas have a reputation as drama queens about water, and it's somewhat deserved. They wilt visibly in heat and drought, and bigleaf types are particularly sensitive. Aim for about 1 inch of water per week during the growing season, delivered deeply and infrequently rather than a light sprinkle every day. Deep watering encourages deeper root growth, which makes plants more drought-resilient. During the first growing season, water two to three times per week to help the plant establish. In summer heat or during dry spells, check soil moisture at 2 inches deep: if it's dry there, water thoroughly.
Morning watering is best for hydrangeas because it allows foliage to dry during the day, reducing fungal disease risk. Drip irrigation or soaker hoses at the root zone are ideal. If you use overhead sprinklers, try to run them early enough that leaves dry before evening. Mulching 2 to 3 inches deep with shredded bark or wood chips makes a significant difference in moisture retention between waterings.
Fertilizer timing and choices
For red-targeted hydrangeas, a balanced slow-release granular fertilizer with a low middle number (low phosphorus) applied in early spring as growth begins is a solid routine. A formula like 10-5-10 or similar works well. A second application in midsummer can support reblooming types through their second flush. Avoid fertilizing after August: late-season nitrogen pushes soft new growth that won't harden before frost and can increase winter dieback. High-phosphorus fertilizers (those with a high middle number, like a general-purpose 10-10-10 or a 'bloom booster' formula with something like 10-52-10) are counterproductive when you're trying to manage aluminum availability for color, because excess phosphorus binds aluminum in the soil and blocks uptake. Keep phosphorus inputs modest.
Pruning: when and how depends on your cultivar
Pruning hydrangeas incorrectly is one of the most reliable ways to lose a season of blooms, and I see it happen all the time when gardeners apply a one-size-fits-all approach. The key rule is to know whether your cultivar blooms on old wood (last year's stems) or new wood (current season's growth), because that determines everything about when and how hard to cut.
Pruning old-wood bloomers (most traditional bigleaf hydrangeas)
- Prune immediately after flowering ends, typically in mid to late summer, while the plant still has time to form next year's buds on new growth before fall.
- Remove only spent flower heads and any dead or crossing stems. Avoid hard cutting back to the base.
- Do not prune in fall, winter, or early spring: you will cut off the buds that contain next year's flowers.
- If you missed the window and it's fall or spring, skip pruning entirely that year rather than risk losing the bloom.
Pruning remontant (reblooming) types like Endless Summer
- Because these bloom on both old and new wood, they're more forgiving, but early spring is still the best pruning window.
- In early spring, remove any clearly dead stems down to the base. Cut back any stems that didn't survive winter.
- Lightly shape for size if needed, but avoid cutting into healthy old wood more than necessary.
- Deadhead spent flowers throughout the season to encourage repeat blooming.
Pruning panicle types (Vanilla Strawberry)
Panicle hydrangeas bloom on new wood only, so they're the most forgiving to prune. You can cut them back fairly hard in late winter or early spring before new growth starts, which encourages strong new shoots and large flower heads. Removing one-third to one-half of the previous year's growth is typical. Avoid cutting all the way to the ground unless the plant is very old and overgrown.
Overwintering: protecting blooms through cold months
In zones 6 and warmer, established bigleaf hydrangeas need minimal winter protection beyond a 3-inch layer of mulch over the root zone. In zones 5 and 6, protecting the stems (and the buds on those stems for old-wood bloomers) matters a lot. After hard frost has arrived and the plant is fully dormant, mound an additional 4 to 6 inches of mulch around the base of the plant. You can also wrap the stems loosely in burlap or use a wire cage filled with straw to insulate them. The goal is not to keep the plant warm, but to prevent the cycle of freezing and thawing that damages stem tissue and kills buds.
Remove winter protection in early spring once temperatures stabilize above freezing. Don't rush this: late frosts in zones 5 and 6 are a real threat to emerging buds. Wait until your average last frost date has passed before removing mulch and burlap fully. If a late frost threatens after you've removed protection, cover plants overnight with frost cloth or old bedsheets.
Growing red hydrangeas in containers
Container growing is a great option for gardeners who want more control over soil chemistry, since you can mix your own medium to the exact pH you want without fighting your native soil. Use a large pot (at least 15 to 20 gallons for most bigleaf cultivars) with excellent drainage. A mix of good-quality potting soil with added perlite and a small amount of bark for structure works well. To target pH 6.5 or above for red tones, start with a slightly alkaline potting mix and test the medium before planting.
Container plants dry out significantly faster than in-ground plants, especially in summer, so expect to water every day or every other day during hot weather. Check soil moisture at 2 inches deep as your trigger. Fertilize lightly every 3 to 4 weeks through the growing season with a diluted balanced, low-phosphorus fertilizer rather than heavy applications. In cold-winter zones, bring containers into an unheated garage or shed before hard freezes, as the root zone in a container has no insulating soil mass and will freeze solid much faster than in-ground roots.
Propagation: cuttings and layering
Stem cuttings (the most reliable method)
- Take cuttings in late spring to early summer from healthy, non-flowering stems. Look for stems with at least 2 to 3 sets of leaf nodes.
- Cut just below a node, making your cutting 4 to 6 inches long.
- Remove the lower leaves, leaving only the top one or two pairs. If the remaining leaves are large, cut them in half to reduce moisture loss.
- Dip the cut end in rooting hormone powder or gel.
- Insert into a small pot of moist perlite or a 50/50 mix of perlite and peat. Water in, then cover loosely with a plastic bag or clear dome to maintain humidity.
- Place in bright indirect light at 65 to 75°F. Avoid direct sun.
- Check for rooting in 3 to 5 weeks by gently tugging: resistance means roots have formed.
- Once rooted, gradually remove the humidity cover over a week to acclimate, then transplant to a larger pot or into the garden.
Layering (low-effort, high-success rate)
- In spring or early summer, select a long, flexible stem that can be bent to reach the ground.
- About 12 inches from the tip, wound the stem slightly by scraping off a small strip of bark on the underside.
- Dust the wounded area with rooting hormone.
- Bury that section of stem 3 to 4 inches deep in the soil, holding it in place with a U-shaped pin or small rock.
- Keep the buried section moist throughout the season.
- By late summer or fall, the buried section should have rooted. Sever the connection to the parent plant and dig up the new plant carefully.
- Pot it up or move it to its new location in the garden.
Seasonal care calendar
| Season | Tasks |
|---|---|
| Early spring (before growth) | Remove winter mulch/protection after last frost risk passes; inspect stems for winter kill; lightly prune dead wood; apply lime or sulfur if soil test indicates need; begin regular watering as temperatures rise |
| Mid-spring (growth active) | Apply slow-release granular fertilizer (low-P); begin aluminum sulfate drenches if targeting blue (blue-direction gardeners only); plant new shrubs after last frost; apply fresh 2–3 in. mulch layer |
| Early summer (budding and bloom) | Water consistently (1 in./week); deadhead spent flowers on remontant types; monitor for pests and powdery mildew; do not apply high-N or high-P fertilizer now |
| Mid to late summer (peak bloom / post-bloom) | Prune old-wood bloomers immediately after flowering; apply second fertilizer dose for remontant types; continue watering through heat; take stem cuttings for propagation |
| Fall (preparing for dormancy) | Stop fertilizing by early August; reduce watering gradually as temperatures cool; apply fall lime if pH adjustment is needed; mound extra mulch around base before hard frost; pot up container plants for storage if needed |
| Winter (dormancy) | Leave stems intact to protect buds (for old-wood types); maintain mulch layer; in zones 5–6, wrap with burlap or fill cage with straw; check and water container plants in storage if soil dries out completely |
Troubleshooting: what goes wrong and why
Flowers fading or losing red color
If your red-toned flowers are fading to pink, lavender, or an indeterminate mauve, check soil pH first. If it's drifted below 6.0, aluminum availability has increased and the plant may be partially forming the blue complex even in a 'red' cultivar. Apply lime to raise pH back toward 6.5. Also check that you're not using a high-phosphorus fertilizer, which can interfere with aluminum uptake. Flower color naturally fades in very hot, bright conditions as well, so adding afternoon shade during peak summer heat can help retain color intensity. Some fading at the end of the season is completely normal and not a sign of a problem.
No blooms or very few flowers
In old-wood bloomers, the most common cause is pruning at the wrong time or late-spring frost killing the buds. If you pruned in fall or spring and got no flowers the following summer, that's the likely culprit. Skip pruning for one full cycle and let the plant set buds undisturbed. For remontant types that still aren't blooming, check for excessive nitrogen fertilization (too much N pushes leaf growth at the expense of flowers) and verify the plant is getting enough light: fewer than 4 hours of sun reduces blooming significantly.
Wilting despite adequate water
Hydrangeas wilt dramatically in afternoon heat even when soil moisture is fine: this is a normal stress response that usually resolves by evening. If the plant is still wilted in the morning, water deeply immediately and check for soil compaction or root issues. Persistent wilting in morning is a sign of inadequate water, root damage from overwatering (which drowns roots), or root rot from poor drainage. Make sure your planting site drains well and that the root zone is not sitting in water after rain.
Powdery mildew and leaf spots
Powdery mildew shows up as white or grayish powder on leaf surfaces, typically in humid, crowded conditions with poor air circulation. Leaf spot diseases cause brown or circular lesions with yellow halos. Both are fungal. Prevention is better than treatment: space plants adequately for air movement, water at the base rather than overhead, and remove affected leaves promptly. Neem oil or copper-based fungicide sprays applied at the first sign of infection can slow spread. Severe repeated infections on a site that's too shaded or humid may indicate the plant needs to be moved.
Common pests
- Aphids: cluster on new growth and undersides of leaves. Knock off with a strong water spray or treat with insecticidal soap. Usually not serious.
- Spider mites: tiny pests causing stippled, bronzed leaf surfaces, worst in hot dry conditions. Increase humidity and use miticide sprays if severe.
- Japanese beetles: skeletonize leaves in midsummer. Hand-pick in the morning when they're sluggish, or use a registered insecticide. Avoid beetle bag traps, which attract more beetles to your yard.
- Slugs: chew irregular holes in leaves, mostly near the base of the plant in moist conditions. Iron phosphate slug bait is effective and low-risk.
FAQ
What determines hydrangea flower color — genetics or soil pH?
Both. For bigleaf (Hydrangea macrophylla) and mountain (H. serrata) the sepal color depends on anthocyanin pigments plus aluminum (Al3+) availability and vacuolar chemistry: aluminum chelates pigments to produce blue tones; low Al and different vacuolar conditions favor pink/red. Many other hydrangea species (panicle H. paniculata, oakleaf H. quercifolia, smooth H. arborescens and white cultivars) are effectively non‑responsive to soil pH because they lack the chemical/transport system to produce blue.
Which hydrangea species and cultivars can produce true red, pink or reddish tones reliably?
Red/pink tones are most achievable in bigleaf (H. macrophylla) and some H. serrata cultivars. Reliable red/pink‑tending cultivars include 'Merveille Sanguine' (aka 'Brunette'), 'Leuchtfeuer', 'Teller' series (e.g., 'Teller Red'), 'Tuxedo® Red' and some breeder selections. Endless Summer® series (reblooming H. macrophylla) can produce pink to red tones depending on cultivar and soil; 'Vanilla Strawberry' is another cultivar known for pink/red caps. Panicle, oakleaf and smooth hydrangeas are naturally pink/white or green and are not pH‑responsive (they are good choices if you want guaranteed pink/red regardless of soil). Always confirm color notes for the exact cultivar from RHS or the breeder.
Should I change my soil pH or pick a red‑capable cultivar?
If you want consistent red/pink with minimal soil work, choose inherently red/pink cultivars or non‑pH‑responsive species. If you already have a pH‑responsive bigleaf and want to shift color, altering soil chemistry can work — but note aluminum availability (not just pH) is the proximate agent, amendments take time, and results differ by cultivar and soil buffer capacity. For long‑term reliability, cultivar choice + proper care is the safest strategy.
How do I select the planting site and timing for red hydrangeas?
Site: part shade is ideal (morning sun + afternoon shade), protected from late‑day sun and strong winds; well‑drained, consistently moist soil high in organic matter. Timing: plant in spring after frost risk or in early fall (at least 6–8 weeks before first hard frost) so roots establish. Hardiness: check cultivar zone rating; many bigleaf varieties are hardy in USDA zones ~5–9 depending on selection.
How do I prepare soil and manage pH safely to favor pink/red flowers?
Stepwise method: 1) Soil test (pH + nutrient panel) before any changes. 2) If your goal is pink/red, raise pH toward ~6.5–7.0 using agricultural lime (calcitic or dolomitic) following extension lime‑rate tables matched to your soil texture and current pH; incorporate into top 6–8 in and re‑test in 3–6 months. 3) To avoid Al availability (which favors blue), keep phosphorus moderate/low (avoid high‑P fertilizers) and avoid aluminum sulfate drench unless aiming for blue. 4) If you must acidify for blue, elemental sulfur is the preferred slow, safer long‑term acidifier — apply according to extension tables, incorporate and re‑test pH months later. 5) Always follow soil‑test guidance and local extension tables rather than guessing rates. Example short‑term aluminum sulfate drench (for blue, not red): many extensions suggest ~1 level tablespoon aluminum sulfate per gallon of water applied to the root zone monthly while buds form; do not exceed label rates and soil test first because excessive Al can harm roots.
What are safe amendment rates and timing (general guidance)?
General safety guidance (use local extension tables for exact quantities): - Lime to raise pH: follow extension lime‑rate tables (lbs/100 ft²) by starting pH and soil texture; incorporate into top 6–8 in; re‑test in ~3–6 months. - Elemental sulfur to lower pH: acts slowly (months), rates and speed depend on texture; extensions provide lbs/100 ft² charts — don’t overapply and re‑test before repeating. - Aluminum sulfate drench (acidifies quickly + supplies Al): many university pages recommend dilute monthly drenches (example commonly cited: ~1 tbsp per gallon applied to root zone in spring), but because of root‑burn and accumulation risk, only use after testing and follow label/local extension advice. - Fertilizer: use low‑phosphorus fertilizer if you aim for blue; for pink/red this is less critical. Always soil‑test and follow extension/lab recommendations; avoid repeated large doses of metal salts.