A single detached hydrangea leaf, pulled from the plant and stuck in soil, almost certainly will not grow into a new plant. Unlike succulents or African violets, hydrangeas don't regenerate from a leaf alone. What actually works is a stem cutting that includes at least one leaf node, the small bump or joint on the stem where leaves attach and roots can develop. Once you understand that distinction, propagating hydrangeas becomes surprisingly straightforward, and you can reliably produce new, blooming plants from cuttings you take yourself.
How to Grow Hydrangeas from Leaves: Step by Step

Marcus Holloway
24 May 2026
Can you really grow hydrangeas from a leaf?
The honest answer is: not from a leaf alone. A bare leaf without any stem tissue attached has no meristematic cells, which are the cells responsible for producing roots. You can press a hydrangea leaf into the most perfect rooting mix in the world, mist it daily, and keep it in a humidity tent for weeks, and you'll end up with a slowly browning leaf and nothing else. This is one of the most common mistakes beginners make, often after seeing leaf propagation work beautifully for plants like sedums or begonias.
What does work is a stem cutting, specifically a softwood or semi-hardwood cutting that includes a short section of stem with at least one node. That node is where the magic happens. When conditions are right, those nodal cells differentiate into root tissue and push out new growth. If you've read about growing hydrangeas from stem cuttings elsewhere on this site, this is the same core technique. The 'leaf cutting' framing people search for is really just a stem cutting with one or two leaves attached, and that framing shift changes everything about how you approach the process.
Best time and materials to take hydrangea cuttings

Timing matters more than most guides let on. The ideal window for taking hydrangea cuttings is late spring through midsummer, roughly May through July in most of the US. During this period, new growth is actively pushing out and the stems are in their softwood phase: green, flexible, and full of the cellular energy needed to produce roots. I've had cuttings root in as little as one week in warm weather taken during this window. Wait until late summer or fall and you're working with harder, woodier stems that root more slowly and with less reliability.
Gather your materials before you cut anything. You want everything ready so the cutting spends as little time exposed to air as possible.
- Sharp, clean pruning shears or a clean knife (wiped with isopropyl alcohol)
- Small pots or a seed tray with drainage holes
- Damp vermiculite or a sterile potting mix (perlite blended with potting soil works well too)
- Rooting hormone powder or gel (optional but genuinely helpful)
- A clear plastic bag or a humidity dome
- A spray bottle filled with clean water
Rooting hormone isn't strictly required, but I'd call it a meaningful upgrade rather than a gimmick. Treating hydrangea cuttings with rooting hormone can improve rooting outcomes and root quality, and extension guidance recommends using it Rooting hormone isn't strictly required. It shortens rooting time noticeably, especially if your conditions aren't perfectly warm and humid. Use the powder or gel formulated for softwood cuttings, not the stronger concentration meant for hardwood.
How to prepare the cutting
Look for a non-flowering stem on your hydrangea. Stems with a bloom at the tip direct their energy into the flower, not root development, so they root poorly and often fail outright. You want a healthy, actively growing shoot that hasn't yet set a flower bud.
- Cut a stem about 5 to 6 inches long, making your cut just below a leaf node at the bottom. A clean, angled cut exposes more surface area for rooting.
- Strip off all leaves from the lower half of the cutting, leaving only one or two pairs of leaves at the top. Buried leaves rot quickly and invite fungal problems.
- If the remaining leaves are large (as they are on mophead or oakleaf varieties), cut each leaf in half crosswise. This reduces moisture loss and keeps the cutting from wilting before it can root.
- Dip the cut end into rooting hormone powder or gel, coating the bottom inch of stem and especially the nodes. Tap off any excess powder.
- Use a pencil or stick to poke a hole in your pre-moistened rooting medium before inserting the cutting. Pushing the cutting directly in can scrape off the hormone you just applied.
- Insert the cutting so at least one node is buried below the surface, typically the bottom 2 inches of the stem.
- Firm the medium gently around the stem so it stands upright without wobbling.
Rooting conditions: soil, light, humidity, and watering
The rooting medium needs to stay consistently moist but never waterlogged. Damp vermiculite is one of the best options because it holds moisture without becoming soggy and is completely sterile, which matters a lot when you're trying to prevent rot.
The Extension Gardener Handbook also recommends using sterile, well-drained and moisture-retentive media for cutting propagation, and it notes that vermiculite by itself is not recommended because it can hold too much moisture Damp vermiculite is one of the best options because it holds moisture without becoming soggy and is completely sterile.
A 50/50 mix of perlite and quality potting soil also works well. Avoid garden soil entirely. It compacts, drains poorly in small containers, and carries pathogens that will destroy your cuttings before they have a chance.
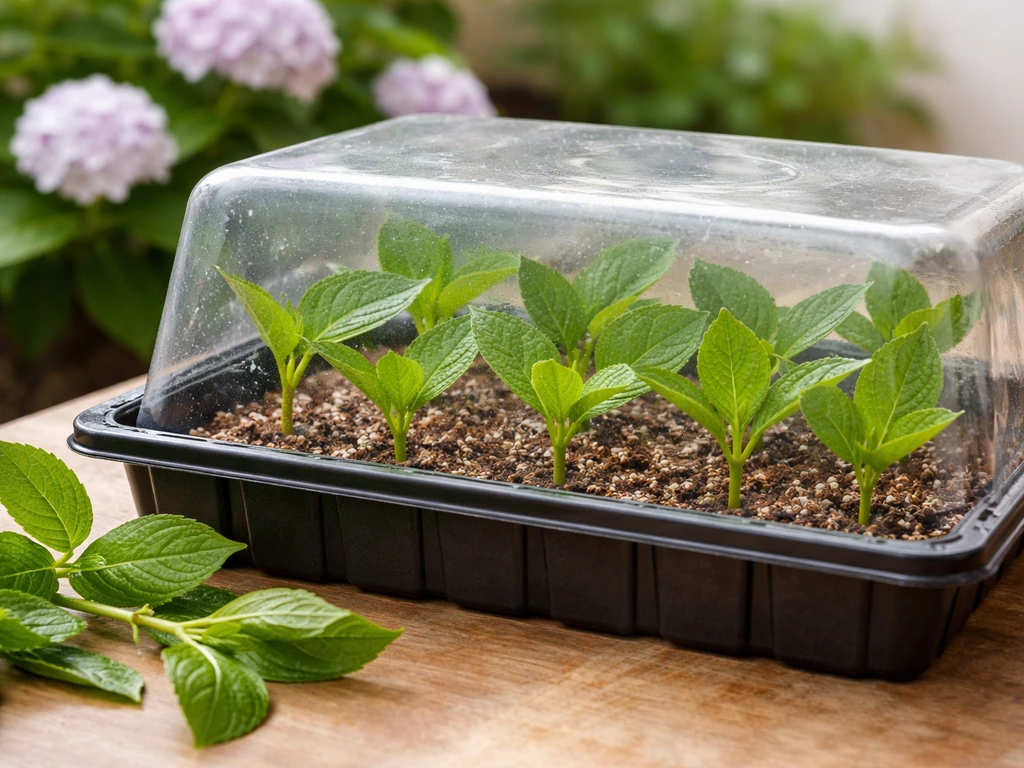
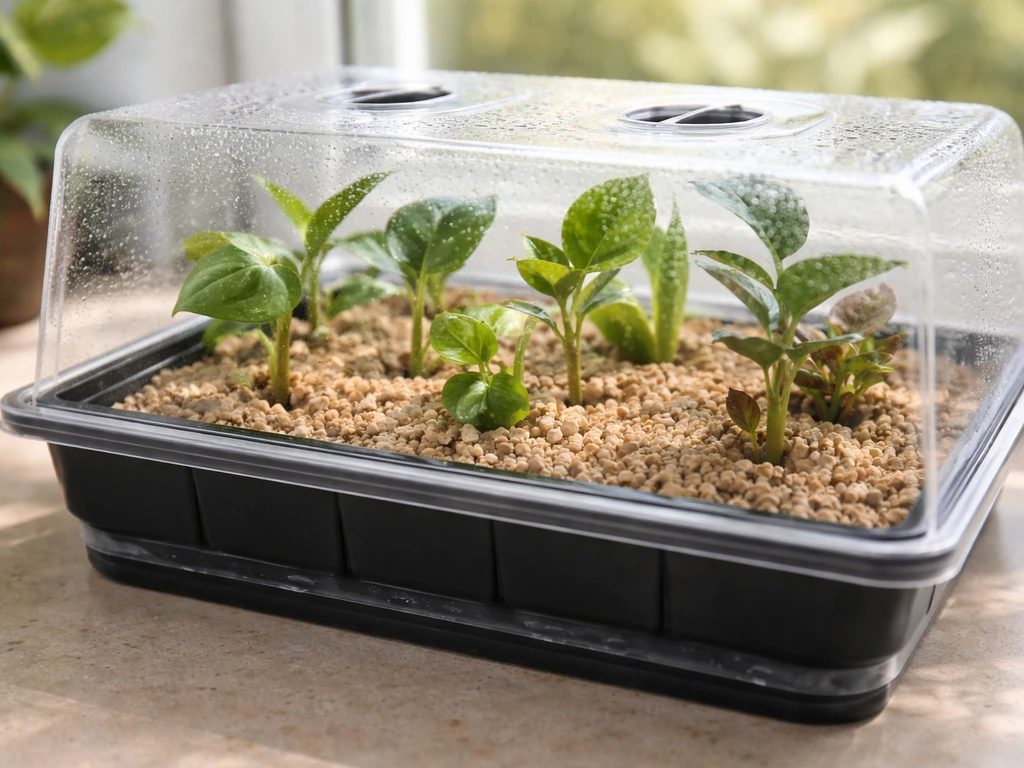
Humidity is the single most important environmental factor for rooting success. An unrooted cutting has no way to take up water from the soil yet, so it relies entirely on the moisture in the air to stay hydrated. Cover your cutting with a clear plastic bag or a humidity dome immediately after potting. Make sure the plastic doesn't touch the leaves directly since that can cause rot. You can prop it up with a skewer or short stick. Mist the inside of the bag lightly every day or two if it dries out.
Light should be bright but indirect. A spot near a window that gets good light without direct afternoon sun is ideal. Direct sun through glass heats up the humidity tent rapidly and can cook your cutting. Bottom heat speeds up rooting significantly. If you have a seedling heat mat, set your cutting pots on it. Aim for a soil temperature around 70 to 75 degrees Fahrenheit. Without supplemental heat, keep cuttings somewhere consistently warm, at least 65 degrees.
Don't overwater. The medium should feel like a wrung-out sponge: moist but not dripping. Check it every few days by pressing your finger into the top layer. If it feels dry, mist or add water gently around the cutting, not directly onto the stem.
How long rooting takes and what success looks like
In warm weather with good humidity, softwood hydrangea cuttings typically begin forming roots within 2 to 3 weeks. If conditions are ideal, especially with bottom heat and cuttings taken in late spring, you might see roots in as little as one week. Cooler temperatures or lower humidity stretches that timeline out to 4 to 6 weeks.
Resist the urge to yank the cutting out and check for roots. Instead, watch for these signs that rooting is underway:
- New leaf growth emerging from the top of the cutting (the clearest sign roots are forming and the plant is actively growing)
- The leaves remaining firm and green rather than wilting or yellowing
- Resistance when you gently tug the cutting upward (roots are anchoring into the medium)
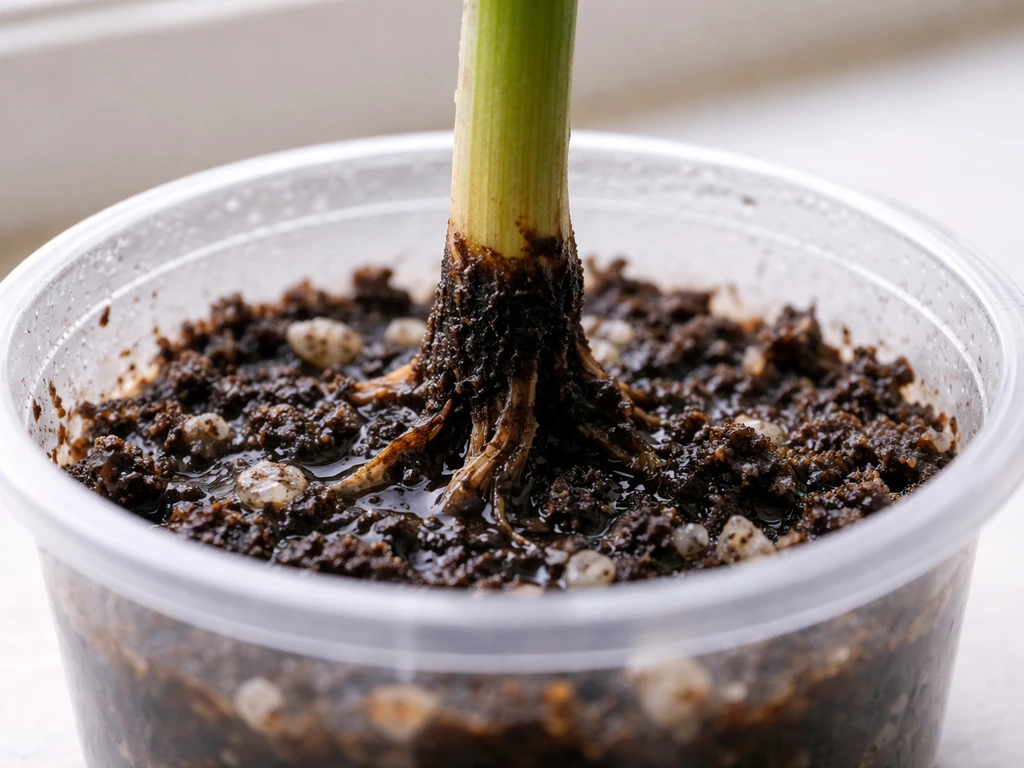
- Fine white root tips visible through the drainage holes of a clear pot
Once you see new leaf growth or feel firm resistance when you tug the cutting, start opening the humidity dome for longer periods each day. Do this gradually over about a week so the cutting acclimates to normal humidity levels without wilting. Going from 100 percent humidity inside a bag to dry indoor air all at once causes even rooted cuttings to crash.
When cuttings fail: troubleshooting rot, wilting, and no roots
The cutting turns black or mushy at the base
This is stem rot, usually caused by a fungal pathogen. It's almost always a moisture and soil cleanliness issue. If the medium is staying too wet, the stem base has no oxygen and pathogens take hold fast. Switch to a sterile medium, make sure your pots have drainage, and ease back on watering. Using non-sterile garden soil is the number one cause of this.
The leaves wilt and go limp right away
Some wilting immediately after taking the cutting is normal. If the cutting perks back up once you've put it under the humidity dome, you're fine. If it stays limp for days, the cutting is losing more water than it can hold. Increase humidity, cut the leaves in half if you haven't already, and make sure the dome is sealed. Taking cuttings in the heat of the afternoon also makes this worse. Cut in the early morning when the plant is fully hydrated.
No signs of rooting after 6 weeks
Check your setup honestly. Is the medium staying moist? Is the temperature warm enough? Did you take the cutting from a stem that was already flowering or starting to bud? Flowering stems are the most common culprit for slow or zero rooting. Also consider whether you took the cutting too late in the season. Cuttings taken in September from dormant or near-dormant plants have poor odds. Try again in late spring with a fresh cutting from a young, non-flowering shoot.
Leaves turn yellow and drop
Some leaf drop in the first week or two is normal as the cutting adjusts. If leaves are yellowing without any new growth appearing, the cutting is likely stressed by inconsistent humidity or has already rotted at the base. Check the stem just at the soil line. If it's firm and green, be patient. If it's soft or discolored, that cutting is done and you should start over.
Transplanting and caring for young hydrangeas until they bloom
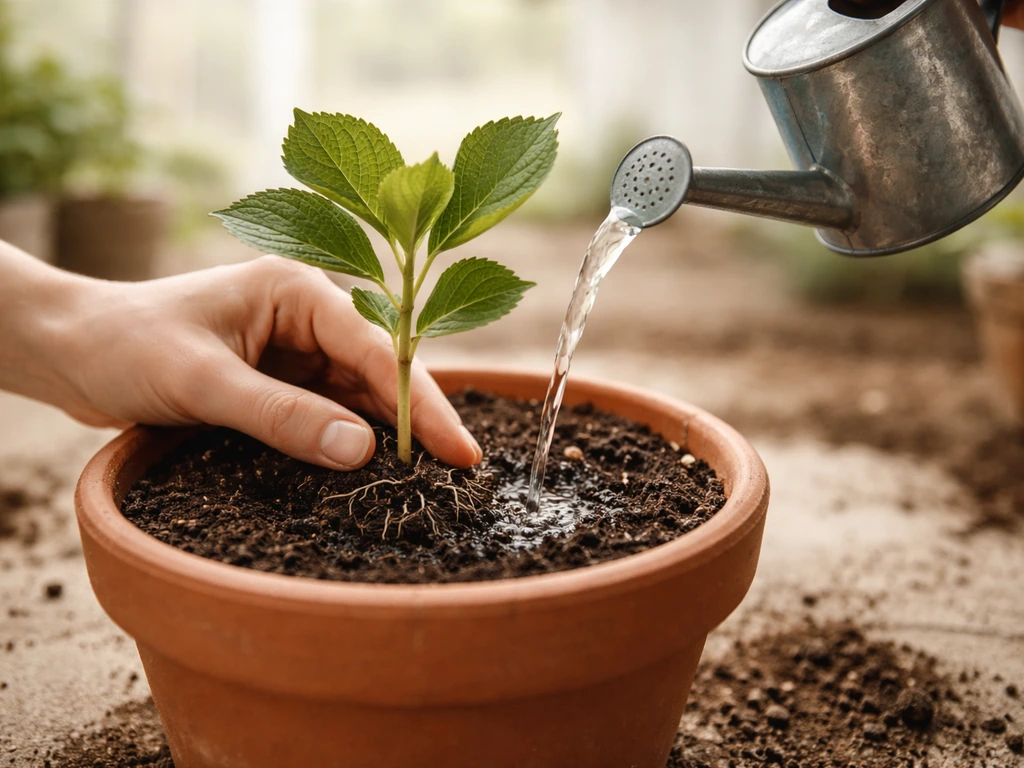
Once your cutting has rooted well and has been hardened off from the humidity dome, it's ready to move to a slightly larger pot with regular potting mix. Don't jump straight to a massive container. Start with a 4- to 6-inch pot, let it fill that with roots over a few weeks, then move up to a 1-gallon pot. Hydrangeas in containers that are too large for their root system tend to stay wet and are prone to root rot.
For the first growing season, keep your young hydrangea in a sheltered spot with morning sun and afternoon shade. The roots are fragile and the plant doesn't yet have the capacity to handle intense heat or drying wind. Water consistently, keeping the soil evenly moist but not soggy. A light application of a balanced, slow-release fertilizer in spring once the plant is established in its new pot gives it a gentle push without overwhelming it.
Hardening off for outdoor planting works the same way it does for seedlings. Start with an hour or two outdoors in a shaded, protected spot, then gradually increase outdoor time over one to two weeks before planting in the ground. When you do plant in the garden, choose a site with well-draining, slightly acidic soil (pH 5.5 to 6.5 works well for most species), and amend with compost if your native soil is heavy clay or very sandy.
Patience is the hardest part of this whole process. A rooted cutting started in May or June will spend its first summer establishing roots in the ground and likely won't bloom until its second or even third year, depending on the variety. How to grow lacecap hydrangea. Limelight and Little Lime hydrangeas, which bloom on new wood, often put out their first flowers faster than bigleaf or mophead types that bloom on old wood.
Limelight hydrangeas are particularly popular for reliable blooms, so once your cutting is established, you can focus on the right variety-specific care to help it thrive. For those, you'll want to be careful not to cut back the stems too hard in the first couple of winters, or you'll sacrifice the buds for next year's blooms.
Growing a full, blooming hydrangea from a cutting you took yourself is genuinely satisfying, and once you've done it once, it becomes second nature. The key takeaway from all of this: don't bother with a bare leaf. Oakleaf hydrangea can be grown in a similar way from healthy stem cuttings, with warmth and consistent humidity helping the cutting root reliably. Grab a stem, find a node, give it warmth and humidity, and you'll have a new plant worth being proud of. To grow mophead hydrangeas, use the same stem-cutting approach, with a node and steady warmth and humidity for best rooting.
FAQ
Can I grow hydrangeas from leaf cuttings if I include the petiole (the leaf stem) but no actual stem node?
Usually no. The petiole alone does not replace the stem node, because the node contains the tissue that can form new roots. If you do not have a short section of stem with a visible node, you are attempting leaf-only propagation, which rarely produces plants.
How do I tell if I cut the right part, the node, without digging into the stem?
Look for the small bump where leaves attach along the stem. When you make the cutting, keep that bump intact and include at least one node in the soil. If your cutting is just a smooth piece between nodes, it will tend to rot or stall.
Should I remove all leaves on the cutting, or leave some attached?
Leave at least one or two leaves for the best balance, then reduce leaf area to slow water loss. If leaves are large, trim them in half. Keeping leaves fully intact often increases wilting and can raise the risk of rot inside the humidity cover.
Why do my hydrangea cuttings root slowly, even though I used a node and a humidity dome?
The most common causes are cutting taken outside the softwood window, low bottom or soil temperatures, and medium that is too wet or too dry. If your environment is cool, rooting timelines can stretch to 4 to 6 weeks or more, even with good technique.
What depth should the cutting go into the rooting medium?
Bury the node area so the node is at least partially covered, while keeping the leaves well above the medium. A common mistake is setting the node too shallow, which dries out the rooting zone, or too deep, which can keep the base saturated and promote rot.
Do hydrangeas need rooting hormone for it to work?
Not required, but it helps most when conditions are not perfect. If you are getting slow rooting, using a softwood-cutting formulation at the base of the node can noticeably improve both speed and success rate.
Can I reuse the same potting medium for multiple hydrangea cuttings?
It is best not to. Sterile medium is part of what prevents rot, and pathogens can carry over between cuttings. If you must reuse, sterilize the container thoroughly and replace the medium for best results.
How do I know if the cutting is rotting versus just not rooting yet?
Watch the stem base at the soil line. Rot typically turns it soft, discolored, or smelly, and the cutting often declines even under humidity. Slow rooting usually shows gradual improvement, such as firming stems or new leaf growth after an initial adjustment period.
Is it normal for leaves to fall off early in the process?
Yes, some leaf drop in the first one to two weeks can be normal as the cutting adjusts. If you see no new growth and the stem begins to soften or discolor, treat it as failure and restart with a fresher cutting.
When is it safe to remove the humidity dome?
Start venting once you see new leaf growth or the cutting feels more resistant when gently tugged. Increase venting gradually over about a week so humidity drops slowly. Removing it all at once is a common reason for even rooted cuttings to collapse.
Do I need bright light during rooting, or should I keep cuttings in the dark?
Bright, indirect light is ideal. Dark conditions tend to slow growth, while direct hot sun can overheat the humidity cover and damage the cutting. A well-lit windowsill that avoids afternoon sun is usually a safe target.
Should I bottom-water the container or water from the top?
For most setups, avoid drenching the stem. Watering should keep the medium evenly moist, and it is typically safer to mist lightly or add small amounts around the medium rather than pouring directly onto the cutting base.
What pot size should I use after roots form?
Move up gradually. A small 4 to 6 inch pot is a safer first step, then size up after roots fill it. Oversized containers stay wet longer than the roots can use, increasing the odds of root rot.
Will hydrangea cuttings bloom the same year they root?
Often no. Many varieties, even with successful rooting, need their first growing season to build strong roots. Expect flowers usually in the second year, sometimes later depending on variety and growing conditions.
Can I propagate hydrangeas from leaves in water instead of soil?
Not for true leaf-only propagation. Hydrangea leaf material without a node and stem section generally will not form viable roots in water. If you are using water, you still need a nodal stem cutting, not a detached leaf blade.
What should I do if my cutting wilts right after I take it?
Immediate wilting can happen, especially if cut in the heat of day or if the cutting dried out. If the cutting perks back up under the dome, you are likely fine. If it stays limp for days, increase humidity, trim leaves if needed, and confirm your dome is sealed without touching the leaves.