
Yellow hibiscus grows best in full sun (at least 6 hours a day), moist but well-drained slightly acidic soil (pH 6.0–7.0), and consistent moisture with a target of about 1 inch of water per week. Whether you're growing a hardy Hibiscus moscheutos like the Luna series or a tropical Hibiscus rosa-sinensis, the fundamentals are the same: right light, right drainage, and a feeding schedule that prioritizes potassium over nitrogen once plants start budding. This guide walks you through every step, from picking your cultivar to coaxing the biggest blooms possible. For a step-by-step walkthrough on how to grow hibiscus at home, see our detailed guide. For detailed, step-by-step cultivation instructions, see our guide on how to grow hibiscus plant.
How to Grow Yellow Hibiscus: Complete Home Gardening Guide
Why yellow hibiscus is worth growing
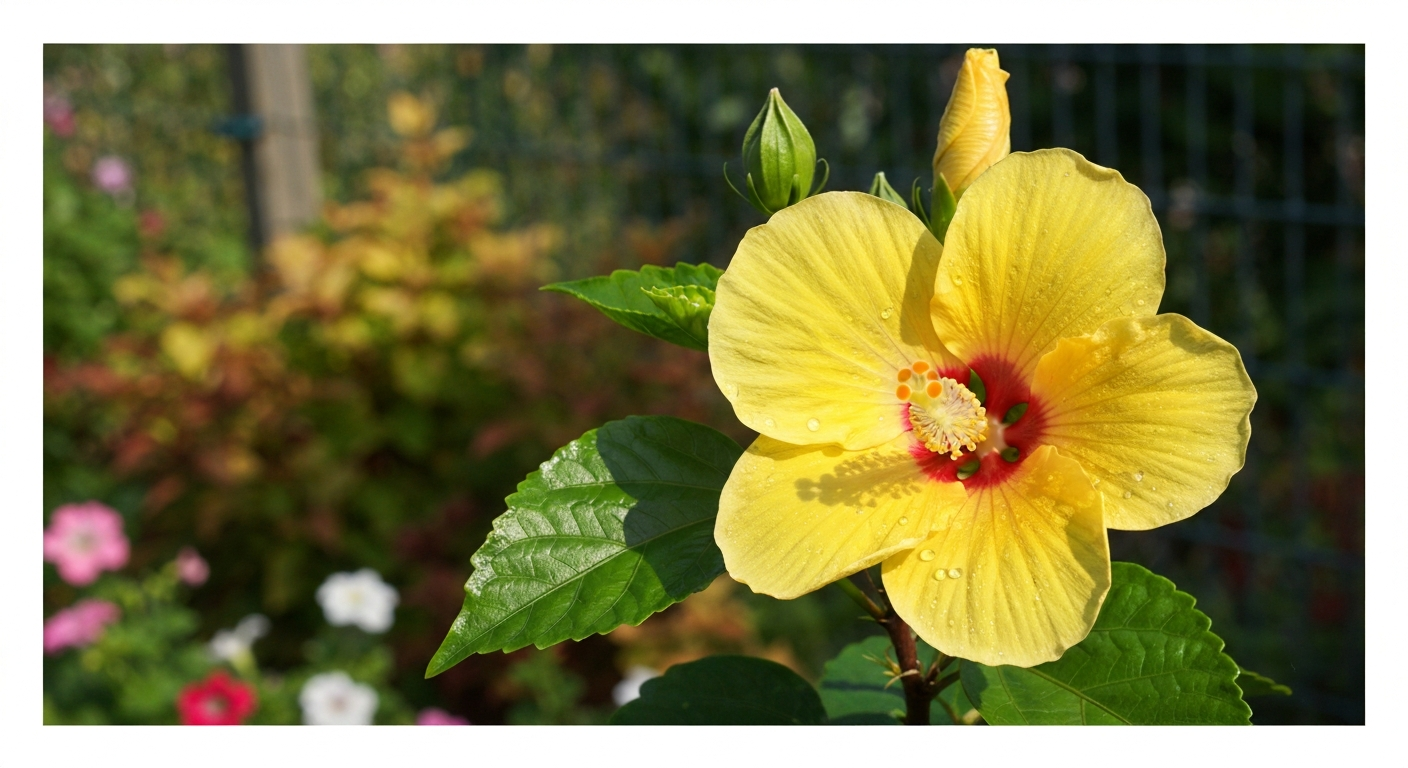
There's something almost theatrical about a yellow hibiscus flower. The dinner-plate-sized blooms, the papery petals, the bold color against dark green foliage, it genuinely stops people in their tracks. I started growing hibiscus for exactly that reason, and I've stayed hooked because these plants are far more adaptable than most gardeners expect. You can grow them as bold landscape shrubs, keep them in containers on a sunny porch, train them into bonsai forms, or tuck them into a perennial border. This guide covers all of those paths. Whether you've never grown hibiscus before or you've tried once and lost a plant to winter, you'll find clear, specific steps here to get it right.
Best yellow hibiscus varieties to grow
Before you buy a plant, decide which type fits your climate. Hardy hibiscus (Hibiscus moscheutos and its hybrids) die back to the crown in winter and regrow from the roots each spring, making them reliable perennials in USDA Zones 4–9. Tropical hibiscus (Hibiscus rosa-sinensis) stays evergreen and blooms almost year-round in Zones 9–11, but needs to come indoors or be treated as an annual in colder regions. Yellow-flowering selections exist in both groups.
| Cultivar / Series | Type | Flower Size | Hardiness Zones | Notes |
|---|---|---|---|---|
| Luna Yellow (Luna Series) | Hardy (H. moscheutos) | 6–8 inches | Zones 4–9 | Compact, bushy habit (1.5–3 ft); heat-tolerant; Louisiana Super Plant; great for containers |
| Moy Grande | Hardy hybrid | Up to 12 inches | Zones 5–9 | Very large blooms; deep rose-pink is common but yellow selections exist; vigorous spreader |
| Disco Belle Yellow | Hardy (H. moscheutos) | 8–9 inches | Zones 5–9 | Seed-grown; one of the classic yellow-flowered moscheutos selections |
| Sun Showers | Tropical (H. rosa-sinensis) | 4–6 inches | Zones 9–11 (container elsewhere) | Clear yellow blooms with a red eye; strong continuous bloomer |
| Kona Gold | Tropical (H. rosa-sinensis) | 5–7 inches | Zones 9–11 (container elsewhere) | Rich golden-yellow; popular for patio containers |
| Yellow Weeping Chinese | Tropical (H. rosa-sinensis) | 5 inches | Zones 9–11 (container elsewhere) | Pendulous branching habit; excellent for espalier or bonsai training |
A quick note on Luna: the Luna series was introduced by Walters Gardens and selected as a Louisiana Super Plant in 2014 by LSU AgCenter specifically because it handles intense heat and tolerates wet soil better than most cultivars. Its compact size (often just 1.5–3 feet at maturity) makes it one of the most versatile hardy hibiscus options for home gardeners, whether in a border or a large pot. If you want more detail on the Luna series specifically, it's worth exploring a dedicated Luna hibiscus growing guide for cultivar-specific tips. For cultivar-specific tips, see the dedicated guide 'How to Grow Hibiscus, Hello Kitty Island Adventure' for a step-by-step walkthrough How to Grow Hibiscus — Hello Kitty Island Adventure.
Choosing the right site
Hibiscus is not shy about its sun requirements. You need a spot with a minimum of 6 hours of direct sunlight per day, that's the definition of full sun used by Penn State Extension and most land-grant universities. Less than 6 hours and you'll get weak, floppy stems and noticeably fewer flowers. More is generally better, though in hot inland climates with sustained temperatures above 95°F, a little late-afternoon shade (say, after 4 p.m.) can prevent flower scorch without sacrificing overall bloom performance.
Wind matters more than most people expect. Strong prevailing winds dry out the soil rapidly, beat up large flowers (those 6–8 inch blooms are surprisingly fragile), and can physically snap stems on tall tropical varieties. A site with a nearby fence, wall, or established shrub on the windward side is ideal. Just make sure that windbreak doesn't create a dense shade pocket, dappled filtered light is very different from full direct sun and hibiscus knows the difference.
Think about microclimate too. A south or southwest-facing bed backed by a light-colored wall or fence radiates heat and extends your effective growing season by a couple of weeks in either direction. In Zone 6 or 7, that kind of microclimate can be the difference between a tropical hibiscus that stays healthy outdoors into October versus one that gets zapped by an early cold snap. For hardy hibiscus like Luna, you have a lot more flexibility, but they still bloom harder and longer in warm, sunny spots.
When and how to plant yellow hibiscus
Timing is where a lot of beginner hibiscus growers go wrong. Hardy hibiscus emerges late in spring, sometimes not until late May or even early June in Zone 5, so don't panic if the spot looks dead while everything else is leafing out. Plant hardy types after your last frost date. For tropical hibiscus, wait until night temperatures are reliably above 50–55°F. Planting too early into cold soil stresses roots even if there's no frost, and a stressed hibiscus takes weeks to recover.
Step-by-step planting checklist
- Check your USDA hardiness zone using the official interactive USDA Plant Hardiness Zone Map and confirm last frost date for your area.
- Choose your site: minimum 6 hours of direct sun, wind protection, and good air circulation to reduce fungal disease.
- Test or estimate your soil pH. Target 6.0–7.0. Adjust with sulfur (to lower pH) or agricultural lime (to raise pH) if needed.
- Dig the planting hole twice as wide and just as deep as the root ball. Do not plant deeper than the container soil level.
- Amend the backfill soil: for clay, mix in 2–4 inches of well-decomposed compost worked into the top 6–8 inches. For sandy soil, add 2–4 inches of compost plus a moisture-retentive amendment like coir.
- Place the plant in the hole so the crown sits at or slightly above surrounding soil level — mounding slightly helps drainage.
- Backfill, firm gently to eliminate air pockets, and water thoroughly until the soil is evenly moist down to root depth.
- Apply 2–3 inches of organic mulch (shredded bark, wood chips) around the base, keeping it 2–3 inches away from the crown.
- Water every other day for the first two weeks to establish roots, then transition to your regular watering schedule.
Planting calendar by zone
| USDA Zone | Last Frost (approx.) | Plant Hardy Hibiscus | Plant Tropical Hibiscus Outdoors |
|---|---|---|---|
| Zone 4 | Mid-May | Late May | Early June (nights >50°F) |
| Zone 5 | Mid-April to early May | Early to mid-May | Late May to early June |
| Zone 6 | Mid-April | Late April to early May | Mid to late May |
| Zone 7 | Late March to early April | Early to mid-April | Late April |
| Zone 8 | Mid-March | Late March | Early April |
| Zone 9–11 | No hard frost | Year-round planting possible | Year-round; tropical hibiscus stays outdoors permanently |
Soil requirements and how to fix problem soil
Yellow hibiscus wants soil that holds moisture without sitting waterlogged. Think moist but well-drained, slightly acidic to neutral, at a target pH of 6.0–7.0. That pH range keeps iron and other micronutrients available, which directly prevents the yellowing leaves (chlorosis) that is one of the most common hibiscus complaints. The RHS entry for Hibiscus moscheutos 'Luna Red' - RHS (soil pH: acid or neutral) indicates this cultivar prefers acid to neutral soils, consistent with a target pH of about 6.0–7.0. If your soil pH creeps above 7.5, even a perfectly fertilized plant will start showing yellow between the leaf veins.
Amending heavy clay soil
Clay soil is the most common problem I hear about from hibiscus growers. The fix is straightforward but takes commitment: incorporate 2–4 inches of well-decomposed compost into the top 6–8 inches of the planting bed. That roughly equates to a 1:3 ratio of compost to existing topsoil across your planting depth. Do this across the whole bed, not just the individual planting hole, dumping compost only in the hole can actually create a drainage bowl that traps water around roots. If your clay is severe, build a raised bed at least 12–18 inches deep and fill it with a blend of topsoil, compost, and coarse amendment like pumice or horticultural grit.
Amending sandy or poor soil
Sandy soil drains too fast, leaving roots dry between waterings. Add 2–4 inches of compost plus about 10–20% by volume of a moisture-retentive organic amendment like coir fiber. Coir is my preference over peat because it's more sustainable and has similar water-holding capacity. You'll likely need to mulch heavily too, because sandy soil loses moisture from the surface quickly.
Container potting mix
For potted yellow hibiscus, skip standard all-purpose potting soil and make a custom mix: 3 parts quality peat-free potting compost, 1 part coarse perlite or pumice, and 1 part orchid bark or coarse pine fines. This combination gives you drainage, aeration, and enough organic matter to hold nutrients. Standard potting mixes compact over time in containers and start holding too much water, that custom blend stays looser through an entire growing season.
Light, temperature, and climate needs
Tropical hibiscus (H. rosa-sinensis) is happiest with daytime temperatures of 75–90°F and nights above 55°F. When night temperatures drop below 50°F for more than a few days in a row, the plant slows down visibly, leaf drop, bud drop, and arrested growth are common responses. This is why tropical hibiscus needs to come indoors before your first fall frost if you're in Zone 8 or colder. Hardy hibiscus is a completely different story: it dies back to the crown each winter and can survive lows down to Zone 4 minimums (around -30°F), regowing from the roots each spring. The tradeoff is that hardy types emerge late and have a shorter flowering window (July through September in most zones).
Garden beds vs. containers
In a garden bed, an established yellow hibiscus has deep soil insulation, more consistent moisture, and a stable root environment. Container-grown plants are more vulnerable to temperature swings, pot soil heats up and cools down much faster than ground soil. In summer, a dark-colored pot in full sun can get hot enough to damage feeder roots, so choose light-colored pots or double-pot (slip the growing pot inside a decorative outer container) to buffer temperature. In winter, container-grown tropical hibiscus must move inside to a bright spot where temperatures stay above 50°F. A south-facing window works, or supplemental grow lights if your indoor light is poor.
Watering schedules that actually work
The rule of thumb for in-ground hibiscus is about 1 inch of water per week during the growing season, adjusted for rainfall. One inch equals roughly 0.62 gallons per square foot of bed, which gives you a way to calibrate drip irrigation or soaker hoses. In practice, deep and less frequent watering (once or twice a week to saturate the root zone) beats frequent shallow watering every time. Frequent shallow watering encourages surface roots that dry out fast and stress plants during heat waves.
Watering containers
Container hibiscus dries out much faster than garden plants. A 14-inch pot typically needs 1–2 gallons per thorough watering, water until it runs freely from the drainage holes, then stop. Small 1–3 gallon nursery pots may need just 0.5–1 gallon per watering. During sustained heatwaves above 90°F, daily watering may be necessary. In cooler or rainy stretches, pull back. The practical check: stick your finger about an inch into the potting mix, if it feels dry at that depth, water thoroughly. If it's still damp, wait another day.
Avoiding overwatering and drought stress
- Overwatering signs: yellowing lower leaves, soft or mushy stem base, soggy soil that never seems to dry, root rot smell from the pot
- Drought stress signs: wilting despite moist-looking soil (roots may be dead), crispy brown leaf margins, premature bud drop, flower petals with dry scorched edges
- Prevention: always check drainage holes are clear and unobstructed; never let containers sit in saucers of standing water for more than a few hours
- If you suspect overwatering in a container, unpot the plant and inspect roots — healthy roots are white or tan and firm; rotted roots are brown, soft, and smell musty
- If root rot is minor, trim affected roots, repot in fresh free-draining mix, and water sparingly until new growth appears
Fertilizing for big yellow blooms
Hibiscus rewards a thoughtful feeding program more than almost any other flowering shrub. The key is the fertilizer formula, not just the frequency. Look for a balanced-to-high-potassium, moderate-nitrogen, low-phosphorus blend. Commercial growers use formulas like 10-4-12 or 17-5-24 (N-P-K) specifically because high phosphorus can actually lock out micronutrients in hibiscus and promote leafy growth over flowers. You'll see these formulas labeled as hibiscus or tropical plant fertilizers at garden centers.
Slow-release vs. liquid feeding
My approach is to combine both methods. In early spring when new growth emerges, apply a slow-release granular fertilizer (a hibiscus-specific or high-K formula) at the label rate. This gives a steady background nutrition throughout the season without you having to think about it. Then, once flower buds start forming, I switch to biweekly liquid feeding with a water-soluble formula at roughly half the label rate. This gives plants a boost right when they need it most and is easy to dial back if you see signs of nitrogen excess (lots of lush dark green leaves but very few flowers). Avoid high-nitrogen all-purpose fertilizers like standard Miracle-Gro, they push vegetative growth at the expense of flowering in hibiscus. There is a hibiscus-specific version that's better formulated, but always check the N-P-K numbers before buying.
| Growth Stage | Fertilizer Type | Frequency | Formula Target |
|---|---|---|---|
| Early spring (new growth emerging) | Slow-release granular | Once at start of season | Moderate N, low P, higher K (e.g., 10-4-12) |
| Active growth (pre-bloom) | Liquid water-soluble | Every 2–3 weeks | Moderate N, low-to-moderate K |
| Bloom period | Liquid water-soluble | Every 2 weeks | Lower N, low P, high K (e.g., 17-5-24) |
| Late summer (winding down) | Liquid water-soluble | Monthly or stop by early fall | Low N, potassium-forward |
| Fall/Winter (tropical indoors) | No feeding or minimal | None to very occasional | Half-strength balanced only if actively growing |
Pruning and shaping for repeat blooms
Pruning is where a lot of gardeners hesitate, but with hibiscus it's genuinely simple once you understand what the plant is doing. Hardy hibiscus (H. moscheutos) dies back to the crown in fall, you can cut the dead stems to about 4–6 inches from the ground after the first hard frost, or leave them until early spring and cut them back before new growth appears. Do not cut hardy hibiscus back in late summer thinking you're tidying up; you might remove developing growth nodes.
Tropical hibiscus needs more active pruning to stay tidy and productive. The general rule: prune back by about one-third in early spring before new growth really gets going. This encourages branching, which means more shoot tips, which means more flower buds (hibiscus blooms on new wood). During the season, deadhead spent flowers promptly, hibiscus flowers last only one day, and removing them keeps the plant from putting energy into seed development.
Shaping for a bushy, floriferous plant
- Pinch or cut growing tips back to the second or third leaf node early in the season to encourage side branching on tropical varieties
- After each flush of blooms, lightly trim the flowering tips back by 2–4 inches to stimulate the next round of buds
- Remove any crossing, rubbing, or inward-pointing branches to improve air circulation inside the canopy
- On older tropical plants, hard renewal pruning (cutting back by half or more) in early spring every 2–3 years reinvigorates growth and improves bloom quantity
- For hardy hibiscus, resist the urge to cut back green stems in late summer — wait until full dormancy
Propagation: seeds, cuttings, and layering
Yellow hibiscus can be propagated three main ways, each with different tradeoffs. Seeds are the most accessible starting point but take longer and produce variable results, seedlings from named cultivars won't always be identical to the parent. Stem cuttings are the standard method for getting true-to-type plants quickly. Layering is the easiest of all if you have an existing plant with flexible low branches.
Growing from seed
- Scarify seeds by nicking the seed coat lightly with a nail file or soaking in warm water for 24 hours before sowing.
- Sow seeds 1/4 inch deep in moist, well-draining seed-starting mix at a temperature of 75–80°F.
- Germination typically takes 1–3 weeks. Keep the medium consistently moist but not waterlogged.
- Once seedlings show two true leaves, transplant to individual 3-inch pots using the container mix described above.
- Harden off outdoors over 7–10 days before planting in the garden after last frost.
Stem cuttings (most reliable method)
- Take 4–6 inch softwood or semi-hardwood cuttings from healthy, non-flowering shoot tips in late spring or early summer.
- Remove all but the top 2–3 leaves. Dip the cut end in rooting hormone powder or gel.
- Insert cuttings into a moist mix of 50% perlite and 50% coarse coir or seed-starting mix.
- Cover loosely with a clear plastic bag or humidity dome to maintain moisture. Keep at 70–80°F in bright indirect light.
- Check for rooting after 3–4 weeks by gently tugging — resistance means roots are forming.
- Once well-rooted (usually 4–6 weeks), pot up into the standard container mix and begin feeding lightly.
Air layering
Air layering works well for thick-stemmed tropical hibiscus. Choose a healthy stem, remove leaves from a 2–3 inch section, wound the bark by scraping lightly, apply rooting hormone, then wrap the wounded area in damp sphagnum moss covered in clear plastic wrap sealed at both ends. Roots typically appear within 4–8 weeks. Once roots are visible through the plastic and at least 1–2 inches long, cut the stem below the moss ball, pot it up immediately, and keep it shaded for a week or two while it adjusts.
Hibiscus bonsai: the basics
Tropical yellow hibiscus, especially willowy varieties like Yellow Weeping Chinese, can be shaped into striking bonsai specimens. The approach differs from standard container growing mainly in pot size, pruning intensity, and soil mix. Hardy hibiscus is generally not suitable for bonsai because its dieback-and-regrow habit makes it very difficult to develop permanent woody structure.
- Start with a young tropical hibiscus (1–2 years old) with an interesting trunk or branching structure.
- Use a shallow bonsai pot with multiple drainage holes and fill with a fast-draining bonsai mix: roughly 60% inorganic aggregate (akadama, pumice, or coarse grit) and 40% quality potting compost.
- Train the main trunk and primary branches using copper or aluminum wire, working in late winter or early spring before active growth. Do not wire too tightly — check weekly and remove wire before it cuts into bark.
- Prune aggressively after each flowering flush, cutting branch tips back to 1–2 leaf nodes. This keeps the silhouette compact and stimulates back-budding.
- Water bonsai hibiscus more frequently than standard containers because shallow pots dry very quickly — check daily in summer.
- Feed lightly but regularly during the growing season: a dilute liquid fertilizer at one-quarter to one-half label strength every 7–10 days works better than occasional heavy feeding in small bonsai pots.
- Repot every 1–2 years in early spring, root-pruning by no more than one-third at a time to avoid shock.
If bonsai training interests you, exploring a dedicated hibiscus bonsai growing guide will give you more in-depth technique on wiring angles and long-term structural development.
Winter care and frost protection
Hardy hibiscus (H. moscheutos and Luna series) handles winter cold well in Zones 4–9 without much intervention. After the first hard frost kills the foliage, cut stems back to 4–6 inches, apply a 3–4 inch layer of mulch over the crown, and leave it alone. The plant will re-emerge in mid-to-late spring. In Zone 4 or borderline Zone 5 winters, a slightly deeper mulch layer (4–6 inches) gives extra insurance.
Tropical hibiscus requires active protection in Zone 8 and colder. Bring potted plants indoors before the first frost, don't wait until a cold snap forces your hand, because a single hard freeze can kill a tropical hibiscus to the roots. Indoors, put the plant in your brightest window (south-facing is ideal) at temperatures above 50°F. Expect some leaf drop as the plant adjusts to lower light; this is normal, not a death spiral. Water sparingly through winter, just enough to prevent the potting mix from drying out completely, and hold off on fertilizing until you move it back outside in spring.
For in-ground tropical hibiscus in marginal zones (Zone 8 or warmer Zone 7 microclimates), you can try heavy mulching over the root zone combined with a frost cloth over the plant during freezing nights. This works for brief cold spells but is not reliable for sustained hard freezes below 25°F.
Common pests and diseases
Hibiscus attracts a fairly predictable set of pest and disease problems. Catching them early makes a big difference, most infestations that I've seen become serious could have been managed in the first week with a simple spray.
| Problem | Symptoms | Organic Treatment | Chemical Treatment |
|---|---|---|---|
| Aphids | Clusters of small soft insects on new growth; sticky residue; curled leaves | Strong water jet; insecticidal soap; neem oil spray | Pyrethrin-based spray; systemic imidacloprid (drench) |
| Spider mites | Fine webbing on undersides of leaves; stippled, dull foliage | Increase humidity; neem oil; insecticidal soap | Miticide (bifenazate or abamectin) |
| Whitefly | Tiny white insects fly up when plant is disturbed; sticky honeydew on leaves | Yellow sticky traps; neem oil; insecticidal soap | Pyrethrin spray; systemic imidacloprid |
| Thrips | Streaked or silvery flowers; distorted buds | Neem oil; spinosad spray | Spinosad or pyrethrin spray |
| Scale insects | Brown waxy bumps on stems; yellowing leaves | Rubbing alcohol on a swab; neem oil; horticultural oil spray | Systemic insecticide (imidacloprid drench) |
| Powdery mildew | White powdery coating on leaves, usually in humid conditions with poor airflow | Potassium bicarbonate spray; neem oil; improve air circulation | Fungicide (myclobutanil or propiconazole) |
| Botrytis (gray mold) | Gray fuzzy mold on flowers or dying stems, especially in cool wet conditions | Remove affected parts; improve airflow; reduce overhead watering | Copper-based or synthetic fungicide (iprodione) |
| Root rot (Phytophthora) | Wilting despite moist soil; brown slimy roots; stem base decay | Improve drainage; remove and repot; beneficial microbes (Trichoderma) | Phosphonate fungicide (mefenoxam); replant in treated fresh mix |
Troubleshooting common problems
Yellow leaves
Yellow leaves on hibiscus have at least half a dozen causes, and guessing wrong wastes time. Here's how to narrow it down: If lower, older leaves are yellowing and dropping while new growth looks fine, that's usually normal leaf turnover or mild nitrogen deficiency, a light liquid feed often resolves it. If leaves yellow uniformly across the whole plant, check soil moisture (both overwatering and underwatering cause this). If you see yellow between leaf veins but the veins themselves stay green (interveinal chlorosis), that's a classic iron deficiency linked to high soil pH, test your pH and correct if it's above 7.0. Use chelated iron foliar spray as a fast fix while you work on correcting the underlying pH.
No blooms
A yellow hibiscus that produces lush green growth but zero flowers is almost always getting too much nitrogen, too little light, or both. Swap to a lower-nitrogen, higher-potassium formula. Make sure the plant is really getting 6+ unobstructed hours of sun, it's easy to underestimate how much a nearby tree or structure is blocking light by mid-summer when foliage is full. Also check that you haven't pruned too late in the season on hardy types, which can remove developing bud sites.
Bud drop
Hibiscus buds that form but drop before opening are frustrating. The three most common culprits are: sudden temperature drops (tropical hibiscus is very sensitive to cold nights), inconsistent watering (swinging from bone dry to waterlogged stresses the plant right when it's investing energy in bud development), and thrips feeding inside buds. Check all three before assuming it's a fertilizer issue.
Root rot
Root rot is one of the most common ways hibiscus dies in containers, and it's almost always caused by poor drainage combined with overwatering. If you catch it early, roots are mostly firm with just a few brown, soft sections, unpot the plant, trim away the rotted roots with clean shears, dust cut surfaces lightly with powdered sulfur or cinnamon as a mild antimicrobial, and repot in a fresh free-draining mix. Don't overwater afterward and make sure the container has unobstructed drainage holes. If more than half the root system is rotted, the plant is unlikely to recover.
Attracting hummingbirds with yellow hibiscus
Yellow hibiscus is genuinely one of the better hummingbird plants you can grow. The large, open trumpet flowers produce substantial nectar, and hummingbirds, particularly Ruby-throated and Anna's hummingbirds, depending on your region, are reliably drawn to them. The key is that hummingbirds are attracted by tubular or funnel-form flowers with accessible nectar, and hibiscus fits that profile well. Planting yellow hibiscus near red or orange flowering companions (such as salvia, cardinal flower, or coral honeysuckle) creates a multi-species pollinator corridor that keeps hummingbirds returning throughout the season. A continuous-blooming tropical hibiscus in a container near a sunny window or patio door also gives you the entertainment of close-up hummingbird visits without leaving the house.
To maximize hummingbird activity, keep your hibiscus in peak health: drooping, stressed plants produce less nectar. Avoid broad-spectrum insecticide sprays during flowering if possible, since these can eliminate the smaller insects hummingbirds also feed on. If you want to build a full hummingbird-friendly planting, pairing hibiscus with other pollinator magnets is worth researching as part of a broader hummingbird plant garden plan. For step-by-step growing tips and companion planting ideas, see our guide on how to grow hummingbird plant.
Seasonal care at a glance
| Season | Hardy Hibiscus Tasks | Tropical Hibiscus Tasks |
|---|---|---|
| Early spring | Watch for late emergence; cut old stems to 4–6 in.; apply slow-release fertilizer; replenish mulch | Move back outdoors when nights are above 50°F; prune by one-third; begin regular feeding |
| Late spring | Plant new specimens after last frost; begin biweekly liquid feeding as growth picks up | Harden off indoor-wintered plants; repot if root-bound; pinch tips to encourage branching |
| Summer | Water to 1 in./week; deadhead; biweekly liquid high-K feed; watch for pests | Water frequently (daily in heat waves for containers); deadhead daily; biweekly high-K liquid feed |
| Early fall | Reduce feeding; enjoy late blooms; stop pruning | Reduce feeding; bring containers indoors before first frost; transition to minimal watering |
| Late fall / Winter | Cut back after first frost; mulch crowns 3–6 in. deep; no feeding needed | Keep indoors in bright light above 50°F; water sparingly; no feeding until spring |
FAQ
What yellow hibiscus varieties are best for home gardens and containers?
Choose based on climate and use: for temperate zones (USDA 4–9) pick hardy hibiscus (Hibiscus moscheutos) cultivars—look for yellow selections or the vigorous Luna series for large blooms and perennial habit. For warm climates (USDA 9–11) or year‑round patio plants use tropical hibiscus (Hibiscus rosa‑sinensis) with many yellow cultivars available. For containers or bonsai, tropical types adapt faster to training; hardy types can be containerized but die back to the crown in winter in cold zones.
When is the best time to plant yellow hibiscus?
Plant hardy hibiscus in spring after the last hard frost when soil can be worked; they emerge late so wait until crown growth begins. Plant tropical hibiscus outdoors only after night temperatures consistently stay above ~50–55°F (after last frost). In containers, you may pot at any time if roots are healthy; avoid major repotting during hot peak summer.
How do I pick the right site and light exposure?
Select full sun (≥6 hours direct sun/day). In very hot inland locations give some late‑afternoon protection to reduce scorching. Ensure good air circulation and space plants to accommodate mature spread (hardy 3–6 ft; tropical varies). For container plants place where they get morning sun and some afternoon shade in extreme heat.
What soil type, pH and drainage do yellow hibiscus need?
Aim for slightly acidic to neutral soil (pH ~6.0–7.0). Roots prefer moist but not waterlogged, well‑drained media. Improve heavy clay by mixing in 2–4 in. well‑decomposed compost worked into the top 6–8 in. For sandy soil add 2–4 in. compost plus moisture‑retentive amendments (coir, peat‑free compost). Raised beds or mounding help where drainage is poor.
What potting mix should I use for container hibiscus?
Use a free‑draining, fertile mix: roughly 3 parts quality peat‑free potting compost or well‑aged compost, 1 part coarse perlite or pumice, 1 part orchid bark or coarse pine fines. This improves aeration and reduces waterlogging. Ensure containers have drainage holes.
How often and how much should I water hibiscus (ground vs container)?
In ground: aim for ~1 inch water/week in summer (adjust for rainfall). Keep soil evenly moist during growth and bloom periods. In containers: water thoroughly until drainage, typically 0.5–2 gallons depending on pot size (10–15 in. pot ≈1–2 gal). Let top ~1 in. of potting mix dry slightly between waterings for tropical hibiscus; increase frequency in heatwaves and reduce in cool/rainy periods.