
Delphinium 'Pacific Giants' can be grown from seed by most home gardeners, but they reward the ones who get the basics right: full sun, well-drained soil around pH 6.5–7.5, cold-stratified seed sown at 65–70°F (18–21°C), and solid staking before the spikes hit 4 feet. Get those four things dialed in and you'll have flower spikes reaching 5–6 feet (sometimes taller) in blues, purples, white, and pink every summer. Skip any one of them and you'll wonder why your delphiniums flopped, rotted, or refused to flower at all.
How to Grow Delphinium Pacific Giants: Complete Care Guide
Marcus Holloway
29 Jul 2026
Who this guide is for and what you'll learn
This guide is written for home gardeners at every level who want to grow Delphinium 'Pacific Giants' properly, from seed or division, in the ground or in containers. Whether you've never germinated a delphinium seed in your life or you've been struggling with floppy stems and weak rebloom for years, you'll find practical, step-by-step instructions here. We'll cover cultivar selection, hardiness zones, site prep, soil pH, every propagation route (cold stratification, direct sowing, and starting indoors), transplanting, staking, feeding, dividing, seasonal care, pest and disease control, and regional adjustments for both cool and hot climates including Australia. By the end you'll have a clear timetable and a repeatable system you can trust season after season.
What exactly are Delphinium 'Pacific Giants'?
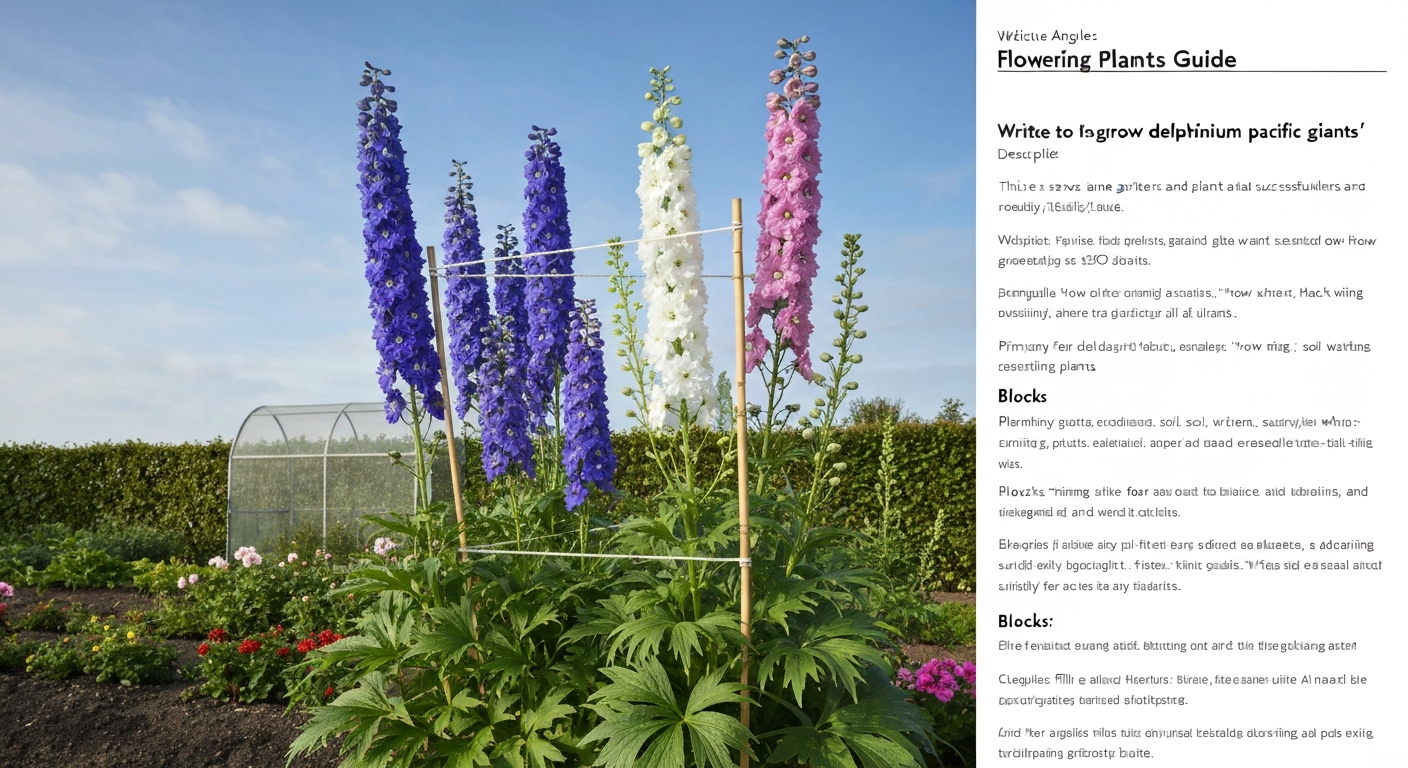
Delphinium 'Pacific Giants' is a series of tall hybrid delphiniums (Delphinium × elatum / Delphinium × cultorum hybrids) developed for the ornamental garden and the cut-flower trade. They are the big ones: mature flower spikes routinely reach 54–72 inches (roughly 137–183 cm), with some catalog descriptions listing the range as 150–180 cm depending on growing conditions. The spikes are dense, upright, and loaded with semi-double or double florets that open from the bottom up over several weeks. Plants form a basal clump of deeply lobed, palm-shaped leaves, and each established clump can send up multiple spikes in a single season.
One thing to know going in: the stems are hollow. That's important because it means Pacific Giants are genuinely vulnerable to wind damage in a way that shorter garden perennials are not. It also means staking isn't optional, it's part of the growing system. Plants are typically treated as short-lived perennials; in ideal cool-summer climates they may persist for several years, but in warmer zones many gardeners get the best results by treating them as biennials or even annuals, raising fresh plants from seed every year or two.
Recommended Pacific Giant cultivars and where to find seeds
The Pacific Giants series includes a group of named cultivars with distinct flower colors, most carrying Arthurian legend names. The most reliably available in seed catalogs include Astolat (pink and lilac tones), Blue Jay (mid to deep blue with dark bee), Black Knight (deep violet-blue with dark bee), Galahad (pure white), Guinevere (lavender-pink with white bee), Cameliard (lavender with white bee), and Percival (white with black bee). You can also buy the series as a mixed packet if you want the full color range, which is a practical and economical starting point for first-time growers.
For seed sourcing, look for suppliers that store seed cold and list a current harvest year on the packet. Delphinium seed loses viability quickly in warm, humid conditions, so fresh seed from a reputable specialist makes a real difference to germination rates. Pinetree Garden Seeds, Ball Seed (trade), OSC Seeds, and specialist perennial seed houses are good starting points. Always check the catalog's hardiness rating for the specific packet you are buying, as individual suppliers sometimes list Pacific Giants as hardy to Zone 3 or 4 and that rating should be verified against your local conditions.
Hardiness and USDA zone guidance
Pacific Giants are most reliably grown in USDA Hardiness Zones 3–7. Most seed houses list them as hardy to Zone 3 or 4, meaning the roots can survive winters with minimum temperatures around -30°F to -20°F (-34°C to -29°C). However, hardiness in delphiniums is at least as much about summer heat and humidity as it is about winter cold. These hybrids are cool-summer plants at heart. In Zone 7 and above, high summer temperatures and humidity accelerate crown rot and root decline, and plants frequently behave as biennials or short-lived perennials rather than long-lived ones. In Zones 8 and warmer, success is possible but requires strategic siting and sometimes treating the plants as winter-to-spring flowering annuals.
Always cross-reference the USDA Plant Hardiness Zone Map for your specific zip code or location. The PHZM was updated in 2023 and many areas have shifted half a zone warmer compared to older maps. Your local microclimate, including whether you garden in a frost pocket, on a slope, or near a body of water, can move your effective zone by half a zone in either direction.
Choosing the right spot in your garden
Light requirements
Pacific Giants need at least 6 hours of direct sun per day for strong, upright growth and maximum flowering. Full sun is the target in most climates. In regions where summer afternoon temperatures regularly exceed 90°F (32°C), giving plants morning sun and light afternoon shade dramatically reduces heat stress and extends the flowering period. Don't plant them in full shade: you'll get etiolated, floppy stems with poor flowering and high disease pressure.
Wind protection and microclimates
Because the stems are hollow and can reach 6 feet, wind is genuinely dangerous to Pacific Giants. A well-placed fence, hedge, or garden wall that breaks the prevailing wind without creating a frost pocket is ideal. Avoid exposed hilltops or sites where wind regularly funnels. Planting along the leeward side of a border, with taller shrubs or a fence upwind, is a practical approach that also tends to create the slightly sheltered, slightly warmer microclimate these plants like.
Drainage matters more than you think
Delphiniums will not tolerate waterlogged soil. Crowns sitting in wet soil over winter or after heavy rain are the number one cause of plant loss in my experience. If your garden has heavy clay or a naturally high water table, consider raising your delphinium bed by even 6–8 inches or building a proper raised bed. Good drainage is more important than any fertilizer program.
Soil preparation: pH, amendments, and drainage
The ideal soil pH for Pacific Giants is 6.5–7.5, meaning near-neutral to very slightly alkaline. If you haven't done a soil test recently, do one before planting. Extension services and home test kits are both fine for this purpose; a mail-in test from your county extension office will also give you a buffer-based lime recommendation, which is much more accurate than a guess. If your soil tests below 6.5, apply finely ground dolomitic limestone according to your soil test result. As a rough working example, research from UF/IFAS shows that in many soils approximately 2–5 lb of finely ground dolomitic limestone per 100 square feet can shift pH by roughly one unit, but your actual requirement depends on soil texture and organic matter content, so use your test result as the guide rather than that number alone.
For organic matter, work in 2–3 inches of well-rotted compost or aged manure before planting, incorporating it to a depth of at least 12 inches. Delphiniums are heavy feeders with deep root systems and they respond noticeably to soil that has been properly prepared versus a quick surface scratch. On heavy clay soils, add coarse horticultural grit (not fine builder's sand) at roughly 1 part grit to 3 parts soil to improve drainage and aeration. On sandy soils, extra compost is your friend because it both improves moisture retention and adds fertility.
Planting depth, spacing, and soil mixes
When setting out transplants or dividing established clumps, plant the crown at exactly soil level, not deeper. Burying the crown promotes the crown rot that is the most common cause of delphinium death in gardens. Space individual plants 18–24 inches (45–60 cm) apart. Crowding restricts airflow and increases powdery mildew risk while competing for nutrients in the fertile soil you've just prepared.
For beds, a practical planting mix is two parts good garden loam, one part well-rotted compost, and one part coarse perlite or grit. This gives you the fertility, drainage, and structure that delphiniums need. For container growing (covered in detail below), the mix changes slightly to emphasize drainage and weight management.
Seed propagation: which method to use and when
There are three main ways to start Pacific Giants from seed: cold stratification followed by indoor sowing, direct outdoor sowing, and starting indoors without stratification using controlled temperature. Cold stratification gives the most reliable results with fresh seed. Direct sowing works well for late-summer sowing in cool climates where natural winter chilling does the stratification work for you. Starting indoors without prior stratification is workable if your seed is fresh and your germination temperature is closely managed. Here's how to do each one.
Cold stratification step by step
Research on Delphinium × cultorum seed (Carpenter and Boucher, HortScience, 1992) found that storing seed dry at approximately 2°C for 3 weeks shortened time to 50% germination without necessarily improving the final germination percentage. Commercial suppliers frequently recommend moist cold stratification at 35–40°F (1–4°C) for 2–3 weeks. Here is a practical protocol that combines both approaches.
- Gather your materials: fresh delphinium seed, a small zip-lock bag, a pinch of barely damp (not wet) vermiculite or paper towel, and a refrigerator running at 34–40°F (1–4°C).
- Mix the seed into the damp vermiculite or fold it loosely in the damp paper towel. The medium should feel barely moist — if you squeeze it and water drips, it's too wet.
- Seal the bag, label it with the date and cultivar name, and place it in the coldest part of your refrigerator (not the freezer). Keep it away from ethylene-producing fruit like apples.
- Leave it for 2–3 weeks. Check every few days to make sure the medium has not dried out entirely or become soggy.
- After 3 weeks, remove the bag and sow the seed immediately. Stratified seed should not be dried out and re-stored; use it within a day or two of removing it from the fridge.
- Sow onto the surface of a fine, well-drained seed-raising mix in trays or small pots. Press seeds lightly to make contact but do not bury them deeply — most delphinium seed germinates better with light or very shallow coverage of no more than 1/8 inch (3 mm).
- Place trays in a location that holds 65–70°F (18–21°C) consistently. A heat mat set to this range under the tray is ideal in a cool room.
- Expect germination in 10–21 days. If nothing has emerged after 21 days, check that temperature is not fluctuating widely and that the mix has stayed evenly moist.
Troubleshooting tip: the most common reason cold-stratified seed fails is temperature drift during germination. A windowsill that hits 65°F by day but drops to 50°F at night is too variable. Use a thermometer to verify your germination location before sowing.
Direct sowing outdoors
Direct sowing works best in cool climates (Zones 3–6) when done in late summer, roughly mid-July through August in the Northern Hemisphere. The seed germinates in early autumn, plants establish a small rosette before hard frost, go dormant under mulch, and resume growth vigorously the following spring. This mimics the plant's natural seed cycle and produces robust plants without the extra propagation infrastructure of indoor sowing.
Prepare the bed as described above (fine tilth, pH-corrected, weed-free). Sow seed thinly on the surface of the bed or just press it lightly to 1/8 inch depth. Water gently with a fine rose or misting nozzle, being careful not to wash the tiny seeds together. Keep the seedbed moist until germination, then thin seedlings to 4–6 inches apart at first, with final thinning to 18–24 inches once plants are established enough to select the strongest individuals.
Starting seeds indoors
Indoors, the ideal time to start Pacific Giants is 8–10 weeks before your last frost date. In Zone 5, that's typically late January to mid-February for a May transplant. Fill 72-cell plug trays or individual 2–3 inch pots with a fine, well-drained seed-raising mix. Sow one or two seeds per cell at the surface or with just 1/8 inch of fine vermiculite sifted over the top. Water gently from below (set trays in a shallow water bath for 10 minutes, then drain).
Maintain a steady germination temperature of 65–70°F (18–21°C). Germination typically takes 10–21 days. Once seedlings have their first true leaves, move them to your brightest window or under grow lights (16 hours light per day works well). Begin feeding with a half-strength balanced liquid fertilizer every two weeks once the second set of true leaves appears. Grow on at 55–65°F (13–18°C) if possible, cooler temperatures after germination produce stockier, more cold-tolerant transplants.
Transplanting into the garden
Harden off indoor-raised seedlings for 7–10 days before transplanting. Start by putting them outside in a sheltered, partly shaded spot for 2–3 hours the first day, gradually increasing exposure over the week until they're spending a full day outdoors in the same sun level as their intended bed. This matters a lot with delphiniums: soft indoor-raised plants put straight into full sun and wind can suffer significant leaf scorch and setback.
- Choose a day when temperatures are mild and no strong wind or heavy rain is forecast — overcast days are ideal for transplanting.
- Water seedlings thoroughly an hour before transplanting so the rootball holds together.
- Dig planting holes 18–24 inches apart, at least as deep as the rootball.
- Set the crown at soil level, not below it. Firm gently around the roots to remove air pockets.
- Water in well, applying about 1–2 cups of water per plant directly at the base.
- Apply a 2-inch layer of mulch around (but not touching) the crown.
- Insert your first stake at planting time so you don't damage the roots later.
Growing Pacific Giants in containers
Container growing is possible but requires the right setup. Pacific Giants need a pot that is at least 15–18 inches (38–45 cm) deep and 12–15 inches (30–38 cm) wide to accommodate the root system and provide stability for the tall stems. Terracotta or heavy ceramic pots are better than lightweight plastic because they reduce the risk of the whole plant toppling in wind.
Use a mix of 50% good-quality loam-based compost (such as John Innes No. 3 or an equivalent loam-based blend), 30% multipurpose compost, and 20% coarse perlite or grit. This gives drainage and weight without sacrificing fertility. Water containers more frequently than in-ground beds because pots dry out faster, especially in warm weather. Check moisture daily in summer and water when the top inch of mix is dry, not on a fixed schedule.
Feed container plants with a balanced liquid fertilizer every two weeks from spring through mid-summer, then switch to a lower-nitrogen, higher-potassium formula (a tomato-type feed works) from mid-summer onward to harden growth before winter. For overwintering in containers, move pots to a sheltered, frost-free but cool location (an unheated greenhouse or garage works in Zones 5–7). In colder zones, sink the pot into the ground or insulate it with burlap and straw to protect the rootball from hard freezes.
Dividing established clumps
Divide Pacific Giants every 2–3 years to rejuvenate clumps that have become congested, are producing fewer or weaker spikes, or have a dead zone developing in the centre. Division is best done in early spring as new growth is just emerging (shoots about 2–3 inches tall), or in early autumn after the plants have finished their second flush of flowering. Avoid dividing in the heat of summer.
- Water the clump thoroughly the day before to reduce root stress.
- Use a sharp spade or garden fork to lift the entire clump, working outward from the crown to preserve as many roots as possible.
- Use two garden forks back to back (or a sharp knife for smaller clumps) to separate the clump into sections, each with at least 2–3 healthy shoots and a good portion of roots.
- Discard the old, woody central section if it looks dead or diseased.
- Dust cut surfaces with powdered sulfur or charcoal to reduce fungal infection risk.
- Replant divisions immediately at soil level, 18–24 inches apart, into freshly amended soil.
- Water in well and keep evenly moist for the first 2–3 weeks while divisions re-establish.
Watering through the seasons
Pacific Giants need consistent moisture during active growth. A good working rule is 1 inch of water per week (from rain plus irrigation combined) during the growing season, delivered at soil level rather than overhead. Overhead watering in the evening promotes mildew and should be avoided. During the first few weeks after transplanting or division, water more frequently, every 2–3 days in dry weather, to help roots establish. Once plants are established and in full growth, deep watering twice a week in dry conditions is usually sufficient in temperate climates.
In periods of genuine drought, delphiniums will show stress (leaf flagging, reduced spike development) before most other garden plants. A 2–3 inch mulch layer reduces moisture loss significantly and is one of the best drought-management tools available. Reduce watering frequency in autumn as growth slows, and keep the crown area relatively dry over winter to minimize rot risk.
Feeding schedule and fertilizer recommendations
Pacific Giants are hungry plants, but the kind of feeding matters as much as the quantity. Too much nitrogen too late in the season produces sappy, soft growth that is more susceptible to both disease and wind damage. Here is a practical feeding schedule for established in-ground plants.
| Timing | Fertilizer Type | Rate / Method | Purpose |
|---|---|---|---|
| Early spring (new growth 3–4 in) | Balanced granular (e.g., 10-10-10 or blood/bone/potash blend) | Per label rate; scratch into soil surface | Promote strong vegetative growth and root development |
| When flower spikes form (4–6 weeks later) | Balanced liquid feed or tomato-type (higher K) | Half-strength liquid, applied every 2 weeks | Support spike development and floret quality |
| After first flush cut back | Light application of balanced granular | Half the spring rate | Fuel second flush of growth and rebloom |
| Late summer / early autumn | Low-nitrogen, high-potassium feed (tomato type) | Half-strength liquid, once or twice | Harden growth before winter; do not push soft leafy growth |
| Late autumn / winter | None | — | Plants dormant; feeding at this time is wasteful and harmful |
A word on proprietary feeds: a general balanced soluble feed is perfectly adequate and you don't need expensive specialist products. The trap with high-analysis quick-release feeds like Miracle-Gro is over-application: it's easy to push excessive nitrogen, which gives you spectacular leaf growth and weak, floppy spikes. Stick to the schedule above rather than just feeding whenever you walk past the bed.
Staking: do it early and do it properly
Staking is non-negotiable for Pacific Giants. Hollow stems at 5–6 feet will break in wind and heavy rain without support, and the damage is irreversible once it happens. The key is to stake early, when plants are still 12–18 inches tall, so that stems grow up through the support naturally rather than being tied to it awkwardly after the fact.
The most effective method for Pacific Giants is a single sturdy bamboo stake (at least 6 feet tall, inserted about 18 inches into the ground) per spike, with the stake positioned about 2 inches away from the stem. Use soft garden twine or velcro plant ties, never wire, and tie loosely in a figure-eight so the stem can sway slightly without rubbing against the stake. Add additional ties as the spike grows, every 12–15 inches of height. For a large clump sending up multiple spikes, a grid of canes with twine woven between them (similar to a peony ring but taller) works well and is less visible than individual stakes.
Mulching and winter protection
Apply a 2–3 inch layer of mulch (composted bark, straw, or leaf mould) around plants in late spring once the soil has warmed. This retains moisture during summer, suppresses weeds, and keeps soil temperatures more even. Keep mulch a few inches away from the crown to prevent moisture buildup and rot at the base.
For winter protection in Zones 3–5, after the first hard frost has killed top growth back to near ground level, apply a deeper mulch layer of 4–6 inches of straw or shredded leaves directly over the crown area. This protects the crown from repeated freeze-thaw cycles that can heave plants out of the soil. Remove this protective mulch gradually in spring once temperatures are reliably above freezing to avoid smothering emerging shoots. In Zones 6–7, a lighter mulch layer of 2–3 inches is typically sufficient. In Zone 8 and warmer, winter cold is rarely the problem and mulch is applied mainly for summer moisture retention.
Deadheading, pruning, and getting a second flush
Cut spent flower spikes down to the nearest side shoot or lateral bud as soon as the main spike has finished flowering. Do not cut all the way to the ground at this stage. These laterals will produce smaller but still showy secondary spikes within 4–6 weeks. When the laterals have also finished, cut the entire stem down to the basal leaf rosette. This cleanup tidies the plant, reduces disease pressure from decaying plant material, and in cool climates can prompt a second flush of basal shoots that may produce a further round of flowering in late summer or early autumn.
In autumn, after all flowering is finished and foliage has died back naturally, cut stems back to about 2–3 inches above ground level. Remove and dispose of (not compost) any stems that showed signs of disease during the season. Leaving hollow stumps in the bed can harbor slugs and fungal pathogens over winter.
Month-by-month seasonal care calendar
| Month / Season | Key Tasks |
|---|---|
| January–February (late winter, Zones 5–7) | Start seeds indoors 8–10 weeks before last frost; check stored seed viability; order fresh seed if needed |
| March–April (early spring) | Remove winter mulch gradually as shoots emerge; apply first balanced granular feed; install support stakes early; begin hardening off indoor seedlings |
| May (late spring) | Transplant hardened-off seedlings after last frost; apply spring mulch layer; continue staking; feed with balanced liquid as spikes form |
| June–July (early summer) | Main flowering period; deadhead spent spikes to laterals; maintain watering (1 in/week); watch for slugs and powdery mildew; stake any unsupported spikes immediately |
| August (mid-late summer) | Cut spent stems to basal rosette after laterals finish; apply second light granular feed; switch to low-nitrogen/high-potassium liquid feed; direct sow seed outdoors in cool climates |
| September–October (early autumn) | Second flush of flowering (cool climates); divide overcrowded clumps in early autumn; reduce watering; final low-N feed if plants are still in active growth |
| November (late autumn) | Cut all stems back to 2–3 in after hard frost; remove diseased material; apply winter protective mulch in Zones 3–5 |
| December (winter) | Plants dormant; no feeding; check mulch is intact; plan next year's plantings; cold-stratify seeds in refrigerator if preparing for early indoor sowing |
Troubleshooting pests and diseases
Slugs and snails
Slugs are the single biggest pest problem for delphiniums. They target emerging shoots in spring and can wipe out a clump overnight. They are most active in mild, wet weather. Prevention: keep mulch away from the crown, remove debris that provides daytime hiding spots, and go out at night with a torch during wet periods in spring to hand-pick them. For organic control, iron phosphate-based slug pellets (such as Sluggo) are effective, low-toxicity, and safe around pets and wildlife. Diatomaceous earth sprinkled around the crown in dry weather creates a temporary physical barrier. Copper tape around container pots provides partial deterrence.
Powdery mildew
Powdery mildew (white or grey powdery coating on leaves) is extremely common on delphiniums, particularly in warm, dry spells with cool nights. It doesn't usually kill the plant but weakens it, reduces flowering, and is unsightly. Prevention is much more effective than cure: space plants properly for airflow, avoid overhead watering, and water at the base. Organic controls include a dilute solution of potassium bicarbonate (1 tablespoon per gallon of water sprayed on foliage), a dilute baking soda spray, or neem oil applied early in the season. Once mildew is established, remove affected leaves and improve airflow before spraying.
Crown and root rot
Crown rot (caused by Fusarium, Pythium, and related fungi) kills plants from the base up, usually visible as sudden wilting or browning at the crown despite adequate soil moisture. It is almost always caused or exacerbated by poor drainage, overwatering, or burying the crown too deep at planting. Once established in a plant it is very difficult to reverse. Remove and destroy affected plants. Do not replant delphiniums in the same spot without improving drainage and replacing the soil.
Aphids and cyclamen mites
Aphids cluster on tender new shoots and under leaves, excreting honeydew that promotes sooty mold. A strong blast of water from a hose knocks them off effectively and repeatedly. Insecticidal soap or neem oil applied directly to infestations works for persistent problems. Cyclamen mites cause distorted, stunted growing tips and are harder to see. If tips look twisted and crinkled rather than just yellowed, suspect mites rather than aphids. Remove and dispose of affected growing tips and treat with neem oil.
Fixing poor flowering, floppy growth, and leggy stems
Poor or absent flowering is almost always traceable to one of four causes: insufficient sunlight, too much nitrogen relative to phosphorus and potassium, plants that are too old and congested, or heat stress. Work through this list before reaching for a different fertilizer. Check that your site is genuinely getting 6+ hours of direct sun. Review your feeding history, if you've been generous with high-nitrogen lawn-type fertilizers, you'll get lush leaves and weak flowers. Divide the clump if it hasn't been touched in more than 3 years. And in hot-summer climates, assess whether afternoon shade might help.
Floppy or leggy stems usually come from one of three things: inadequate sunlight causing the plant to stretch toward light, staking that was installed too late (after the plant had already started leaning), or soil that is too nitrogen-rich. If you stake early (when plants are 12–18 inches tall) and provide full sun, floppy growth is rare. Leggy seedlings started indoors are almost always a light problem: 16 hours under a good grow light or a very bright south-facing window solves it.
Growing Pacific Giants in different climates
Cool climates (Zones 3–6)
This is where Pacific Giants thrive most naturally. In cool-summer climates you'll get the longest-lasting spikes, the best color, and the most reliable perennial performance. Your main jobs are staking early, managing slugs, and ensuring drainage is good enough to survive winter. Plants often persist and improve for 3–4 years with regular division and feeding. Second flushes of bloom in late summer are common and sometimes as impressive as the first.
Hot climates (Zones 7–9)
Heat and humidity are the enemy. In Zone 7 and warmer, Pacific Giants are best treated as biennials or short-lived perennials. Site them where they receive morning sun and afternoon shade, improve drainage aggressively, and mulch thickly to keep root zones cool. In Zone 8 and warmer, some gardeners have success with a winter-to-spring planting cycle: transplant in autumn, enjoy flowers in late winter to spring, and allow plants to decline in summer heat. Choosing a planting site with good air movement also helps reduce fungal disease in humid climates.
Notes for Australian gardeners
USDA zone numbers don't translate directly to Australian conditions, and it's worth being clear about that. Australia's climate system (Bureau of Meteorology zones) is based on different parameters than the USDA minimum-temperature map, and Australia doesn't have a simple equivalent zone system. As a practical guide: gardeners in the cool-temperate regions of southeastern Australia (Tasmania, the Victorian highlands, the ACT, the tablelands of New South Wales) are working in conditions roughly comparable to USDA Zones 7–8 in terms of summer warmth, sometimes cooler in winter. These are the areas where Pacific Giants perform best in Australia. In these regions, timing shifts: late summer to autumn sowing (February to April) for plants to flower the following spring is a commonly used approach. Gardeners in subtropical and tropical regions (Queensland, coastal New South Wales, Western Australia's north) will find Pacific Giants very difficult and will get the best results only in the cooler months with afternoon shade. This parallels the challenges faced by Zone 8–9 growers in the United States. For more region-specific guidance on growing delphiniums in Australian conditions, including timing adjustments for the Southern Hemisphere, the guide on how to grow delphiniums in Australia covers this in more detail. See the guide how to grow delphiniums in Australia for detailed Southern Hemisphere timing and regional adjustments.
Quick reference timetable
| Task | When (Northern Hemisphere, Zone 5 example) | Notes |
|---|---|---|
| Cold stratification of seed | 12–13 weeks before last frost (Jan–Feb) | 2–3 weeks at 34–40°F in damp vermiculite |
| Start seeds indoors | 8–10 weeks before last frost (Jan–Feb) | 65–70°F; surface sow; expect germination in 10–21 days |
| Direct sow outdoors (cool climates) | Mid-July to August | Natural winter chilling provides stratification |
| Harden off seedlings | 2 weeks before transplanting | 7–10 days of gradual outdoor exposure |
| Transplant outdoors | After last frost (mid-May in Zone 5) | Crown at soil level; 18–24 in spacing |
| Insert stakes | At transplanting or when plants reach 12–18 in | 6-ft bamboo canes, 18 in into ground |
| First spring feed | When new growth is 3–4 in tall | Balanced granular per label |
| Second feed (spike formation) | 4–6 weeks after first feed | Balanced liquid, every 2 weeks |
| Deadhead spent spikes | As main spike finishes (June–July) | Cut to first lateral, not to ground |
| Cut back to rosette | After laterals finish (August) | Apply second light granular feed |
| Apply winter mulch (Zones 3–5) | After first hard frost (November) | 4–6 in straw or shredded leaves over crown |
| Divide clumps | Every 2–3 years, early spring or early autumn | When spikes weaken or clump becomes congested |
Further reading and related guides
Pacific Giants are one part of a much broader and fascinating delphinium family. If you want a broader understanding of delphinium species, their cultural needs across different varieties, and how to select between the major groups, the guide on how to grow delphiniums covers the genus as a whole. For those gardening in Australia, the guide on how to grow delphiniums in Australia provides detailed Southern Hemisphere timing and regional adjustments that go beyond the notes above. If you enjoy growing tall, spire-forming cottage garden perennials alongside your delphiniums, the guide on how to grow columbines is a natural companion read since columbines share some of the same cool-garden preferences, though they are considerably easier to establish. For fragrant shrubs that pair beautifully in the same border as Pacific Giants, the guide on how to grow philadelphus (mock orange) is worth exploring.
FAQ
What primary research questions must be answered to create a complete growing guide for Delphinium 'Pacific Giants'?
Identify cultivar traits (mature height, spike length, flowering season, cultivar variability); definitive hardiness/habit for Pacific Giants; ideal site conditions (light, soil texture, drainage, pH); precise seed propagation protocols (cold stratification duration/temperature, light sensitivity, germination temperature and timing, direct sow vs. indoor start); transplant timing and methods; seasonal care schedule (when to feed, water, stake, mulch, divide); container‑growing specifics (pot size, mix, watering); division and renewal technique and timing; staking/support methods and timing; pruning/deadheading and winter protection methods; common pests/diseases and evidence‑backed organic control options; troubleshooting causes and fixes for poor flowering or leggy growth; regional adjustments for cool vs. hot climates and Australia; reliable seed/young‑plant sources and cultivar recommendations; locally actionable measurements (depth, spacing, fertilizer rates, lime rates based on soil test).
Which authoritative climate and hardiness references should be consulted for USDA zone and regional guidance?
USDA Plant Hardiness Zone Map (official) to place U.S. locations into zones; state and national extension services (e.g., NC State Extension, WSU Extension) for regionally adjusted perennial hardiness notes; Bureau of Meteorology (Australia) for Australian climate zones and BOM local climate data; CPBR / Australian conversion guidance for translating USDA zones to Australian descriptors; local university extension or horticultural services for microclimate and elevation adjustments.
What cultivar‑level and supplier sources should be checked for accurate Pacific Giants specifications and availability?
Commercial seed and young‑plant catalogs and data sheets from reputable suppliers (Ball Seed, Müller Seeds, OSC Seeds, Pinetree/CalaSeed, other major seed houses) for stated heights, cultivar lists, sowing recommendations, and hardiness claims; nursery plant‑label information from reputable growers; cultivar trial reports when available; reputable mail‑order reviews and provenance data to confirm cultivar names and series membership.
Which peer‑reviewed and extension publications are required for evidence‑based propagation protocols, including cold stratification and germination rates?
Peer‑reviewed studies on Delphinium seed physiology (e.g., Carpenter & Boucher 1992 on storage/temperature effects) for experimental baselines; university extension propagation guides and Master Gardener handbooks (WSU, NC State, UF/IFAS) for practical stratification protocols, germination temperatures, light sensitivity, and seedbed media recommendations; commercial propagation notes from seed companies for supplier‑tested protocols to cross‑validate.
What sources should be used to define ideal soil, pH, and amendment/reclamation practices for delphinium beds?
RHS perennial growing guides and university extension soil recommendations (WSU Master Gardener Handbook, NC State, UF/IFAS) for preferred pH (≈6.5–7.5), drainage and fertility needs; soil test laboratories and extension bulletins for lime application rates (buffer‑based recommendations); extension publications on soil improvement (compost incorporation rates, sand/grit amendment for heavy soils) and raised bed construction.
What references are needed for watering, fertilization schedules and recommended fertilizer types/amounts?
University extension culture guides (NC State, WSU, UF/IFAS) and RHS guidance for recommended feeding frequency and N‑P‑K balance for tall perennials; commercial production guides for feed rates used by growers; research or extension tables converting fertilizer product labels to application rates; local extension advice for adjusting schedules by climate and soil moisture retention.