Hellebores are some of the most rewarding perennials you can grow, but they do have a specific set of needs. Plant them in dappled shade with rich, well-drained soil that stays evenly moist (but never waterlogged), set the crown just at soil level, mulch generously, and leave them largely alone. Oklahoma State University Extension notes that hellebores need blank" rel="noopener noreferrer">moist, well-drained soil and do best in shade, with guidance to prune old foliage. Do that, and you'll have a plant that blooms reliably from late winter into spring, often pushing flowers up through snow, for decades with minimal fuss. If you want to focus specifically on getting heliconia established, use the same idea of matching the right light, moisture, and drainage to the plant’s needs how to grow heliconia.
How Do You Grow Hellebores Step by Step Care Guide

What hellebores actually need to thrive
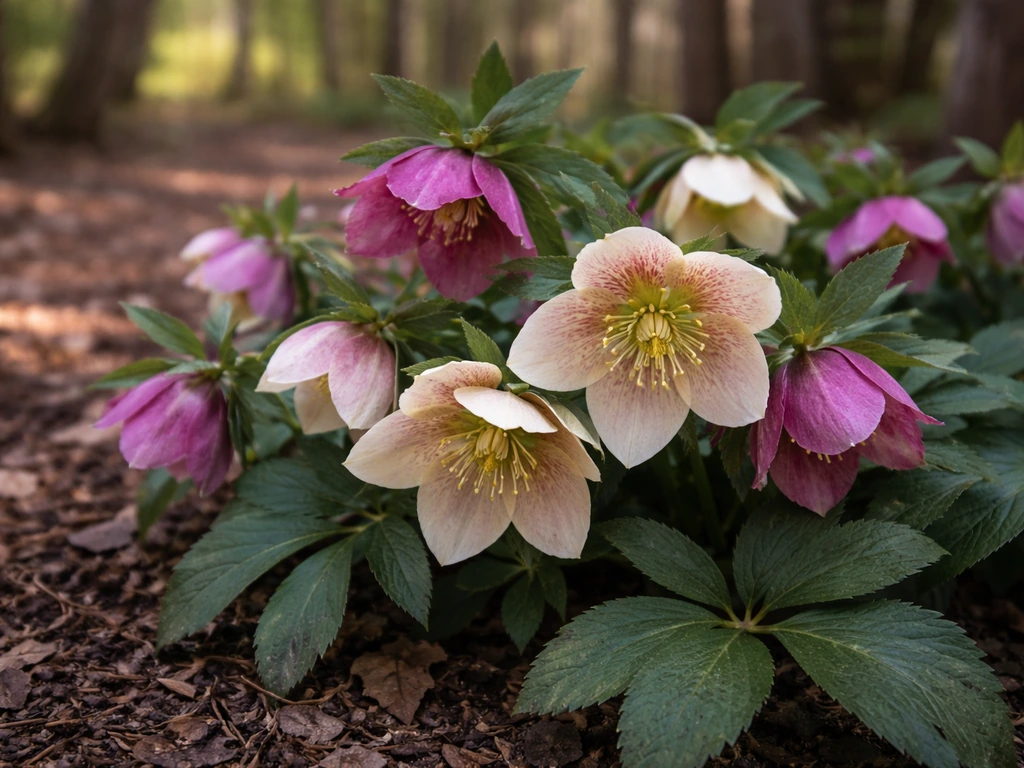
Hellebores (most commonly Helleborus x hybridus, the Lenten rose, and Helleborus niger, the Christmas rose) are long-lived, evergreen perennials that bloom when almost nothing else does: late winter to early spring. They're hardy across a wide range of USDA zones (typically zones 4 through 9, depending on variety), and once established they're genuinely tough. But they take their time getting there. Most won't bloom well until their second or even third year, so patience is part of the deal.
The core requirements are simple: shade or filtered light, fertile and consistently moist but well-drained soil, neutral to slightly alkaline pH, and a crown that sits at exactly the right depth. Get those four things right and you're most of the way there. Everything else, watering, feeding, seasonal cleanup, is about keeping those conditions stable.
- Dappled or partial shade, ideally under deciduous trees so they get winter sun when dormant overhead canopies let it through
- Rich, fertile soil loaded with organic matter and neutral to slightly alkaline pH (around 7.0 or just above)
- Consistent moisture during the growing and flowering season, combined with excellent drainage to prevent winter waterlogging
- Crown set at soil level, not buried too deep
- Hardy in USDA zones 4 to 9 (check your specific cultivar, as some vary)
Best time to plant and where to put them
The ideal planting window runs from autumn through to spring. Autumn is often the best choice because the soil is still warm enough for roots to establish before the ground freezes, giving plants a head start before their late-winter bloom period. Spring planting works too, especially if you're buying plants already in flower at a nursery. What you want to avoid is planting in the dry heat of summer, when new plants struggle to establish and the stress can set them back significantly.
For location, think 'woodland edge.' Hellebores naturally grow beneath deciduous trees and shrubs, which means they get decent light in winter and early spring when the canopy is bare, then filtered shade through summer when they need protection from scorching. A north or east-facing border works well in most gardens. They can handle some direct sun in cooler climates but need shade from hot afternoon sun, especially in warmer zones. The key is avoiding both deep, dry shade (they'll sulk and barely flower) and full midday sun (leaves scorch and the plant weakens).
If you're gardening in a warmer climate (zones 7 to 9), lean toward more shade and pay extra attention to moisture. In cooler zones, a spot that gets a little more winter light is actually helpful for early blooms.
Soil, drainage, and the container vs. in-ground decision
Soil prep is where most hellebore failures start. These plants need fertile, organic-rich soil that drains well. Waterlogged roots in winter are essentially a death sentence, and even H. niger, which tolerates quite a bit, will rot if it sits in cold, wet soil for extended periods. If your garden has heavy clay, slow-draining beds, or spots where water pools after rain, you need to fix that before you plant.
The fix is straightforward: work in generous amounts of well-rotted compost or leaf mold, and if drainage is genuinely poor, add horticultural grit to help water move through faster. In severe cases, consider raised beds, which give you full control over both drainage and soil composition. Aim for a pH close to neutral, around 6.5 to 7.5. Hellebores are not fans of acidic, peaty soils, so avoid planting mixes that are heavily peat-based.
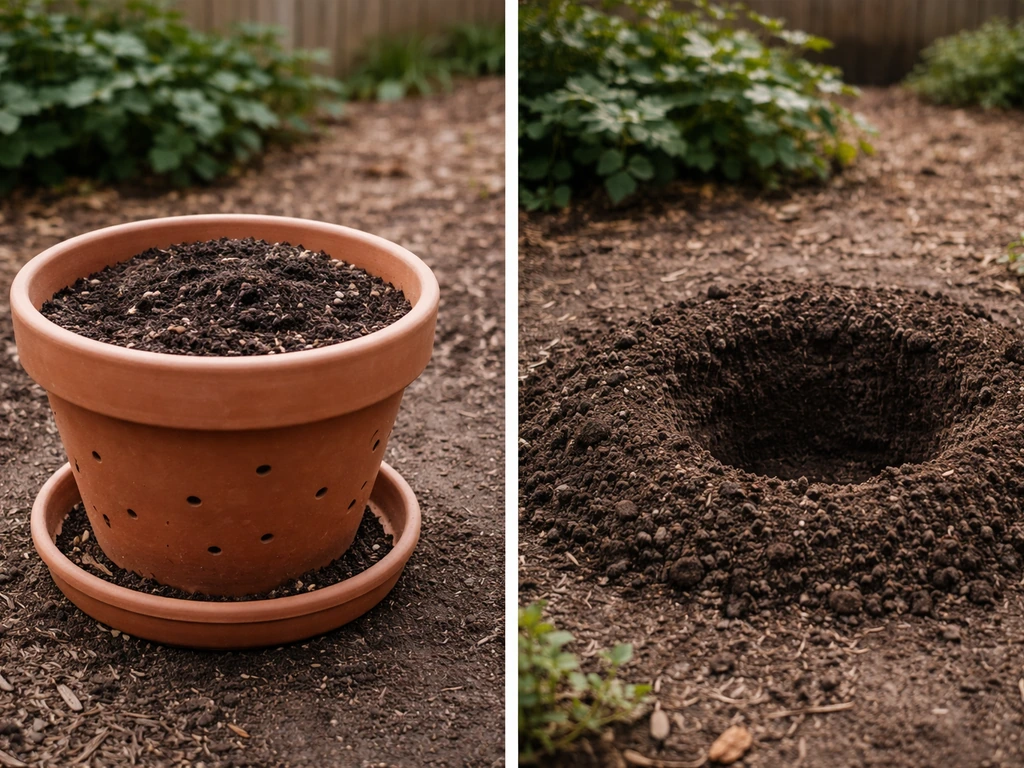
Growing hellebores in containers
Containers work well for hellebores if you get the setup right. Use a pot that has at least one large drainage hole (multiple is better), and go with a loam-based compost mixed with perlite or grit to improve drainage. Skip the pure peat mixes. Autumn is the best time to pot them up; spring works too, though an autumn-planted container plant may not flower until its second year. Size matters: hellebores have deep root systems, so use a pot at least 12 inches deep and wide. One advantage of containers is that you can move the plant under cover during the wettest winter weather, which is particularly handy for H. niger, which really dislikes prolonged damp.
| Feature | In-Ground | Container |
|---|---|---|
| Drainage control | Depends on native soil; may need amending | Full control with correct mix and pot choice |
| Winter moisture risk | Higher in clay or low-lying spots | Lower if pot has good drainage holes |
| Establishment speed | Faster once roots spread | Can be slower; watch for drying out |
| Longevity | Excellent; plants can thrive for decades | Good, but needs repotting every 2 to 3 years |
| Flexibility | Fixed position | Can move to shelter or better light seasonally |
| Best for | Established borders and woodland gardens | Patios, smaller gardens, or difficult drainage sites |
How to plant hellebores step by step
Before you dig, prep the soil properly. Dig the planting area to about a spade's depth (roughly 12 inches) and work in a generous amount of well-rotted compost. If drainage is a concern, add a handful of horticultural grit per square foot and mix it in well. Let the bed settle for a day or two if you can.
- Dig a hole roughly twice as wide as the root ball and just deep enough that the crown (where roots meet stems) will sit right at soil level, not below it.
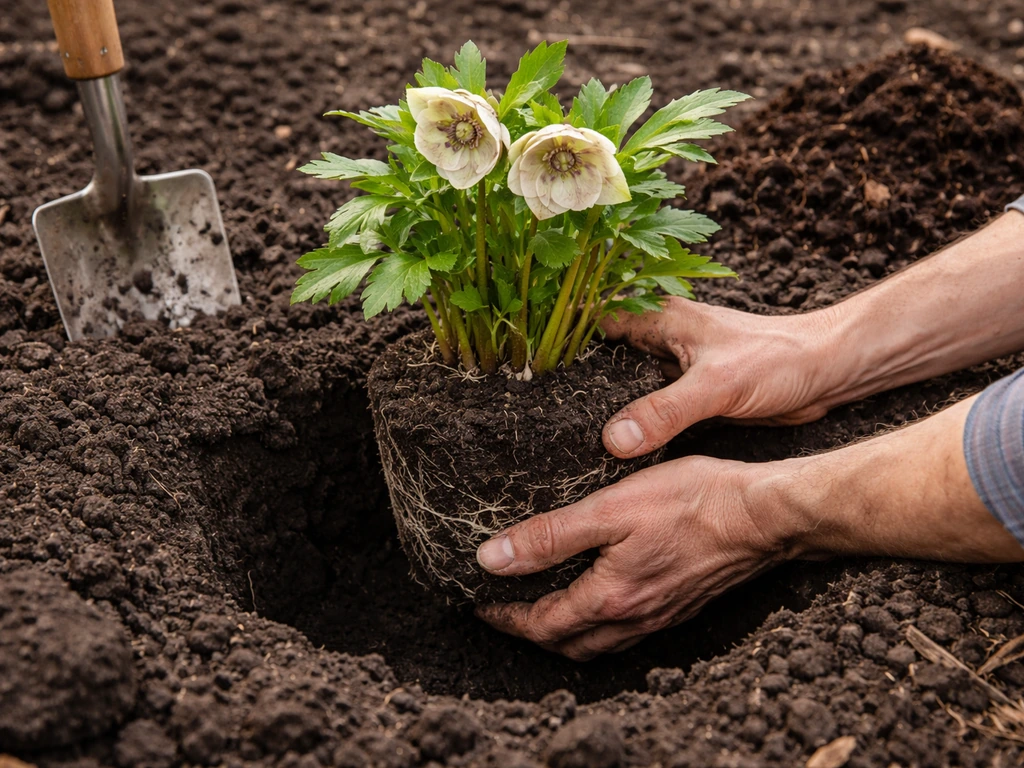
- Remove the plant from its pot and gently loosen the outer roots if they're circling the rootball.
- Place the plant in the hole and check crown depth: the top of the root system should be flush with the surrounding soil surface. This is critical. Planting too deep is one of the most common mistakes and leads directly to crown rot.
- Backfill with your amended soil, firming gently around the roots to remove air pockets.
- Space plants around 18 to 24 inches apart. Hellebores spread slowly but form good-sized clumps over time, and they resent being disturbed once settled.
- Water in thoroughly immediately after planting.
- Apply a 2 to 3 inch layer of mulch around the plant, keeping it 1 to 2 inches clear of the crown and stems. Direct contact between mulch and the crown traps moisture and encourages rot.
- If planting on a warm day, try to do it in the late afternoon or on a cloudy day to reduce transplant stress.
One more thing worth mentioning: hellebore roots are quite brittle and sensitive. Handle them carefully during planting, and once they're in the ground, try not to disturb them for several years. Unlike something like heuchera, which handles dividing fairly readily, hellebores strongly prefer to be left alone once established.
Watering, mulching, and fertilizing during establishment
In the first year, consistent watering is your most important job. Water regularly, especially during dry spells, to help roots establish. You're aiming for soil that stays evenly moist but not wet. Once established, hellebores become surprisingly drought-tolerant: they may wilt during a hot dry stretch, but they'll bounce back after watering. That said, they do need reliable moisture during their flowering period in late winter and spring, so don't let the soil dry out completely at that time.
Mulching is one of the best things you can do for these plants. A 2 to 3 inch layer of well-rotted leaf mold or compost helps retain moisture, suppresses weeds, moderates soil temperature, and gradually breaks down to feed the soil. Apply it in autumn and again in spring if needed. Just keep that gap between the mulch and the crown, 1 to 2 inches at minimum, to prevent rot building up at the base of the stems.
Fertilizing hellebores is a light touch situation. These are not heavy feeders, and over-fertilizing with nitrogen-rich products will push leafy growth at the expense of flowers. A side dressing of balanced, slow-release granular fertilizer in early spring when new growth appears is plenty. Alternatively, a good layer of well-rotted compost serves the same purpose more gently. If you do use granular fertilizer, keep it away from the crown and foliage entirely as it can burn both. Don't chase results with multiple heavy applications. Hellebores reward patience, not overfeeding.
Sunlight and seasonal care through the year
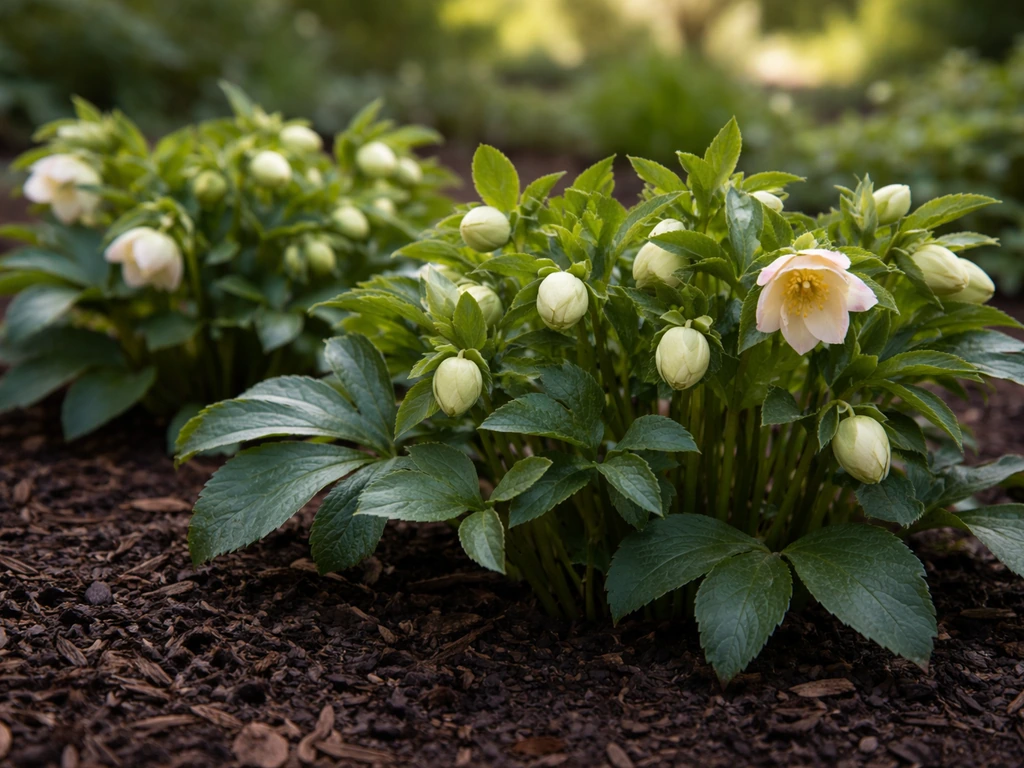
Late winter and spring: flowering time
This is when hellebores are at their best. Flowers emerge from late winter, often pushing through snow or frost, and continue into mid-spring. During this period, keep the soil consistently moist and apply your early spring fertilizer or compost top-dress. You'll notice that new foliage follows the flowers by a couple of months. Once flowering is done, remove spent flower stems if you don't want seeds to form (hellebores self-seed readily, which is lovely or chaotic depending on your preference). Leaving seed heads on does divert energy, so if you want to maximize next year's flowering, deadhead as the flowers fade.
Summer: low maintenance mode
Hellebores are essentially resting in summer. Keep them watered during extended dry spells, but they're reasonably tolerant once established. The evergreen foliage holds through summer and provides ground cover under trees. This is the time to do any soil amending or mulch refreshing around the plants. Avoid planting or dividing in summer heat.
Autumn: planting and prep
Autumn is when hellebores start to wake up a little. This is the best time to plant new specimens, divide overcrowded clumps (do this carefully in late autumn to early winter), or move plants to a better location. Apply a fresh layer of mulch before winter sets in. If you're in a zone where winters are very wet, this is the time to address drainage issues before waterlogging becomes a problem.
Winter: prep for flowering
In late winter, tidy up old and damaged foliage to give the emerging flower buds a clear path and improve air circulation around the plant. Removing old leaves also reduces the chance of fungal disease spreading from old material to new growth. For H. niger especially, make sure drainage is excellent through this period. Flower buds start forming and you'll start to see the season's blooms emerge even in cold weather.
Why your hellebores aren't blooming (and other problems to fix)
No flowers or very few flowers
This is the most common complaint, and usually the cause is one of three things. First, the plant is simply too young. Hellebores can take two to three years to settle in and bloom well, especially if they were planted in autumn. Give them time before worrying. Second, the crown is planted too deep. A buried crown won't flower reliably and will eventually rot. If you suspect this, carefully lift the plant and replant it at the correct depth with the crown at soil level. Third, too much shade. Deep shade reduces flowering significantly. Try moving the plant to a spot with more filtered light, especially in winter and spring.
Crown rot and root rot
If a plant is wilting, collapsing, or has soft, blackened tissue at the base, crown rot is likely the culprit. The causes are almost always waterlogged soil, a crown that's planted too deep, or mulch packed too tightly against the stem. There's no easy cure for advanced crown rot. Remove the plant, improve drainage in the area, and replant healthy divisions or new plants at the correct depth. Prevention is everything here: good drainage, correct crown depth, and that gap between mulch and stem.
Leaf spot and fungal disease
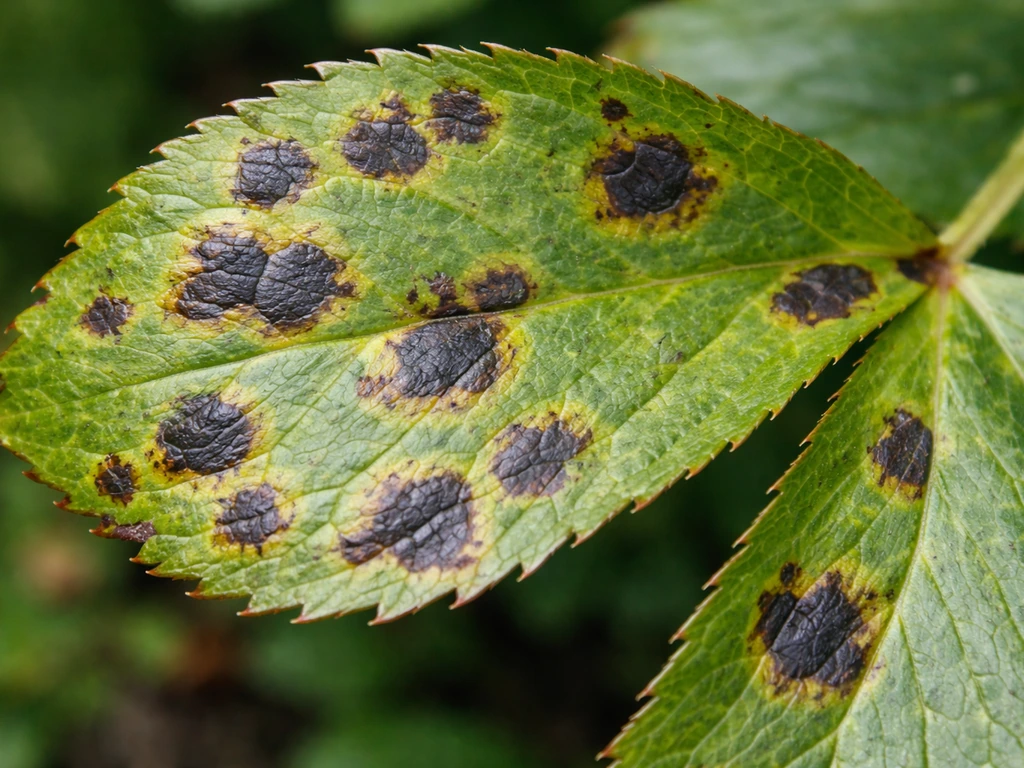
Dark, irregular spots on the leaves are typically hellebore leaf spot, caused by the fungus Coniothyrium hellebori. It spreads through the growing season from spring through autumn and loves the kind of damp, crowded conditions that poor air circulation creates. The fix is to remove and dispose of (don't compost) all affected leaves, improve spacing between plants if they're crowded, and apply a copper-based fungicide if the infection is severe. Removing old foliage in late winter is also a key preventive step.
Hellebore black death
This one is serious. Helleborus net necrosis virus, commonly called black death, causes black streaking on leaves and flowers, stunted growth, and distorted new growth. There is no cure. If you see these symptoms, dig up and destroy the entire plant (don't compost it) and do not replant hellebores in the same spot for a season. It's rare, but it does appear, and acting fast prevents it spreading to nearby plants.
Aphids and other pests
Aphids occasionally attack hellebores, clustering on new growth and flower stems and leaving behind sticky honeydew that encourages sooty mold. A strong jet of water dislodges most of them. For persistent infestations, an insecticidal soap spray works well. Hellebores are generally not heavily pestered compared to many other flowering perennials, so this is usually a minor issue rather than a crisis.
Transplant shock and yellowing leaves
Newly planted or recently moved hellebores often drop or yellow some leaves as they adjust. This is normal and not a disaster. Plant on a cloudy day or in late afternoon to reduce stress, water in well, and mulch the area. If a plant is really struggling after moving, cutting back some of the older leaves reduces the demand on stressed roots and often helps the plant stabilize faster. Yellowing on established plants that haven't been disturbed is more often a sign of waterlogging, nutrient deficiency, or disease, so check those conditions first.
Your practical next steps
If you're starting from scratch, the most impactful things you can do right now are: choose an autumn or spring planting date, prepare a well-drained, compost-rich bed in dappled shade, and source a named variety of Helleborus x hybridus from a reputable nursery (named varieties give you predictable flower color and form, unlike seedlings). Get the crown depth right at planting, mulch carefully, water through the first year, and then step back and let the plant establish at its own pace. If you want a detailed checklist beyond crown depth, drainage, and mulching, see how to grow hortensia for a similar step-by-step approach to establishing flowering plants. Rushing hellebores with excess fertilizer or unnecessary disturbance is exactly how you slow them down.
If you already have hellebores that aren't performing, work through the troubleshooting checklist: crown depth, drainage, light levels, and disease. If you want a smoother start, follow a simple hoya plan for light, watering, and repotting so your plants grow steadily hoyas. Most problems trace back to one of those four things. Hellebores that are happy in the right conditions are genuinely long-lived, reliable, and beautiful, well worth the couple of years it takes to get them properly established.
If you're building out a shade border around your hellebores, they pair beautifully with other shade-tolerant perennials. Heuchera makes an excellent companion with complementary foliage, and if you're thinking about what else to plant nearby, exploring options specifically suited to grow with hellebores is worth doing early so you can plan the bed as a whole. If you want more ideas for plants that thrive in the same cool, dappled shade, see what to grow with hellebores. If you also want a different flowering plant for similar conditions, you can apply the same kind of careful placement and soil prep by learning how to grow kniphofia. If you also want to add Heuchera to the mix, this guide on how to grow heuchera will help you match the right light and soil. If you're also interested in daylilies, review this guide on how to grow hemerocallis for tips on planting and care.
FAQ
How long does it take for hellebores to flower after planting?
Most hellebores need 2 to 3 years to settle in for consistent blooms. If you planted a nursery plant in spring, expect a lighter first season, then fuller flowering in year two.
Can you grow hellebores in full sun?
Usually no. In cool climates, a little morning sun can be fine, but avoid hot afternoon sun (especially in zones 7 to 9). Too much direct sun can scorch leaves and reduces bud production.
What’s the correct crown depth, and how can I tell if I planted it too deep?
The crown should sit at soil level, not buried. A too-deep crown often leads to weak growth, few flowers, and eventual rot, especially if soil stays wet in winter. Replanting is the right fix if you catch it early.
Why are my hellebores not blooming even though they look healthy?
The most common causes are crown depth, insufficient light (deep shade), or the plant being too young. Also check that drainage is good, because chronic winter damp can weaken flowering even before you see obvious disease.
How should you water hellebores in winter and during flowering?
Water to keep soil evenly moist, but never waterlogged. In late winter and spring, consistent moisture helps flower quality, so supplement during dry spells, but stop once natural rainfall resumes and the soil holds moisture well.
Is mulch safe for hellebores, or can it cause problems?
Mulch helps a lot, but keep it 1 to 2 inches away from the crown. Packed mulch against the stem increases the risk of crown rot in wet weather, so leave that breathing gap even if you refresh mulch in autumn.
Should you fertilize hellebores, and what type is safest?
They generally do best with light feeding. Use a balanced slow-release fertilizer in early spring when new growth appears, or rely on compost top-dressing. Avoid high-nitrogen feeding, which tends to boost leaves at the expense of blooms.
Can you divide hellebores, and when is the best time?
You can divide overcrowded clumps in late autumn to early winter, but do it carefully because roots are brittle and dislike disturbance. Expect a slower recovery and possibly reduced flowering for a year afterward.
What should you do with hellebore seed pods, should you deadhead?
Removing spent flowers prevents self-seeding if you want a tidy bed and may redirect energy toward next year’s blooms. If you want more plants, leave a few pods to mature, but know that seedlings often vary in flower color.
What’s the best way to handle hellebores with wet, heavy soil?
If water pools after rain, improve drainage before planting by adding compost or leaf mold and, if needed, grit. For persistently heavy or winter-wet sites, raised beds or higher ground level give the most reliable protection against rot.
Can hellebores be grown in containers year-round?
Yes, as long as drainage is excellent and the pot is deep (at least 12 inches). In very wet winters, moving the container under cover reduces crown rot risk. Use a loam-based mix with grit or perlite, and avoid peat-heavy mixes.
My hellebores have black spots on leaves, what should I do?
If you see leaf spot, remove and dispose of affected leaves (do not compost). Improve airflow by spacing plants, and if it’s severe, use a copper-based fungicide. Late-winter tidy-up also reduces infected debris carrying over to new growth.
What if I suspect crown rot, can I save the plant?
If rot is advanced (soft blackened base tissue), there’s usually no cure. Remove the plant, correct drainage, and replant only healthy divisions or new plants at the correct crown depth, and avoid replanting in the same spot for a while.
Do aphids or other pests require aggressive treatment?
Usually not. A strong jet of water knocks down most aphids. If they persist, insecticidal soap is typically enough. Because hellebores are not heavily pest-prone, focus first on plant vigor, spacing, and airflow.
Are hellebores safe around pets and kids?
Hellebores are considered toxic if ingested. If you have curious pets or small children, plant them where leaves and seed pods are harder to access, and wear gloves when handling, especially when cutting stems or dividing plants.