Yes, you can root hibiscus cuttings in water, and plenty of gardeners do it successfully at home with nothing more than a jar and a windowsill. Tropical hibiscus (Hibiscus rosa-sinensis) responds especially well to water propagation. The process works, but there's a real trade-off you should know about upfront: roots grown in water tend to be thinner and more fragile than roots developed in potting medium, which makes transplanting a bit trickier. Go in with that expectation, handle the roots carefully when it's time to pot up, and you'll be fine.
How to Grow Hibiscus in Water from Cuttings

Marcus Holloway
14 May 2026
Is it actually possible to root hibiscus in water?
It is, and it's not a fluke. Research on Hibiscus rosa-sinensis stem cuttings shows rooting percentages that can reach close to 87% under good conditions, though those numbers come from controlled propagation setups with auxin treatments. In a home setup with plain water and decent light, you won't hit that ceiling every time, but you can still get reliable results with the right cutting and a clean setup.
Hardy hibiscus varieties can also be rooted in water, though tropical types are generally more cooperative. The main limitation isn't whether roots will form, it's that water roots are structurally different from soil roots, adapted to a low-oxygen, wet environment. When you move a water-rooted cutting into soil, the plant has to essentially rebuild its root architecture, which causes a brief adjustment period. That's normal, not a sign something went wrong.
Picking the right cutting and the right time
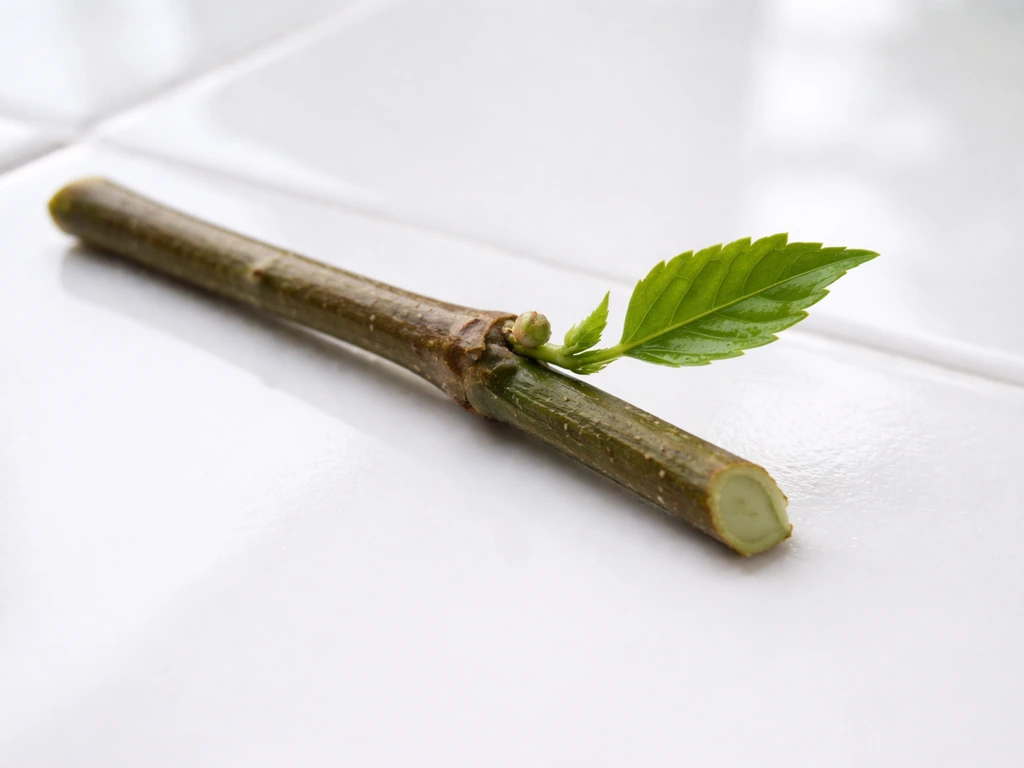
The cutting itself is where most people go wrong before they've even filled a jar. You want a softwood or semi-hardwood stem tip cutting, roughly 4 to 6 inches long, taken from healthy, actively growing growth. Look for a stem that isn't bone-hard and woody but also isn't floppy and brand new, something in between, with a little firmness when you bend it. A stem that snaps cleanly is too mature. One that bends without any resistance is too young.
Cut just below a leaf node (the bump where a leaf attaches to the stem), using clean, sharp scissors or pruning snips. A clean cut matters, a ragged or crushed stem end invites rot before roots can even start. You want 2 to 3 nodes on the cutting total, with at least one node that will sit below the waterline. Strip off all leaves from the lower half of the cutting, leaving just 2 to 4 leaves at the top. Too much leaf surface means the cutting loses water faster than it can absorb it, stressing the stem before roots develop.
Timing matters more than most guides admit. Late spring through early summer is the sweet spot, that's when stems are actively growing and rooting hormones are naturally elevated. In May or June, you can expect roots to show up in 2 to 4 weeks. Cuttings taken in late summer or fall are slower to root, and cuttings taken from a plant that's stressed, dry, or pest-ridden rarely work. Always take cuttings from a plant that looks vigorous and well-watered.
Setting up your water propagation container
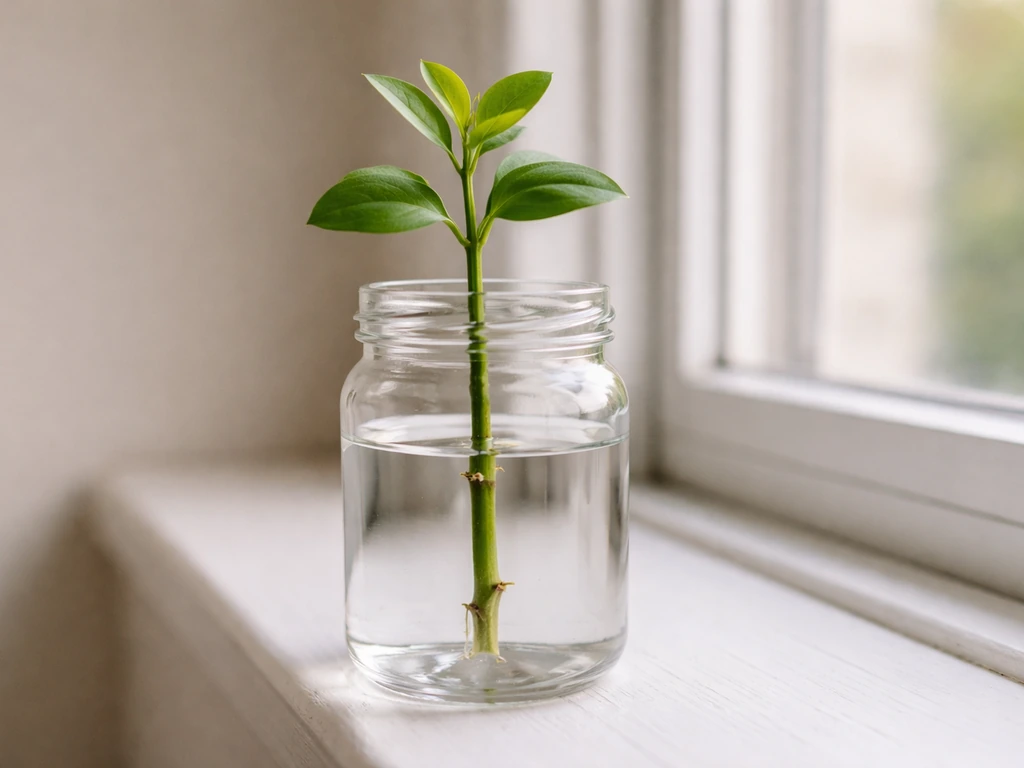
Container choice affects more than you'd think. Use something narrow enough that the cutting can stand upright without flopping over, but not so tight that it squeezes the stem. A clean glass jar, a recycled bottle with the top cut down, or even a small vase all work well. The key detail: use an opaque or dark-colored container, or wrap a clear one with foil or dark paper. Light hitting the water promotes algae growth, and algae competes with your cutting and clouds the water with bacteria. It's a small thing that makes a real difference.
Fill the container with room-temperature water, filtered or rainwater is ideal, but plain tap water that has been left out for 24 hours to off-gas chlorine works fine too. The water level should submerge at least one node but should not reach the lower stripped leaf stubs. Submerging leaf material is a fast path to rot. About 2 to 3 inches of water in the jar is usually right for a 4 to 6-inch cutting.
Placement is critical. Put your cutting somewhere it gets bright, indirect light for most of the day. A windowsill with morning sun or a spot a few feet back from a south-facing window works well. Direct, harsh afternoon sun will stress the cutting before it has roots to support itself. Warm temperatures (65 to 80 degrees Fahrenheit) encourage rooting. If your space runs cool, a heat mat under the jar helps.
How to place the cutting and care for it early on
- Take your cutting in the morning when the stem is fully hydrated, not in the heat of the day.
- Make your cut just below a node at a 45-degree angle using clean, sharp snips or a knife.
- Remove all leaves from the bottom half, leaving 2 to 4 healthy leaves at the top.
- Optional but helpful: dip the cut end briefly in powdered rooting hormone (IBA-based) before placing it in water. This isn't required, but it does speed things up.
- Place the cutting immediately into your prepared container of water so the cut end doesn't dry out.
- Position the container in bright, indirect light at room temperature.
- Check the water level daily for the first week — cuttings absorb water quickly before roots form, and you don't want the cut end exposed to air.
- Change the water completely every 3 to 5 days. This is the single most important maintenance step. Fresh water keeps oxygen levels up and prevents the bacterial buildup that causes rot.
Don't move the jar around or disturb the cutting constantly to check on it. Stability helps. Once roots start forming, even minor disturbance can snap them off, those early water roots are genuinely delicate.
How to tell rooting is happening
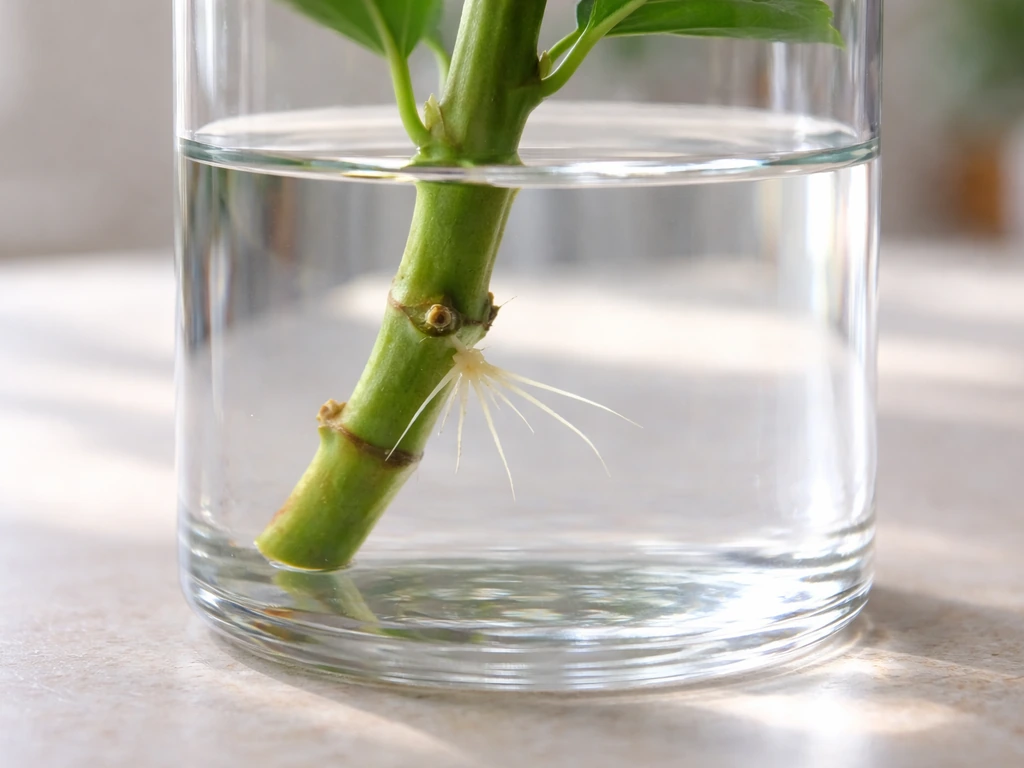
Within the first week or two, you may notice small white or pale bumps forming at the nodes along the submerged part of the stem. Those are root primordia, the precursors to actual roots. By weeks 2 to 4 under good conditions, you should see thin white root strands extending from the cut end or from the nodes. Water roots are typically whiter and more thread-like than soil roots, which can look almost translucent at first. That's normal.
A cutting that has rooted successfully also tends to put out a little new leaf growth at the top. That's a reliable signal that the cutting has established enough of a root system to start supporting above-ground growth again. If you see new leaves unfurling but no visible roots yet, give it more time, the roots may be shorter than they look through the glass. Wait until you have roots that are at least 1 to 2 inches long before considering transplanting.
When things go wrong: troubleshooting the common failures
The stem is rotting
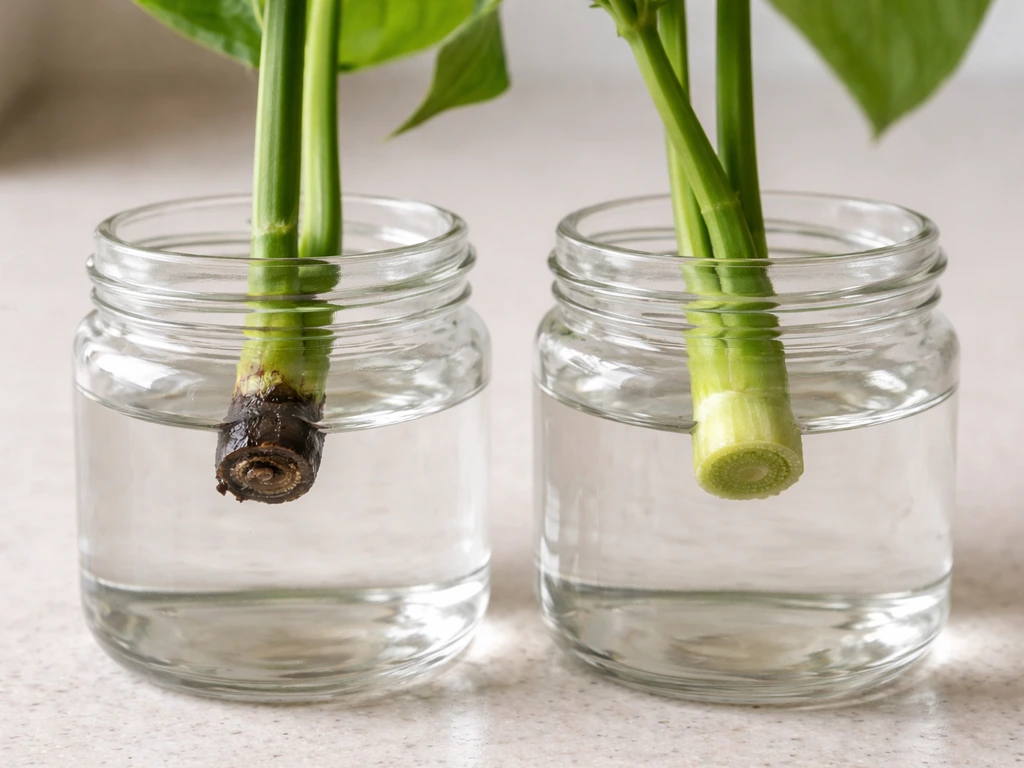
Rot at the cut end is the most common failure, and it almost always comes down to two things: water that wasn't changed often enough, or leaves left on the submerged part of the stem. Bacteria build up fast in warm, stagnant water. If you see black, brown, or mushy tissue forming at the stem end, take the cutting out, trim back to healthy green tissue with clean snips, rinse the container thoroughly, refill with fresh water, and start over. If the rot has moved more than an inch up the stem, the cutting is usually unsavable.
No roots after three or four weeks
If the cutting looks fine but nothing is happening, consider a few things. First, is the cutting actually soft/semi-hardwood? Fully woody stems root poorly in water. Second, is the temperature warm enough? Rooting stalls below 60 degrees Fahrenheit. Third, is there enough light? A dark corner won't cut it. Try moving the cutting to a warmer, brighter spot and wait another week or two before giving up. Adding a drop of liquid willow extract (a natural rooting stimulant) to the water can sometimes nudge a stuck cutting along.
Algae or cloudy water
Green algae in the water is mostly harmless but signals too much light hitting the container. Cloudy or milky water is more concerning, that's bacterial growth, and it will harm the cutting. Both problems are solved the same way: change the water immediately, scrub the container, block light from reaching the water, and increase your water-change frequency to every 2 to 3 days. A small piece of activated charcoal placed in the water can also help keep it clearer between changes.
Leaves are dropping
Some leaf drop in the first week is normal. The cutting is stressed, it hasn't rooted yet, and it's conserving energy. If you lose one or two of the lower leaves, don't panic. If the cutting drops all its leaves and the stem starts looking shriveled, that's a sign of too much light or heat drying out the foliage faster than the stem can absorb water. Move it to a slightly shadier spot and make sure the water level is adequate. A few remaining leaves are fine, a completely stripped stem rarely makes it.
What to do once roots have formed
Once your roots are 1 to 2 inches long and you have a decent cluster of them, you have a decision to make: pot it up into soil, or keep it going in water longer. If you want to expand beyond water rooting cuttings, learning how to grow hibiscus from leaves can give you another way to start new plants. Technically, hibiscus can continue growing in water as a quasi-hydroponic plant, but it needs nutrient supplementation to do so (plain water provides no nutrients), and the long-term results in a home setup are rarely as good as soil. For most home gardeners, transitioning to soil is the better path to a blooming, robust plant.
Transitioning your rooted cutting to soil

Do this gently and with low expectations for the first two weeks, that's not pessimism, it's just the reality of water-to-soil transitions. Water roots and soil roots are structurally different, and the plant will go through an adjustment period where it may look wilted or pause growth. That's normal. Here's how to make it go smoothly:
- Choose a pot that's only slightly larger than the root ball — about 4 inches for most rooted cuttings. Too much soil volume around small roots holds excess moisture and causes rot.
- Use a well-draining potting mix. A standard potting mix blended with about 20 to 30 percent perlite works well for hibiscus, keeping moisture consistent without waterlogging.
- Make a hole in the center of the soil, lower the cutting in carefully, and firm the soil gently around the roots. Don't pack it.
- Water thoroughly right after planting, then let the top inch of soil dry out before watering again.
- Keep the newly potted cutting in bright, indirect light for the first 1 to 2 weeks — no direct sun until you see new leaf growth, which signals the roots have adjusted.
- Do not fertilize for at least 3 to 4 weeks after transplanting. The roots are too fragile to handle fertilizer salts, and the plant needs to establish itself first.
If you want to skip the dramatic soil transition, you can gradually mix a diluted hydroponic nutrient solution into the water once roots reach 2 inches and keep the plant in water longer. This can work, but it requires more active management: monitoring nutrient levels, pH (aim for 5.5 to 6.5), and water quality. For most people, that's more effort than just potting up. Once you're growing hibiscus in soil, regular care practices apply, good light, consistent watering, and feeding with a balanced or slightly phosphorus-forward fertilizer once the plant is established and pushing new growth.
A quick comparison: water propagation vs. other methods
| Method | Ease for beginners | Root quality | Time to roots | Transplant difficulty |
|---|---|---|---|---|
| Water propagation | Very easy to start | Thin, fragile water roots | 2 to 4 weeks | Moderate — roots need to adapt to soil |
| Potting mix/perlite | Moderate | Strong, soil-adapted roots | 3 to 5 weeks | Low — roots already adapted |
| Rooting hormone + perlite mix | Moderate | Strong roots, faster development | 2 to 3 weeks | Low — easiest transplant |
| Layering (soil-based) | Requires parent plant access | Excellent — never severed | 4 to 8 weeks | Very low |
Water propagation wins on simplicity and visibility, you can watch the roots form, which is satisfying and helpful for learning. Once your hibiscus takes off, consistent light and proper feeding are what ultimately help you grow more hibiscus flowers. If you're a first-timer or you just want to try propagating hibiscus without buying extra supplies, start with water. If you've already done it once and want better transplant success rates, a perlite-heavy potting mix is worth the small upgrade. Both approaches can get you a blooming hibiscus, water propagation just requires a bit more care at the transplant stage.
Once you've got the propagation process down, you'll naturally want to dial in the rest of hibiscus care, how to push for more flowers, how to grow hardy types outdoors, and the differences in soil and feeding for established plants. Water propagation is a great entry point, but it's just the beginning of what hibiscus can do with the right attention. If you’re growing red hibiscus for flowers, you’ll want to adjust light, soil, and feeding to match that variety. If you want more hibiscus blooms, focus on consistent bright light and regular feeding once your new plant is established.
FAQ
Can I grow hibiscus in water permanently instead of potting it into soil?
You can keep it going longer as a quasi-hydroponic setup, but plain water will stall growth without nutrients. If you continue in water, you need added fertilizer and you must manage water quality and pH (roughly 5.5 to 6.5), plus expect slower, less robust long-term results than soil.
Should I use rooting hormone when I’m growing hibiscus in water?
It isn’t required, but a rooting stimulant can help if cuttings seem slow or inconsistent. Apply it to the cut end or use a small amount in the water only as directed, and remember that temperature and leaf removal usually matter more than hormone use.
How often should I change the water to prevent rot or cloudy water?
Change it proactively every 2 to 3 days, especially in warm conditions or with a lot of light. If you see cloudiness, milky water, or any black, brown, or mushy tissue at the cut end, replace the water immediately and scrub the container.
Why do my hibiscus cuttings root but then stop making new leaves?
That usually means the roots are still too short to support top growth or the plant is going through stress from light and temperature. Wait until roots are at least 1 to 2 inches long, keep bright indirect light, and avoid moving the jar frequently during the first weeks.
Is it better to use filtered water, rainwater, or regular tap water left out?
Filtered or rainwater is fine, but regular tap water that has sat out about 24 hours is also workable because it lets chlorine dissipate. The bigger driver of success is keeping water clean through regular changes, not which source you start with.
How do I know if the white bumps I see are roots or something else?
In water propagation, pale white bumps at submerged nodes are typically root primordia. True roots will extend as thin strands over time, while rot shows up as darkening or mushy tissue spreading from the cut end.
Can I put more than one hibiscus cutting in the same jar?
You can, but it increases the chance of bacterial buildup and tangling fragile roots. If you do, keep at least a small spacing between cuttings, use a wider container, and be extra consistent with water changes and gentle handling at transplant time.
What’s the ideal temperature range for rooting hibiscus in water?
Aim for about 65 to 80°F. Rooting commonly stalls below 60°F, so if your windowsill runs cool, a small heat mat under the container can make a noticeable difference.
Should the leaves be fully removed from the submerged part of the stem?
Yes. Leaves or leaf stubs under the waterline usually rot quickly and can ruin the cutting. Keep only a few leaves at the top (around 2 to 4), and remove all foliage that would sit below the water level.
When is the best time to transplant water-rooted hibiscus into potting mix?
Transplant once roots reach about 1 to 2 inches long and you have a visible cluster. Waiting longer improves survival because water roots are delicate, and the plant needs time to rebuild roots for soil.
What’s the safest way to pot up a hibiscus cutting without damaging water roots?
Be gentle and avoid pulling on strands. Fill the pot first, then lift the cutting by the stem and support the root mass, planting at the same depth as the submerged nodes were. Keep it in bright, indirect light for a short adjustment period.
If my cutting starts turning black at the stem end, can I save it?
Sometimes. Remove it right away, trim back to healthy green tissue with clean snips, discard any water, scrub the container, and refill with fresh water. If rot has moved far up the stem (more than about an inch), it often cannot recover.
Does moving or checking the cutting constantly affect rooting?
Yes. Frequent disturbance can snap early roots, which slows progress. Once you set the jar, only inspect when necessary and then put it back in the same position promptly.