You can grow hostas from bare roots successfully by planting them in spring once soil temperatures have warmed to at least 50°F, soaking the roots for a few hours beforehand, setting the crown just at or slightly below soil level, and keeping the soil consistently moist for the first three to four weeks while shoots emerge. It sounds simple because it mostly is, hostas are forgiving plants, but a few mistakes in the first week (planting too deep, letting roots dry out, planting in waterlogged soil) can set you back an entire growing season.
How to Grow Hostas From Roots: Step by Step Guide

Marcus Holloway
1 May 2026
Choosing bare-root hostas and getting the timing right
Bare-root hostas are exactly what they sound like: dormant crowns with roots attached, sold without any soil. You'll usually find them available from late winter through early spring, either online or at garden centers. This is actually the best state to receive a hosta in, dormancy means less stress during shipping and handling, and the plant puts its energy straight into rooting when you get it in the ground.
Timing is everything with bare roots. The key is soil temperature, not just air temperature. You want the ground to be at least 50°F before planting. In most temperate zones (USDA zones 3–9, where hostas thrive), that typically means mid-spring, anywhere from late March in warmer zones to late April or even early May in colder ones. Planting into cold, wet soil is one of the most common reasons bare-root hostas rot before they ever wake up. A cheap soil thermometer takes the guesswork out of it completely.
If your bare-root hostas arrive before your soil is ready, which happens often when ordering online, don't panic. You can store them temporarily in a cool, dark place (like a basement or garage) in barely damp peat or newspaper for up to two weeks. If it's going to be longer than that, pot them up in containers indoors with some basic potting mix and move them outside once conditions improve.
Picking the right spot: light, spacing, and drainage
Hostas are shade garden workhorses, but 'shade' doesn't mean 'anywhere dark.' The ideal spot gets dappled or filtered light for several hours a day, like under a high-canopy tree. Most varieties do best with morning sun and afternoon shade. Deep, all-day shade will result in slow, weak growth, the plant survives but it won't thrive. Full sun tends to scorch the leaves and stresses the plant unless you're in a cooler northern climate.
Drainage matters as much as light. Hostas sitting in waterlogged soil will rot, full stop. If your chosen spot holds puddles after rain for more than an hour, either build up a raised bed or pick a different location. Slight slopes or beds along a foundation with amended soil both work well. What you're aiming for is soil that stays evenly moist but never soggy.
For spacing, plan on 18 to 24 inches between plants for most medium-sized varieties. Giant hostas like Empress Wu can need 4 to 6 feet of space, while miniature types can be as close as 12 inches. It's tempting to plant closer together for an instant full look, but overcrowded hostas compete for moisture and airflow, which invites disease. Give them room, they fill in faster than you'd expect.
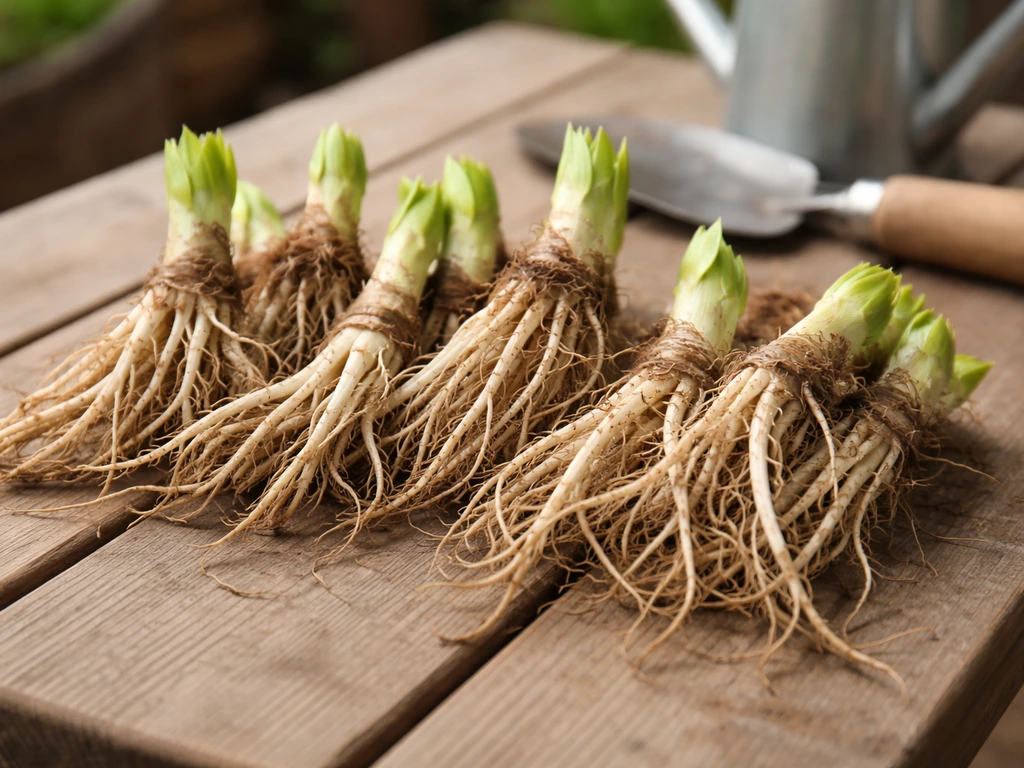
Handling bare roots before you plant: inspection, soaking, and storage
Before you do anything else, inspect what arrived. Unwrap the roots and look for firm, white or light tan roots and a clearly visible crown (the knobby top section where shoots will emerge). Some browning on the outer roots is normal, but mushy spots, a foul smell, or a completely dried-out, brittle root system are red flags. Cut away any dead, mushy, or clearly rotted roots with clean pruners. If the crown itself is mushy, return the plant or compost it, no amount of care rescues a rotted crown.
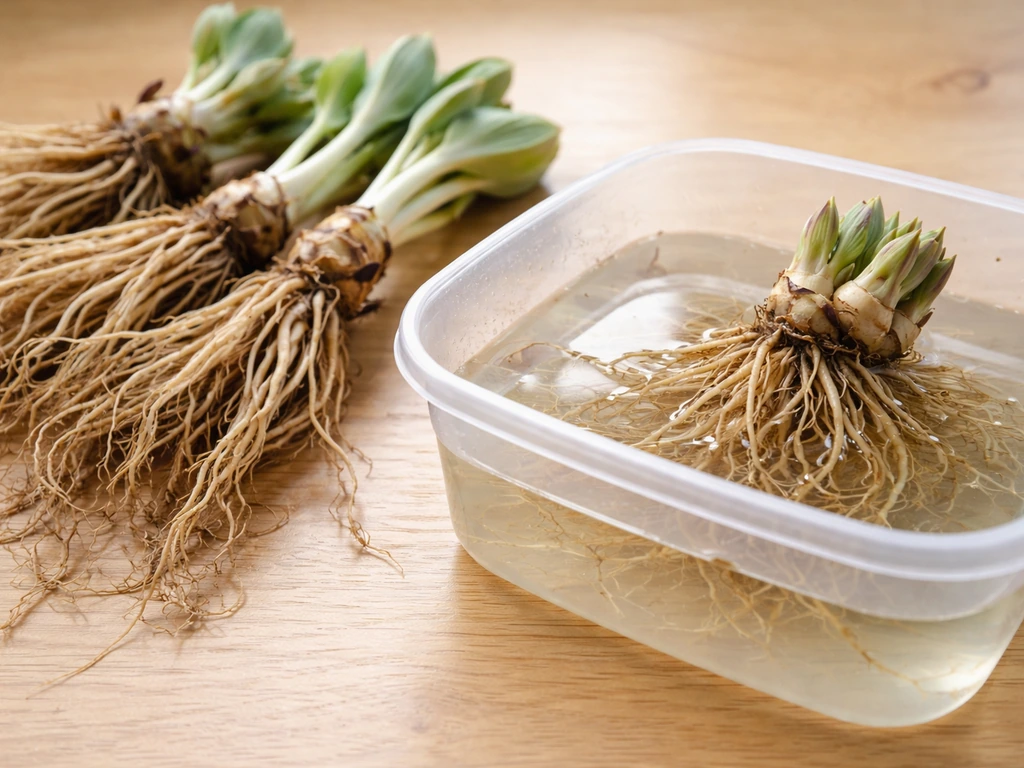
Soaking is a step a lot of beginners skip, and it makes a real difference. Before planting, submerge the bare roots in a bucket of room-temperature water for two to four hours. If the roots arrived late in the season or look particularly dry and shriveled, extend the soak to six hours. This rehydrates the root tissues and gives the plant a head start on uptake the moment it hits the soil. Don't soak overnight or longer, roots sitting in stagnant water too long can start to break down.
Once soaked, plant as soon as possible. If you absolutely have to wait a day or two, wrap the roots loosely in damp burlap or newspaper and keep them somewhere cool and shaded. Never let them sit in direct sun or in a warm spot, they'll dry out within hours.
Preparing the soil and planting the right way
Hostas aren't extremely fussy about soil, but they perform best in rich, well-draining loam with a slightly acidic pH between 6.0 and 6.5. Before planting, dig in two to three inches of compost and work it into the top 12 inches of soil. If your soil is heavy clay, add perlite or coarse sand as well. Skip the pure Miracle-Gro approach at this stage, what you need right now is good soil structure, not a fertilizer hit that can burn tender emerging roots.
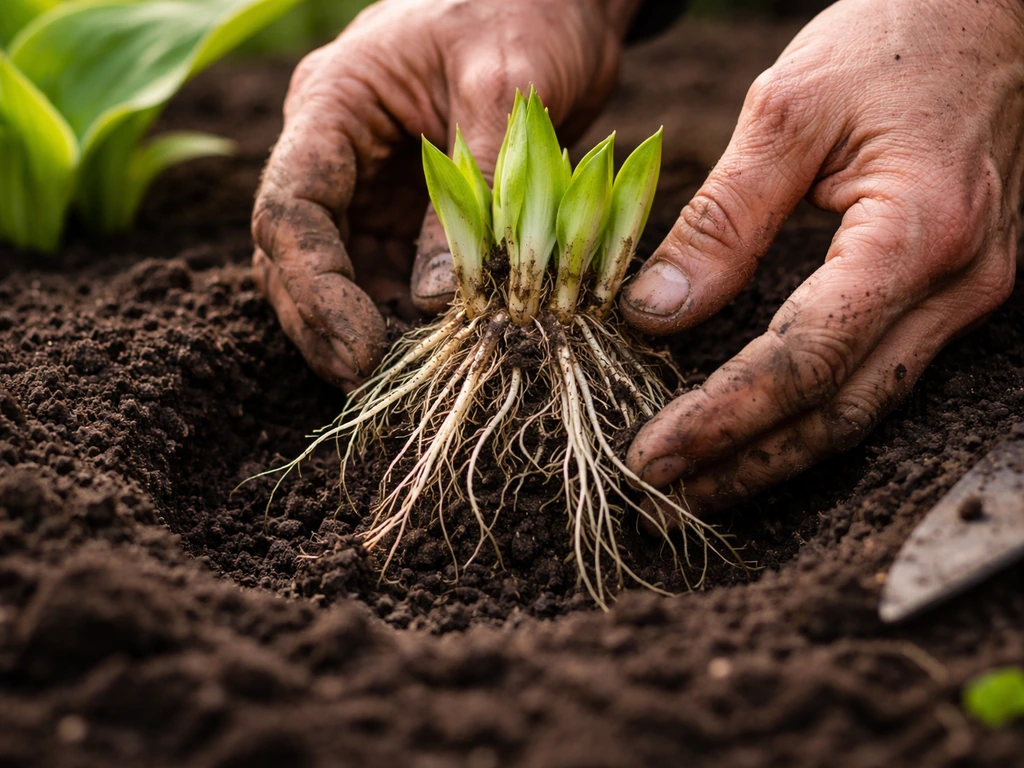
Dig your planting hole wide enough to spread the roots out without bending or cramming them, usually about twice the width of the root spread. Depth is where most beginners go wrong. The crown (the top of the root mass where the growth buds are) should sit right at soil level, or at most one inch below the surface. Planting the crown too deep is the number one cause of bare-root hosta failure. If you’re growing a white feather hosta, you can follow the same planting depth and crown placement, then focus on giving it the light and moisture it needs to develop its best color planting the right way. The buds need light and warmth to wake up. Burying the crown 2 to 3 inches down is like putting a lid on a pot and wondering why nothing's cooking.
- Dig a hole about 12 inches wide and 8 to 10 inches deep.
- Create a small mound of amended soil in the center of the hole to set the crown on.
- Drape the roots down over the mound so they spread outward naturally.
- Adjust the mound height so the crown sits at or just slightly below the surrounding soil line.
- Backfill gently, firming the soil as you go to eliminate air pockets.
- Water in thoroughly right after planting.
Watering and getting through the first few weeks
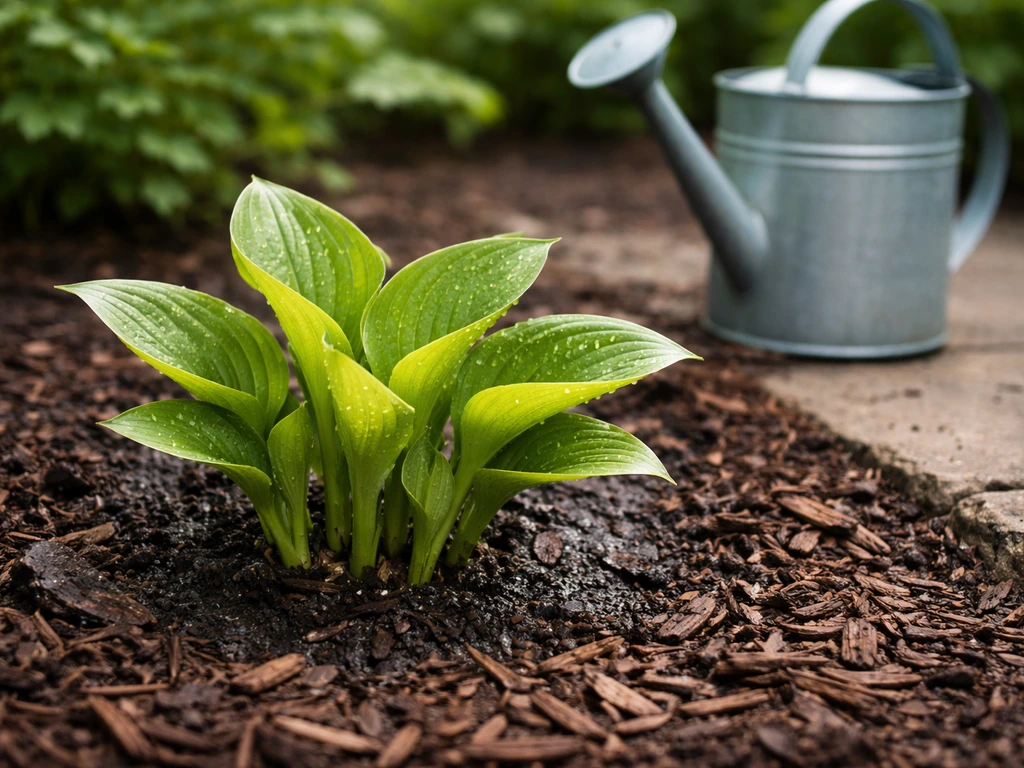
The first three to four weeks after planting are the most critical. The plant is building its root system before it has any leaves to photosynthesize, so it's running entirely on stored energy. Your job is to keep the soil consistently moist, not wet, not dry, during this whole window. Check soil moisture every day or two by pressing a finger two inches into the ground. If it feels dry at that depth, water. If it's still damp, wait.
A good baseline is to water deeply once or twice a week, depending on rainfall and temperature. In warm, dry spring weather you might need to water every other day. What you want to avoid is letting the soil dry out completely between waterings while the roots are still establishing. Once you see leaves emerging, usually within two to four weeks, the plant is actively growing and its needs shift toward regular, deep watering rather than constant moisture.
If you planted during an unexpected cold snap (spring weather being what it is), don't overwater cold soil in an attempt to help. Cold, wet soil is where rot starts. Cut back watering if temperatures dip below 45°F and let the soil dry out slightly between waterings until things warm back up.
Fertilizing and mulching once things are moving
Hold off on fertilizing until you see actual leaf growth, usually that two to four week mark after planting. Feeding bare, dormant roots before growth starts does nothing useful and risks burning tender new tissue. Once leaves are actively emerging, apply a slow-release balanced or slightly nitrogen-forward granular fertilizer (something like 10-10-10 or similar) worked lightly into the soil surface. This feeds the plant steadily through spring and into early summer.
For a growth boost, supplement with a high-nitrogen liquid fertilizer every couple of weeks during peak growing season (late spring into early summer). Dilute it to half-strength if you're applying directly to the leaves. Once midsummer hits, back off the nitrogen so the plant can start hardening off for fall rather than pushing soft new growth that won't survive the cold.
Mulch is one of the best things you can do for a newly planted hosta. Apply two to three inches of shredded bark, wood chips, or shredded leaves around the plant, keeping the mulch pulled back two inches from the crown. Mulch does several things at once: it moderates soil temperature (critical in late planting situations), retains moisture, suppresses weeds, and gradually breaks down to improve soil structure. It also protects the crown if a late frost sneaks in after you've planted. If cold weather is forecast, pile a bit of extra mulch temporarily over the crown, it acts like a blanket.
When things seem slow: troubleshooting common problems
Patience is genuinely the hardest part of growing hostas from bare roots. They can take three to five weeks to show any visible signs of life, and some divisions, especially large, established crowns, sulk for a while before waking up. Before you assume something is wrong, give it time. If it's been six weeks with zero growth and you're in the right temperature range, then start investigating.
| Problem | Likely Cause | What to Do |
|---|---|---|
| No shoots after 4–6 weeks | Crown planted too deep, or soil still too cold | Gently check planting depth; scrape back soil to confirm crown is close to surface; check soil temp |
| Crown is mushy or smells bad | Root rot from overwatering or poor drainage | Dig up, cut away rotted tissue, treat with dilute hydrogen peroxide, replant in better-draining spot |
| Leaves emerge then wilt or collapse | Transplant shock, inconsistent watering, or late frost damage | Shade the plant temporarily, water consistently, protect from frost with fleece or extra mulch |
| Leaves are pale yellow or bleached | Too much direct sun, especially afternoon sun | Move to a shadier spot or add shade cloth during the hottest part of the day |
| Slow, weak growth all season | Nutrient-poor soil, wrong soil pH, or heavy shade | Test soil pH (target 6.0–6.5), amend with compost, apply balanced fertilizer, assess light levels |
| Holes in leaves, slime trails | Slug and snail damage | Apply iron phosphate bait around plants; remove debris and mulch slightly to reduce hiding spots |
Transplant shock is real and very common with bare-root hostas. A plant that looked fine when it arrived but then produces limp, droopy, or papery first leaves is usually just shocked from the transition. Keep it watered, give it shade, and don't feed it aggressively, too much fertilizer on a stressed plant makes things worse, not better. Most hostas pull out of shock within a week or two once roots start anchoring.
Seasonal aftercare and what to do as the season progresses
Once your hosta is established and actively leafing out, it's largely low-maintenance for the rest of the season. Keep up with watering during dry spells, deep and infrequent is better than shallow and frequent. One inch of water per week is a good rule of thumb, whether from rain or your hose. Hostas with large, broad leaves lose more moisture through transpiration and may need more during heat waves.
By midsummer, your plant should be fully leafed out and settled in. This is a great time to assess how it's doing, note the size, vigor, and color. If it's running smaller than expected for the variety, that's normal for the first year. Hostas are famously described as 'sleeping, creeping, leaping', first year they establish, second year they start spreading, third year they really take off. Don't judge a newly planted hosta by its first season.
In fall, once the first hard frost hits and the leaves die back, cut the foliage down to the ground and compost the healthy leaves (discard any showing disease). Leave the crown in place, hostas are cold hardy and most varieties handle zone 3 winters without protection. In very cold zones or for newly planted crowns that haven't had a full season to establish, apply a fresh four-inch layer of mulch over the crown after the ground freezes to insulate against freeze-thaw cycles that can heave roots out of the soil.
Next spring, pull back that mulch once daytime temps consistently stay above 40°F so the crown can warm up and new shoots can emerge freely. That's the moment your investment from this season really pays off, those tight little points pushing up through the soil are one of the most satisfying things in the spring garden. If you want to keep expanding your collection, you can divide established hostas every three to four years in early spring the same way you received yours: dig, divide, and replant as bare-root crowns.
Different varieties have slightly different needs and personalities. If you're growing a specific cultivar like Autumn Frost, White Feather, or a giant like Empress Wu, it's worth looking into variety-specific guidance on light tolerance and size expectations, the general principles here apply across the board, but the details matter when you're trying to get the most out of a particular plant. For best results, use local timing for planting and be ready to protect Autumn Frost if late spring or early fall frosts threaten new growth.
FAQ
What should I do if my hostas start sprouting while they are still being stored before planting?
Move them immediately into a pot with drainage holes (use potting mix) and keep them in the brightest cool location you have (ideally near a window) until outdoor soil warms. Keep the crown at or just below the pot surface, water lightly so it is not soggy, and transplant outdoors when conditions match your area’s soil temperature and frost risk.
How much water is “consistently moist” for bare-root hostas without causing rot?
Aim for soil that stays damp at about the 2-inch depth, not waterlogged. Water deeply so moisture reaches the root zone, then wait until the top inch starts to dry before watering again. If you see puddles, slow drainage, or a sour smell from the planting area, you likely have too much water or poor drainage.
Should I prune off any dead-looking roots or leaves when I receive bare-root hostas?
Yes for dead roots, but be careful with the crown. Trim clearly mushy or foul-smelling roots back to firm tissue with clean pruners. Do not cut or damage the crown, if the crown is firm it can still recover, even if some outer roots look rough.
Can I plant bare-root hostas in partial shade that gets afternoon sun?
Often yes, but watch the intensity. Morning sun with afternoon shade is usually safest for growth and leaf quality. If your site gets strong afternoon heat, add extra mulch (kept a couple inches away from the crown) and monitor moisture closely during dry spells to reduce scorch.
What is the correct planting depth if I am unsure where the crown sits?
Use the crown knob location as your guide, it should end up at soil level (or just slightly below, about 1 inch). If the crown ends up covered deeper than that, shoots may struggle to emerge. If you realize you planted too deep, it is sometimes better to carefully adjust the planting depth early rather than waiting the entire season.
Do bare-root hostas need fertilizer right after planting?
Hold off until you see real leaf growth. Early feeding before the plant awakens does not help much because there is not active uptake yet, and it can stress new tissue. Once leaves emerge, use a slow-release granular fertilizer and then consider liquid nitrogen only during active growing season.
My bare-root hosta is not growing after 4 to 6 weeks, what should I check first?
First confirm soil temperature is in the target range and drainage is good (no persistent soggy soil). Next inspect the crown after gently loosening the soil around it, look for firmness versus mush. Also check whether the crown was planted too deep, that is a common cause of no emergence even when watering has been correct.
What should I do if a late frost hits after I plant my bare-root hostas?
Protect the emerging buds and crowns with mulch added temporarily over the crown, or use a light frost cover during the coldest nights. Avoid piling so much material that the crown stays wet and unventilated. Remove or reduce protection once temperatures stabilize so shoots can continue emerging.
Why are my first leaves limp, papery, or droopy even though the crown seems okay?
That pattern usually points to transplant or shock stress. Keep the soil evenly moist, provide shade from harsh midday sun for a bit, and avoid aggressive fertilizing. Most hostas recover within 1 to 2 weeks once roots reestablish and water uptake improves.
Is it okay to plant bare-root hostas close together for a fuller look?
It is better to follow spacing guidance for airflow and competition. Overcrowding can keep foliage wet longer and reduces how fast the soil dries after rain. If you want an immediate fuller look, consider planting in clusters with proper spacing between clusters rather than placing plants so tightly they touch as they mature.
How late in the season can I plant bare-root hostas before winter becomes a problem?
You want enough time for at least some root establishment before hard freezes. If nights are already consistently near freezing, consider potting up temporarily and waiting for more favorable weather, or plant and plan on extra mulch after the ground freezes. The key goal is crown survival through freeze-thaw, not fast leaf growth.
Should I divide my hosta the same year I planted it from bare roots?
Usually no. Bare-root plants need at least one full season to establish an anchored root system. Divide only established hostas, commonly every 3 to 4 years, so you do not set the plant back during its first major establishment period.